Migration Portal User Guide
> for application owners
This guide provides step-by-step instructions application owners can follow to migrate applications using the IDaaS Migration Portal.
The Migration Portal is a self-service, AI-assisted tool to help application teams complete the IDaaS migration process. The portal will also provide real-time reporting dashboards for CISOs, CIOs, the global project team, application teams and delivery managers to track and monitor the project progress.
Please contact your PoD Lead if you face any issues accessing the portal. The PoDs will conduct regional awareness sessions for the portal.
The sections below include detailed instructions for each phase of the migration, guidance on how to proceed if the migration process fails, and steps for properly decommissioning applications. Additionally, it outlines the support model available to assist users throughout the migration journey.
Portal Features & Benefits
The Portal is designed to give application teams fewer manual steps and reduced submission of SNow forms. Application data is pre-filled and visually represented, making it easy to identify readiness, defects and gaps.
Feature Overview

Showcases the status of the applications you are listed as the owner of, the metadata, application readiness and further instructions to migrate your applications to EntralD.
Presents a comprehensive overview of all the applications in the migration. Helps you monitor progress and make informed decisions.

Provides instant assistance, offers interactive support and guidance and answers queries about the migration process.
Process Comparison
| Legacy Migration Process (SNow-Based) | Portal Migration Process (Portal-Based) |
|---|---|
| App inventory dashboard | Track migration status via centralised dashboards in the IDaaS Application Migration Portal. |
| App migration ServiceNow (SNow) form | Access the IDaaS Application Migration Portal to view app inventory and complete app migrations. |
Portal Walkthrough Demo
This walkthrough covers the Portal's primary features and common usage patterns to expect when migrating your application(s):
Issues accessing this video? use this direct link instead
Timeline
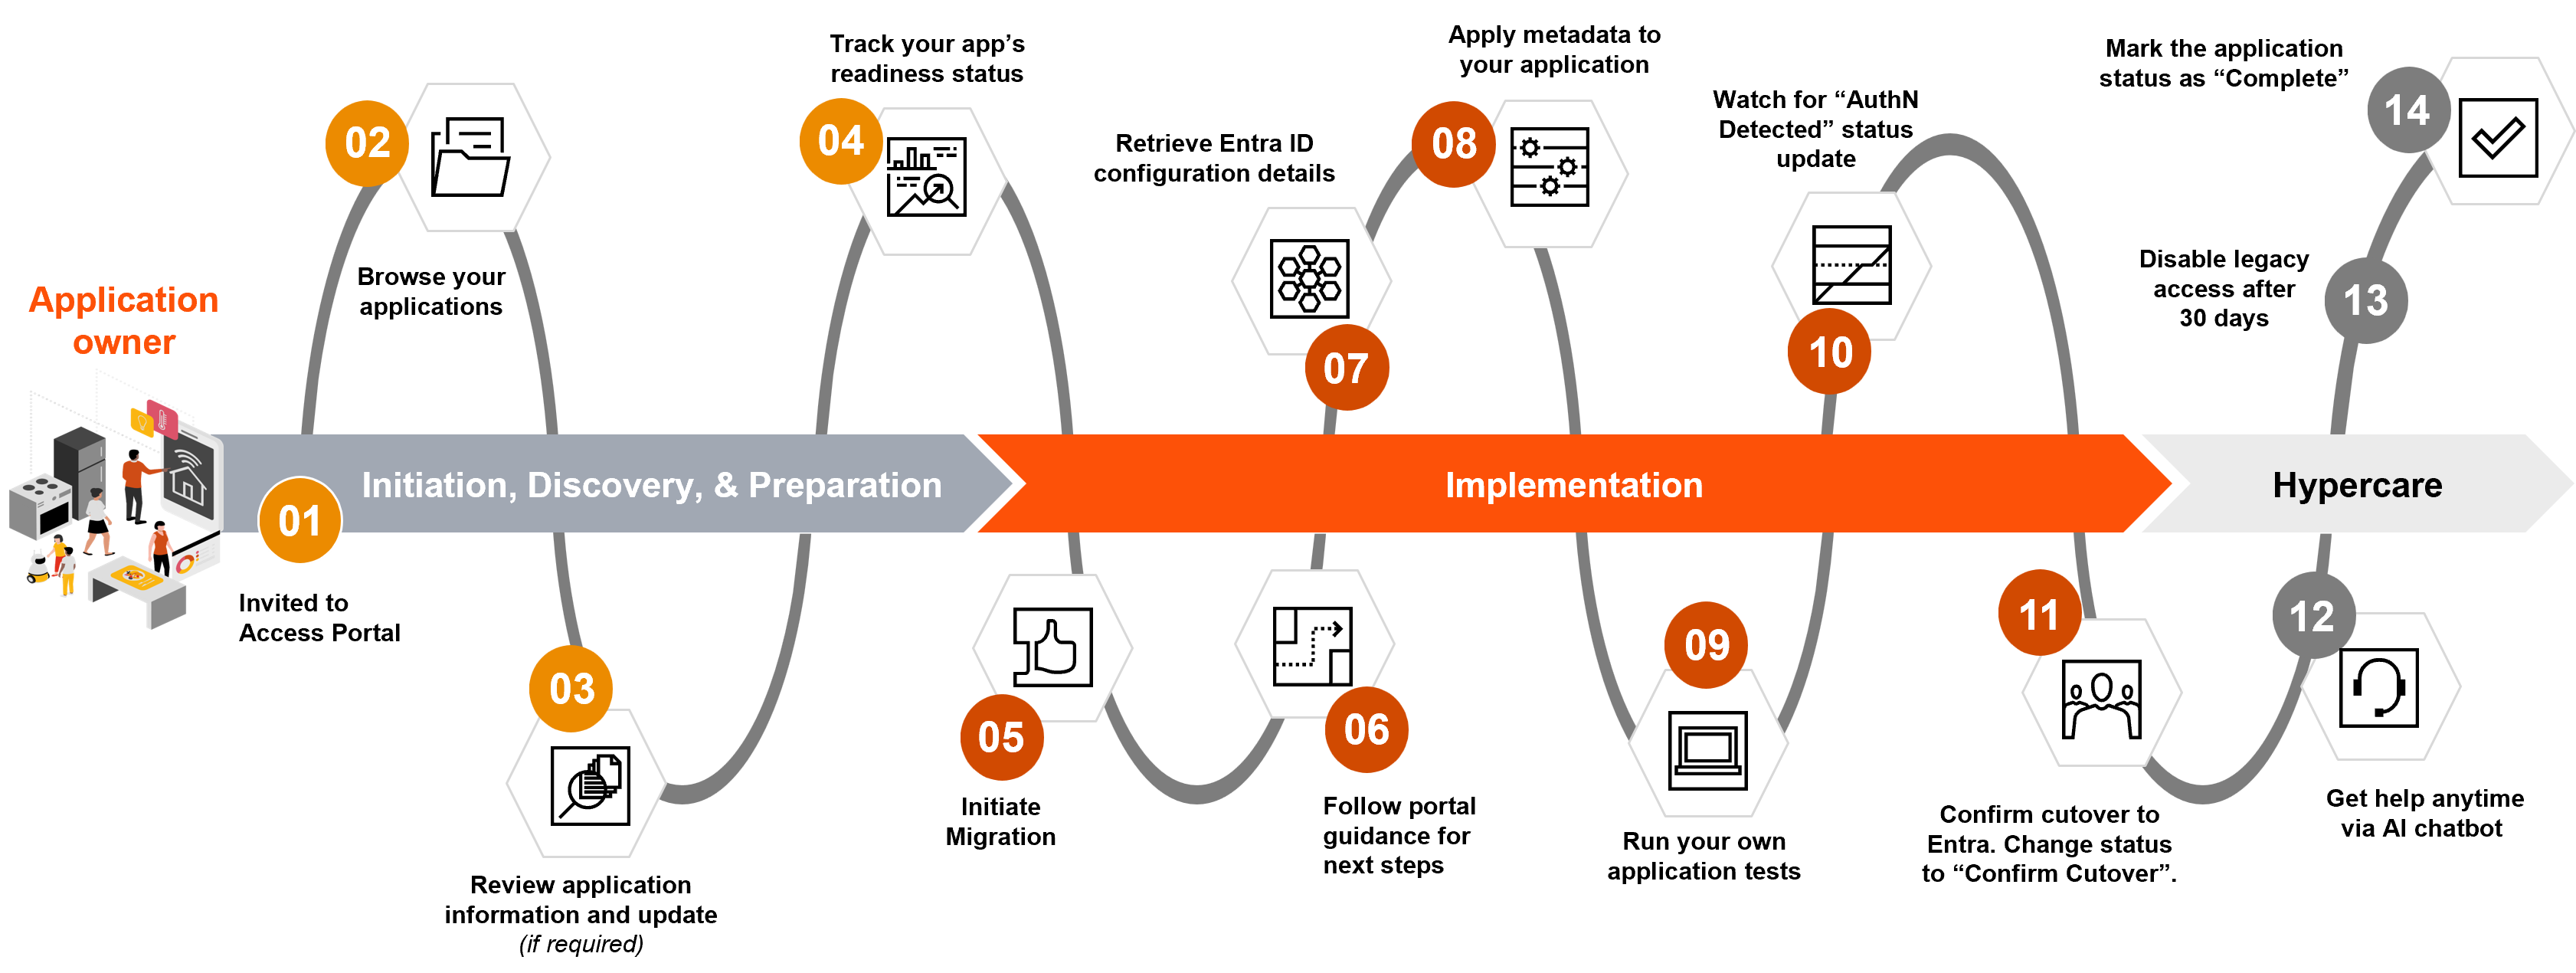
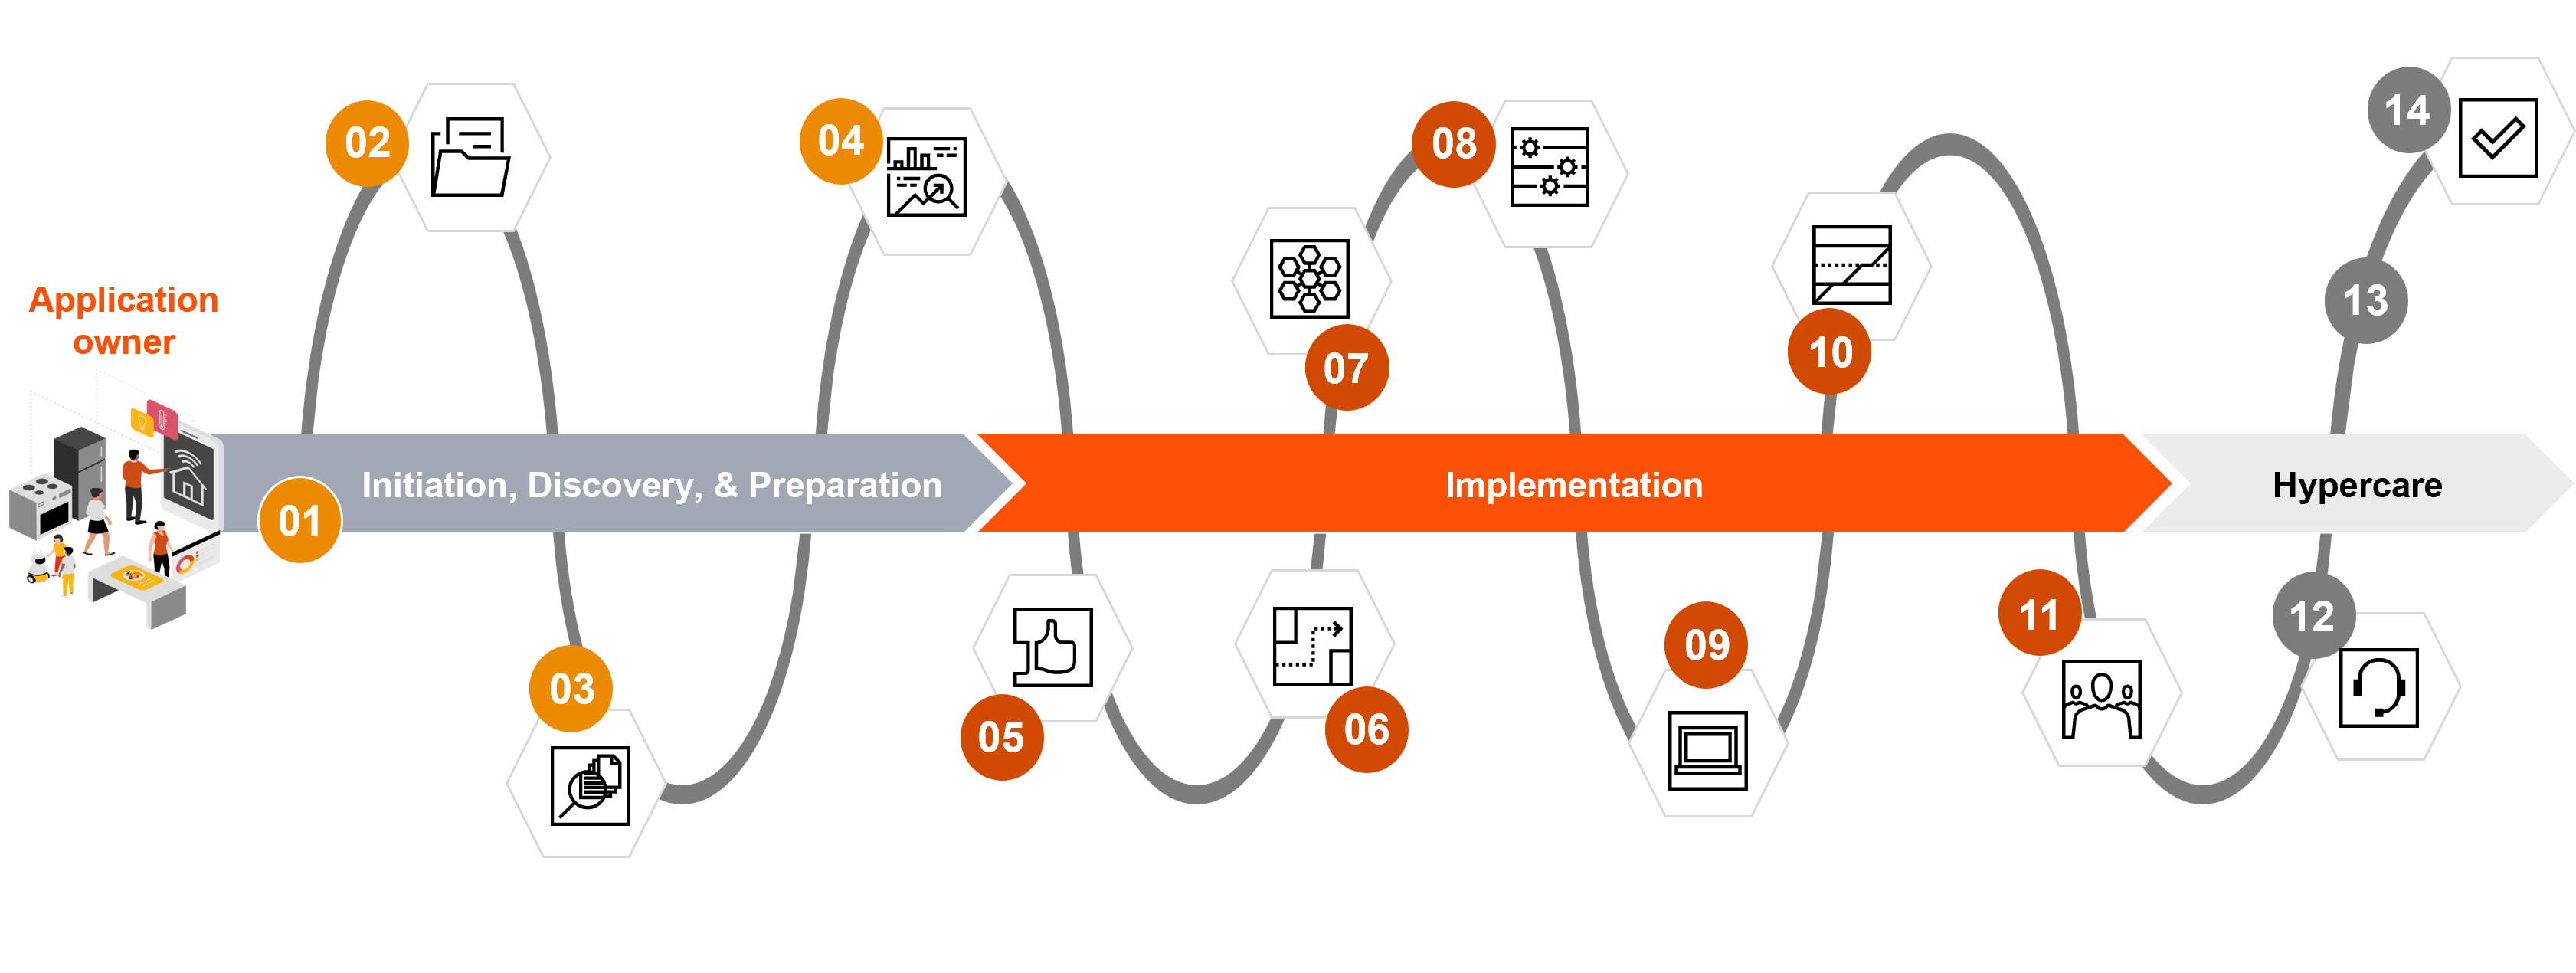
A high-level flow of activities involved in a Portal-based migration:
Dependency Planning
Determine the user type, segment and sub-segment your application falls into, followed by the up-front activities to plan and be ready for the migration to Entra ID.
Internal-Only Applications
@pwc.com email addressesSegment | Sub-segment | Up-front activities to plan for the application migration to Entra ID |
|---|---|---|
GUM | Using GUM API | If your application uses GUM APIs, please refer to this guidance for transitioning to Microsoft Entra ID APIs. |
GUM Groups and GUM Groups via claims | If your application has GUM groups, please identify all the applicable groups as this info will be required during migration.
| |
Determine if your application within PwC Identity (ForgeRock) today is making LDAP calls to Directory Services (OpenDJ) via an LDAP client. These can be in addition with their SSO integration or can be direct calls to LDAP. | ||
LDAP | Token claims | Determine if your application performs LDAP calls and verify if your application can make REST calls.
If your application only needs to query/look up details about the authenticated user (i.e., the user using the application), then the information can be retrieved via token claims.
|
Graph API |
| |
LDAP calls to |
| |
External Applications
@pwc.comSegments: GUM, With / Without Federation
Applications with external users (non-federated) can migrate via the Portal provided they are not dependent on LDAP or GUM.
- There is a dependency for Client Federation. Once the dependency (client federation) is resolved, the IDaaS project team will notify when applications with external users (federated) can migrate. Currently, no action is required for these federation-dependent application teams.
Portal Personas
| Persona | Description |
|---|---|
| Admin | Full admin access to portal enabling assigned users to grant access and see all data. Restricted to developers, support teams, and PoD teams. Should not be provisioned to end users. |
| Application Owner | Corresponds to the Primary Application Owner, Secondary Application Owner, and the Application IT Owner attributes per application.
|
| Application Delegate | Corresponds to the App Delegate 1 and App Delegate 2 attributes within the portal.
|
| Project Manager | Role for users who are global project managers. These can see data across all territories. Unable to edit data, decommission applications, or initiate application migrations. Please avoid this role where possible to align with the principle of least privilege. |
| Senior Executive | Enables assigned users ability to view all applications. Unable to edit anything. Same visibility as Project Manager for PowerBI. |
| Migration Team | Assigned to migration team members. Supports end users with migration activities as required. Full visibility of all applications with ability to make edits as required. Full view of all dashboards. Does not have the ability to perform user management of the portal (i.e. configuring role assignments). |
| Delivery Manager | Read only. Unable to perform edits. A user can be the delivery manager for multiple territories, but territories can only have one delivery manager. Limits scope of data to only those applications that are in the same territory as that user. Unable to initiate migration or decommission applications. |
| Territory CISO & CIO Leaders | Read only. Unable to perform edits. A user can be the Territory CISO or CIO Leader for multiple territories but territories can only have one delivery manager. Limits scope of data to only those applications that are in the same territory as that user. |
| Territory Project Manager | Functions similarly to the current project manager role however data will be restricted only to the territory of the user. Multiple users can be the territory project manager for multiple territories but each territory can only have one territory project manager. Not able to initiate migration or decommission applications. |
User Journeys
The Migration Portal experience, for apps which are eligible to use it, will follow one of three possible user journeys. Each is described below, with a summmary of the status changes involved in completing it.
The Journey: Migration goes smoothly, with timely progress through each status.
Status changes:
Not Ready➡️Awaiting Initiation: All prerequisites are met.Awaiting Initiation➡️Processing: SSO object creation underway in EntraID.Processing➡️Ready: App ready for technical owner reconfiguration.Ready➡️AuthN Detected: App setup complete; authentications now being detected in EntraID.AuthN Detected➡️Confirm Cutover: Configuration tested successfully; ready for cutover.Confirm Cutover➡️Complete: Hypercare ends with successful migration.
Outcome: The application is fully migrated with no unresolved issues.
The Journey: Decision is made not to proceed with migration.
Status changes:
- Change
(Any Status)➡️To Be Decommissioned: App owner marks the application for decommissioning.
Outcome: Migration efforts halt; app becomes un-editable. Decommissioning process is initiated following SNow ticket guidance.
The Journey: Encountering technical errors or unmet criteria halt the progress.
Status changes:
- Change
(Any Status)➡️Failed: Issues arise in setup or integration, prompting troubleshooting.
Outcome: Immediate attention needed to resolve errors; IDaaS Entra ID Migration Team and app owner engage through SNow to identify and fix problems.
Migrating your application to Entra ID
- Access the IDaaS Migration Portal here. You will be greeted by a pop-up introducing the portal's capabilities:
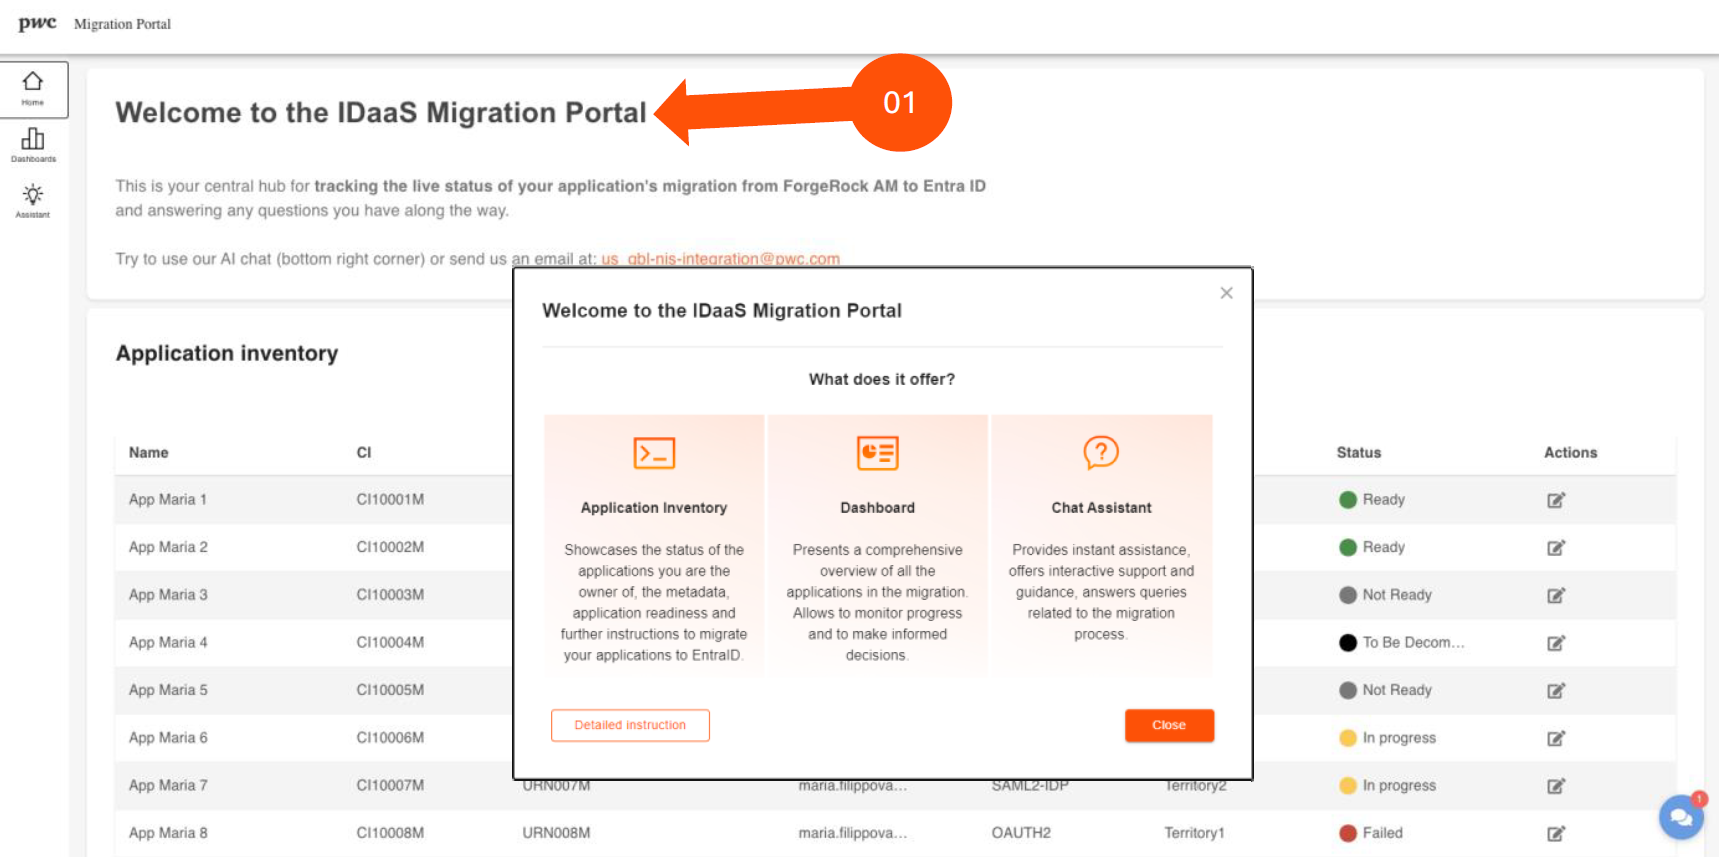
Close the pop-up to reveal the Home page, where you will see your "Application Inventory."
If you receive an error indicating that you don’t have access when trying to access an app, please inform the IDaaS Entra ID Migration team so they can troubleshoot and confirm you have been granted access within the portal.
- Browse your applications: The "Application Inventory" page lists all applications, including those you own.
View my owned apps only option, checked by default ⬇️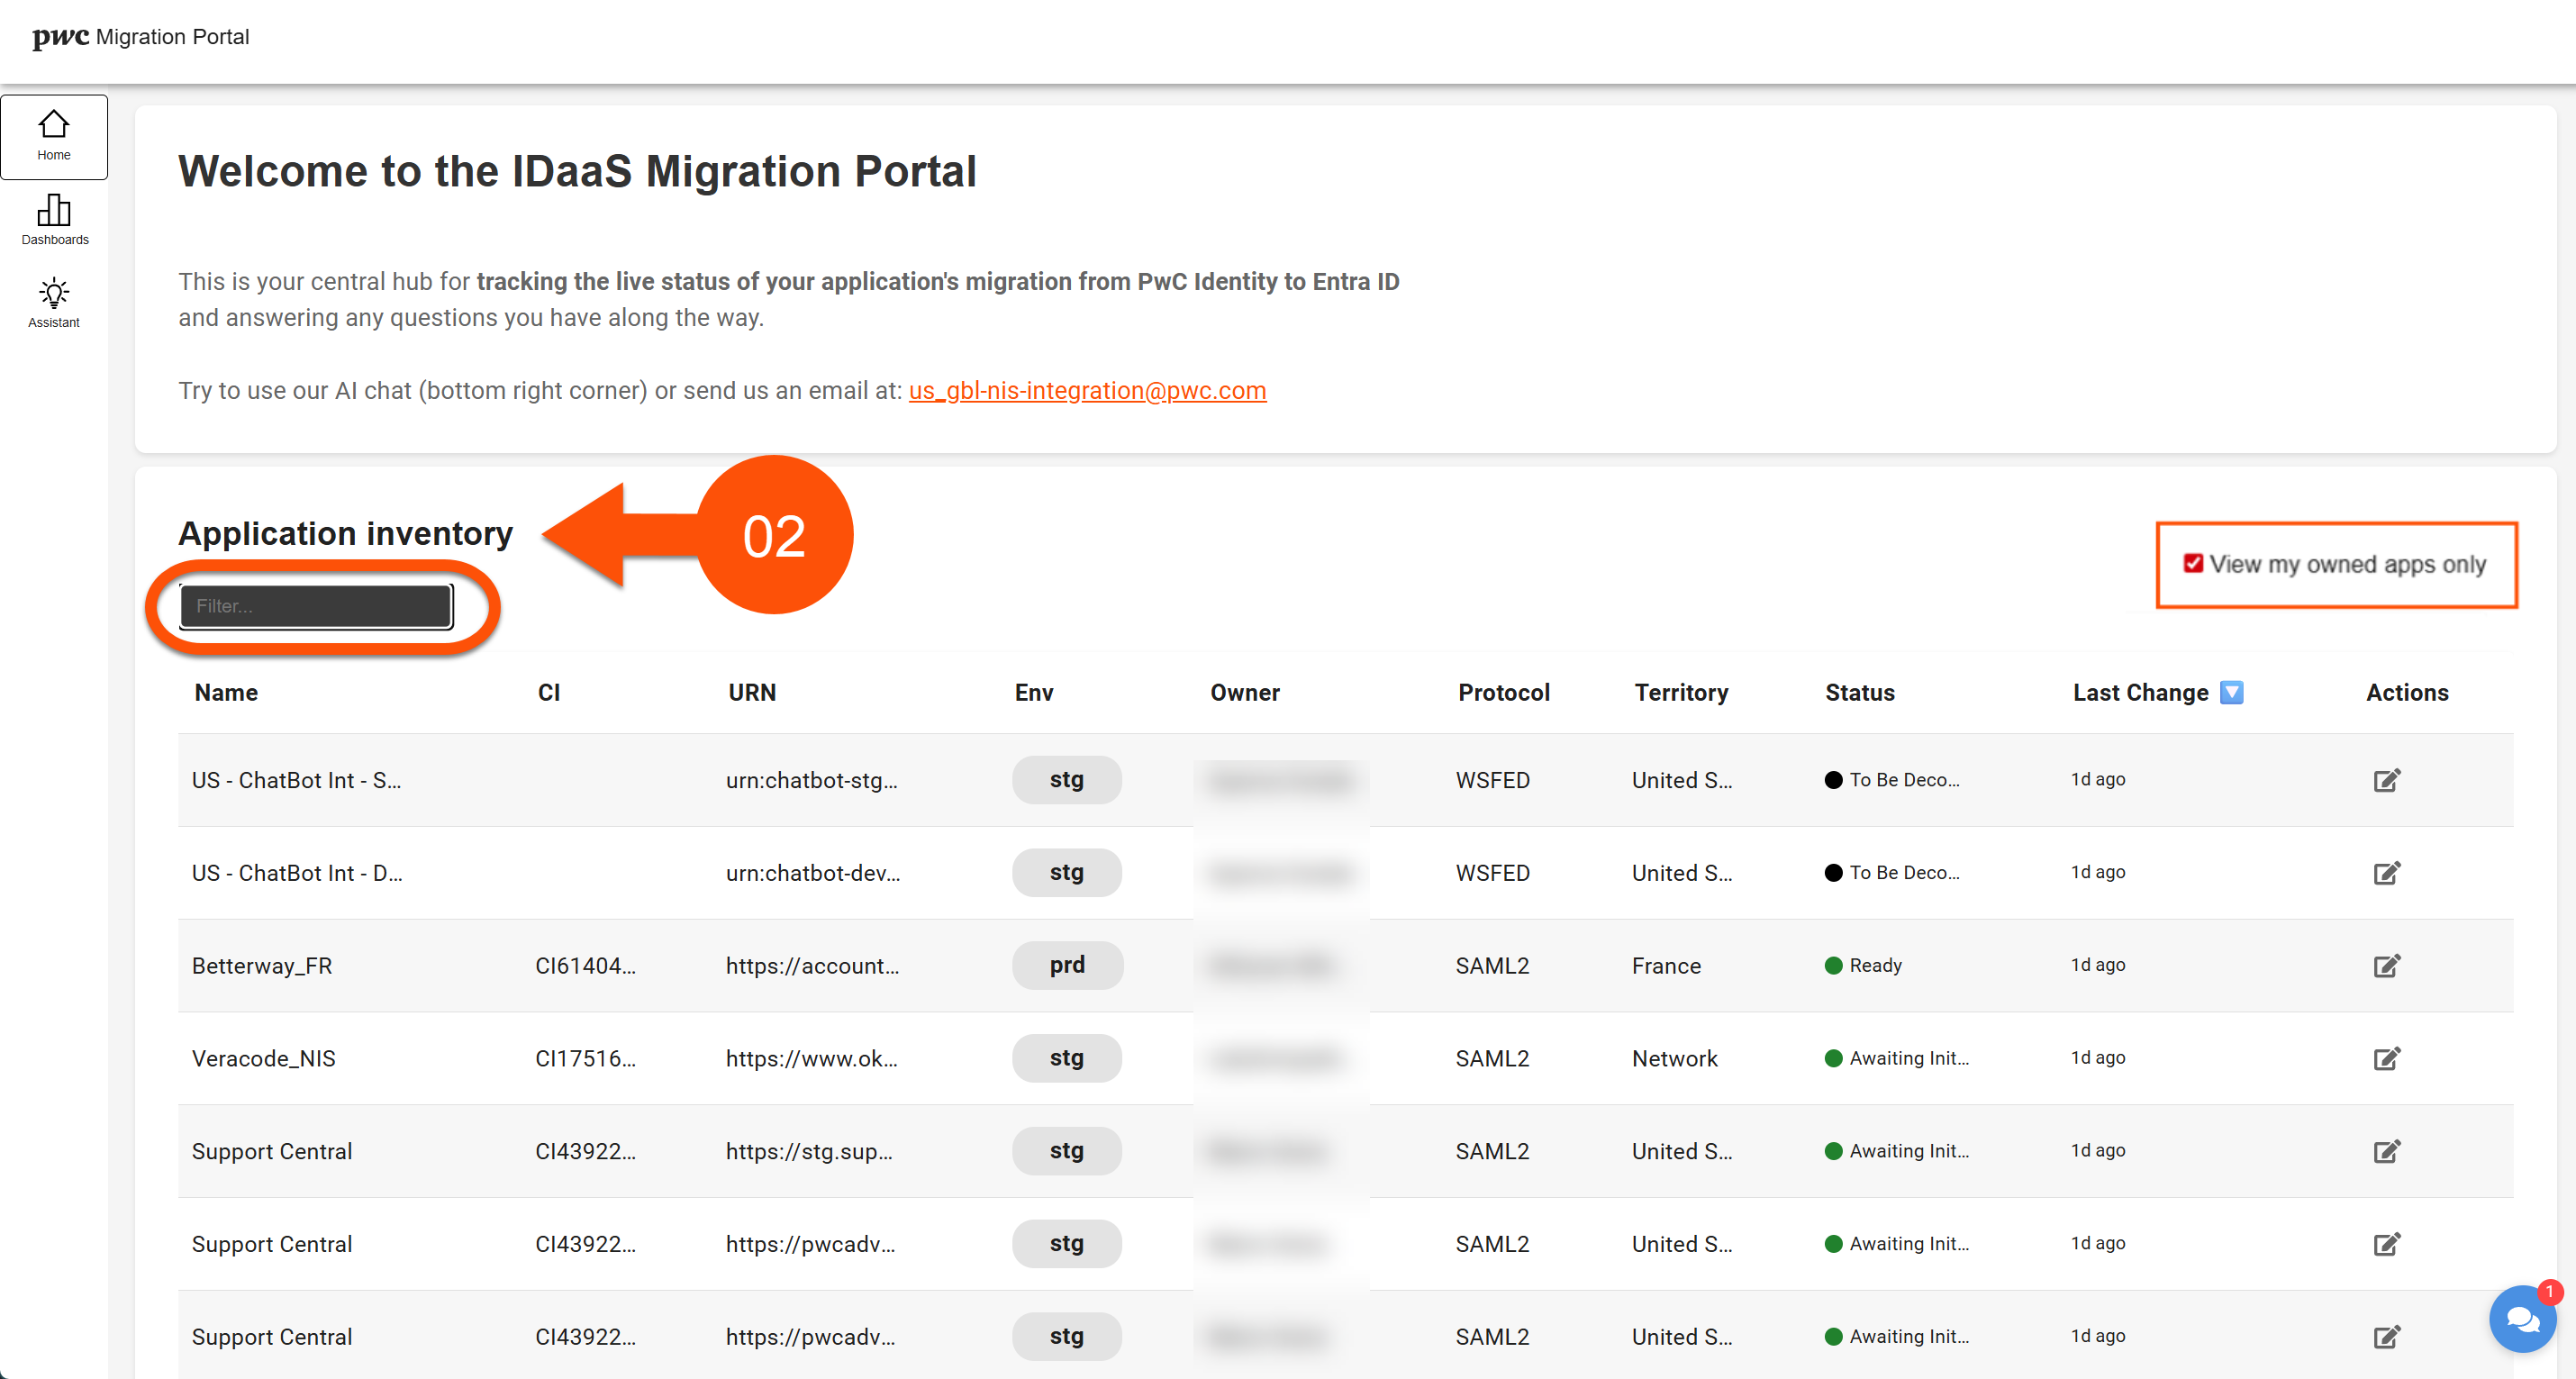
The inventory's columns represent various datapoints for each application including its:
Name- Application nameCI- Configuration ItemURN- Unique Resource NameEnv- The application instance.Stgrefers to Stage environment.Prdrefers to Prod environment of your application.Owner- Who owns the applicationProtocol- The application's authentication protocolTerritory- Designated territory for the applicationStatus- Indicates if the app is ready for migrationLast Change- Number of days since the most recent update to theStatuscolumnActions- Allows users to see what actions are needed to successfully migrate
status Indicators
The applications' assigned status indicates its overall migration progress.
status transition | Responsible (execution) | When to change the status | Description |
|---|---|---|---|
Not Ready ➡️ Awaiting Initiation | Migration Portal (Automatic) | Status updates as soon as all the prerequisites are fulfilled | Initial requirements fulfilled for starting the migration. |
Awaiting Initiation ➡️ Processing | App Owner App Delegate 1 or App Delegate 2 (Manual) | Status changes when App owner/delegate clicks on | User starts the migration and the factory begins creating the SSO objects in EntraID. |
Processing ➡️ Ready | Migration Portal (Automated) | Once the SSO object has been generated in EntraID and the portal has retrieved that data, the status is updated to Ready. | Application metadata has been generated and retrieved, making it available for app owners to reconfigure their application. |
Ready ➡️ AuthN Detected | Migration Portal (Automated) | Automatically changes when the applications SSO configuration is complete using the new metadata. | App setup complete; authentications now being detected in EntraID. |
AuthN Detected ➡️ Confirm Cutover | App Owner (Manual) | Manually, when the configuration is approved and validated by the app owner. | Configuration tested successfully; ready for cutover. Once the app owner has changed the status to Confirm Cutover, no further action is required. |
Confirm Cutover ➡️ Complete | Migration Engineer (Manual) | Manually, 4 weeks after the hypercare period has ended. | Migration Complete. Migration Engineer will disable the application (URN) from ForgeRock |
Any Status ➡️ To Be Decommissioned | App Owner (Manual) | Manually, when the app owner decides the app should be decommissioned. | App marked for decommissioning. |
Any Status ➡️ Decommissioned | Migration Portal (Manual) | If the application does not have an EntraAppID and is not active in PwC ID, then the application is inferred as being decommissioned. Once the application instance in ForgeRock is disabled, NIS Migration Engineer will manually update the status to Decommissioned. | Decommissioning process complete. |
Any Status ➡️ Failed | Migration Portal / IDaaS Entra ID Migration Team (Manual) | When issues arise in setup or integration, requiring manual intervention. | Problems detected; troubleshooting required. |
Failed ➡️Ready to Start | IDaaS Entra ID Migration Team (Manual) | Manually, when issues are resolved, and prerequisites meet criteria again. | Problems resolved; prerequisites resubmitted. |
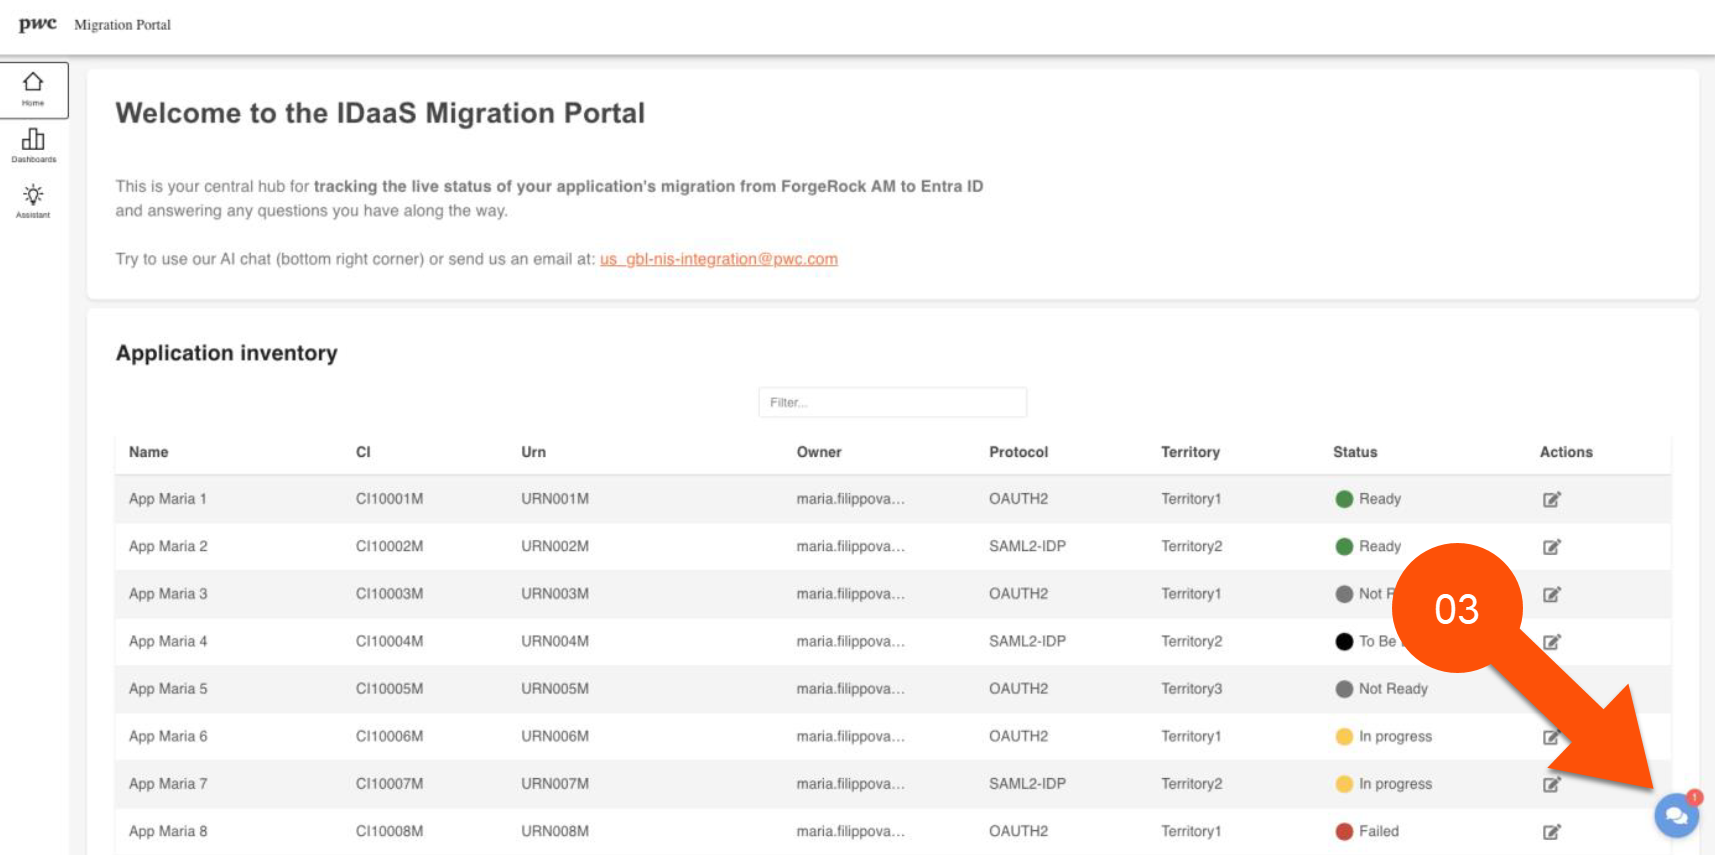
- Use the interactive AI chatbot to ask queries and get help.
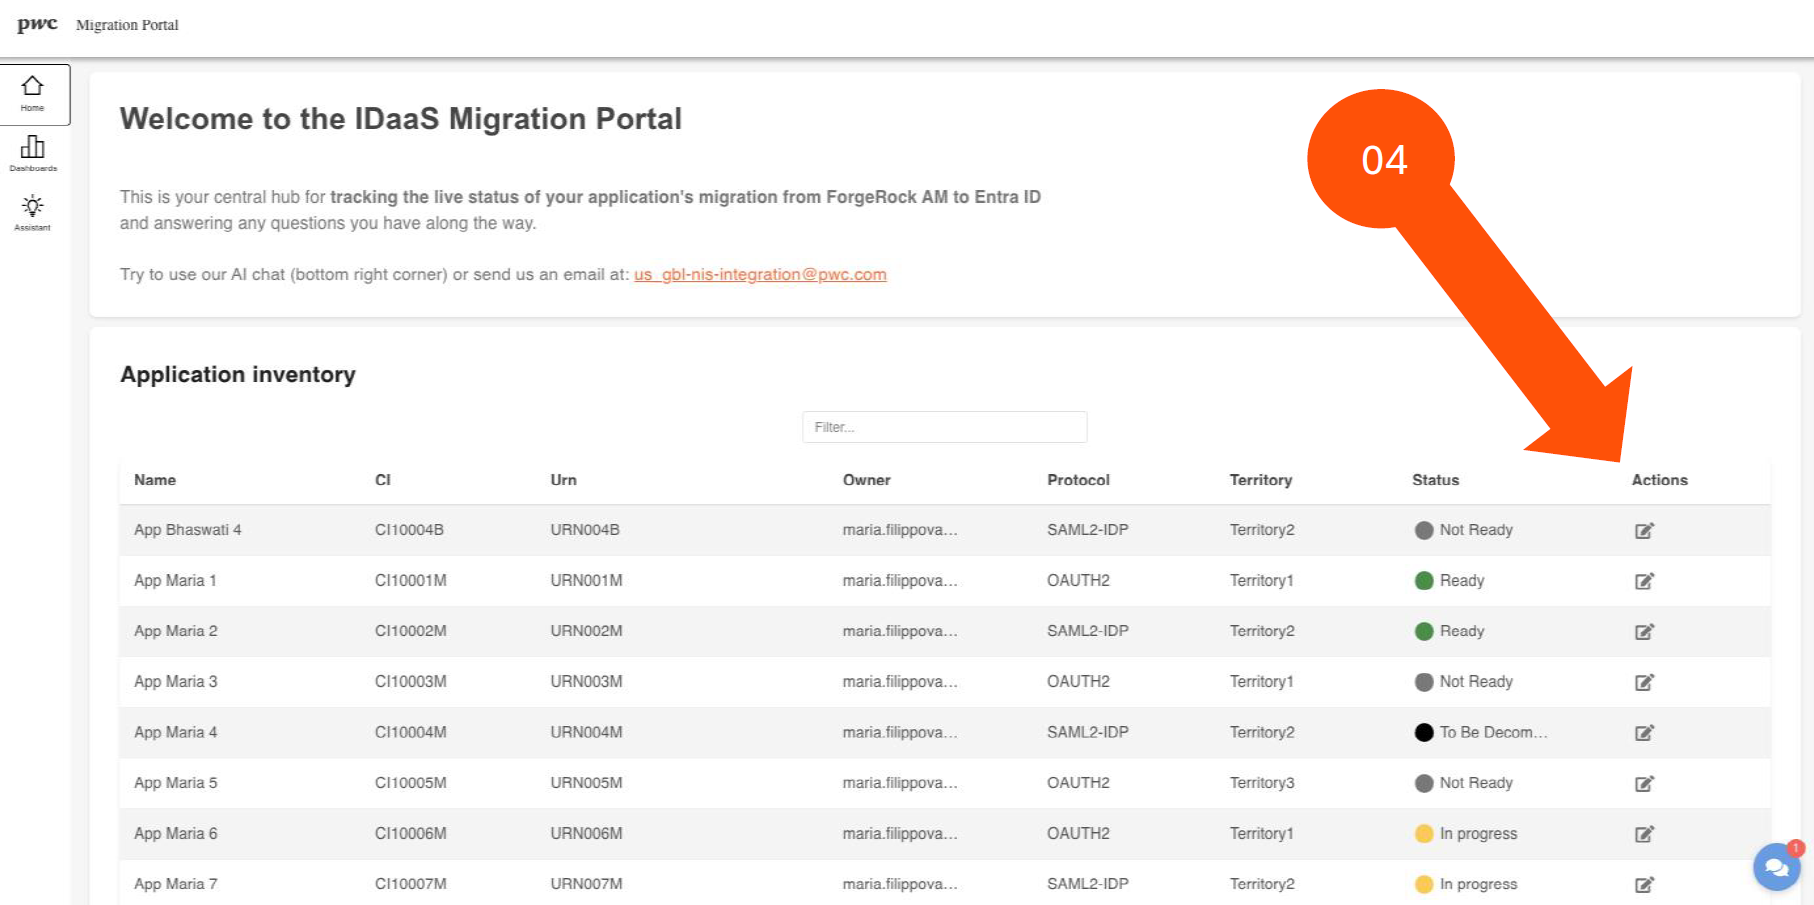
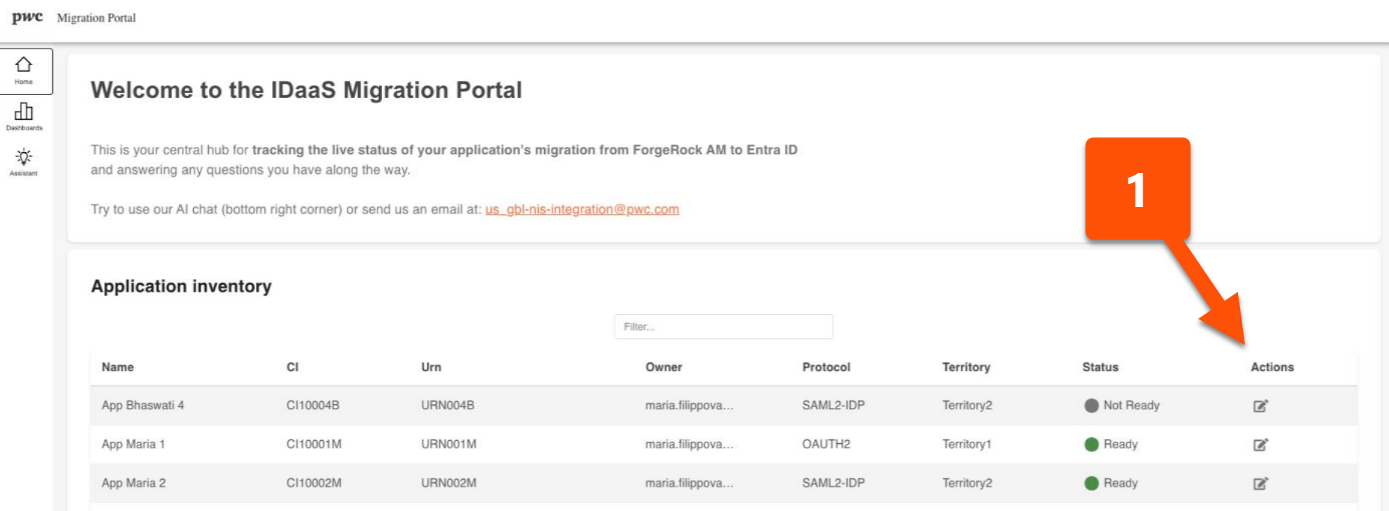
- Click Actions on the right-hand side of each application to view the attributes for the application.
A pop-up will display the application's Current Data and status of each of its Definition of Ready requirements:
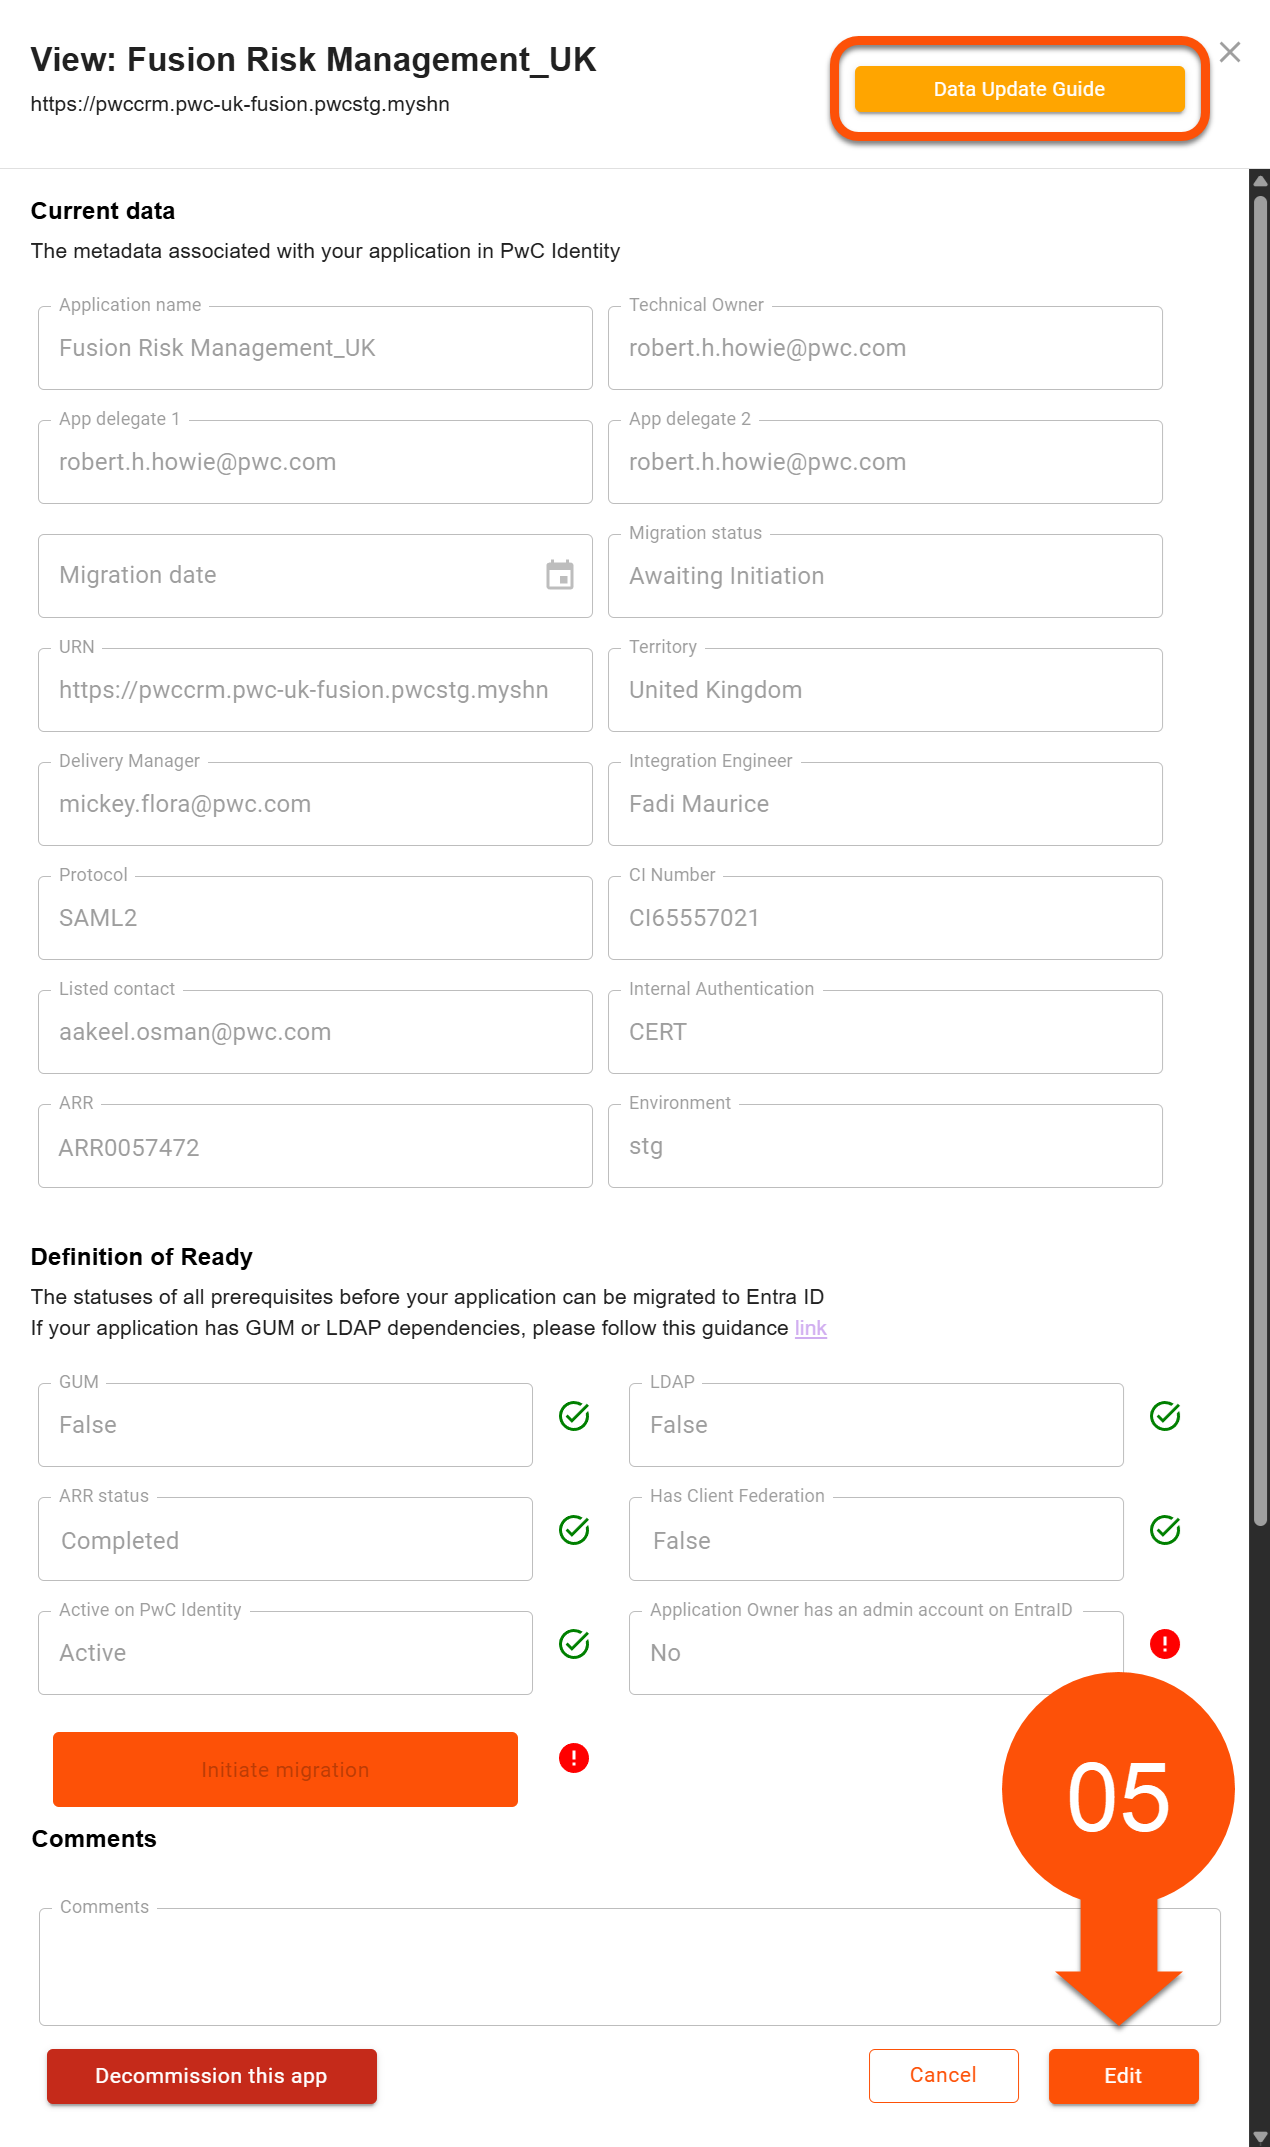
- If required, click to update the details of your application's profile:
📝 How to Update Application Details:
- To update the application's Current Data attributes, click the button at the top of the pop-up window. This will direct you to detailed guidance on how to proceed.
- To address the Definition of Ready items, continue to the next step.
fields cannot be modified directly in the portal - such as, for example, the Primary Application Owner, Secondary Application Owner, and the Application IT Owner fields:
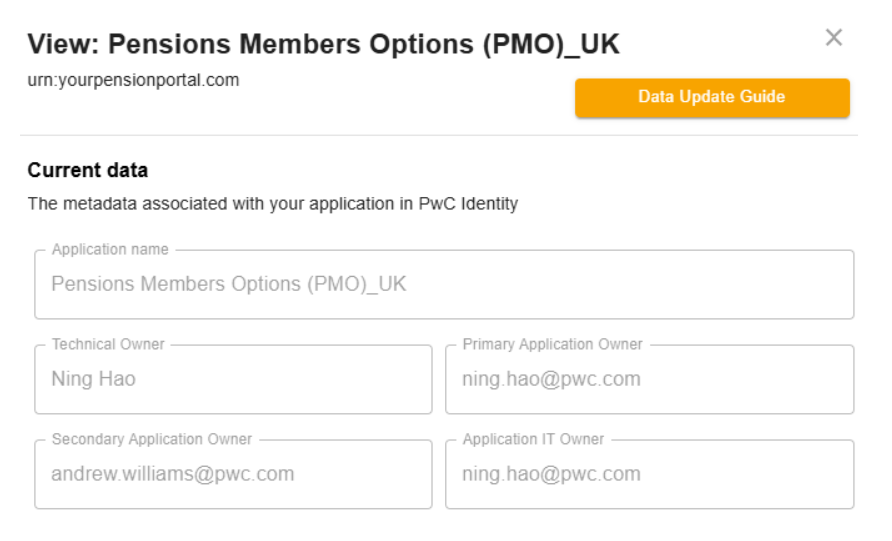
You can follow the guidance listed later in this article on how to update application data.
For any queries, contact your PoD lead / migration engineer or, if needed, email the IDaaS Entra ID Migration Team.
- Alternatively, click to exit without making changes.
You can appoint application delegate (per application) to initiate migration and complete the migration on your behalf. These attributes are the App delegate 1 and App delegate 2 fields in the portal.
-
Select the field and enter the email of the delegate.
-
Optionally, to add the second delegate, select the field and enter the email of the delegate.
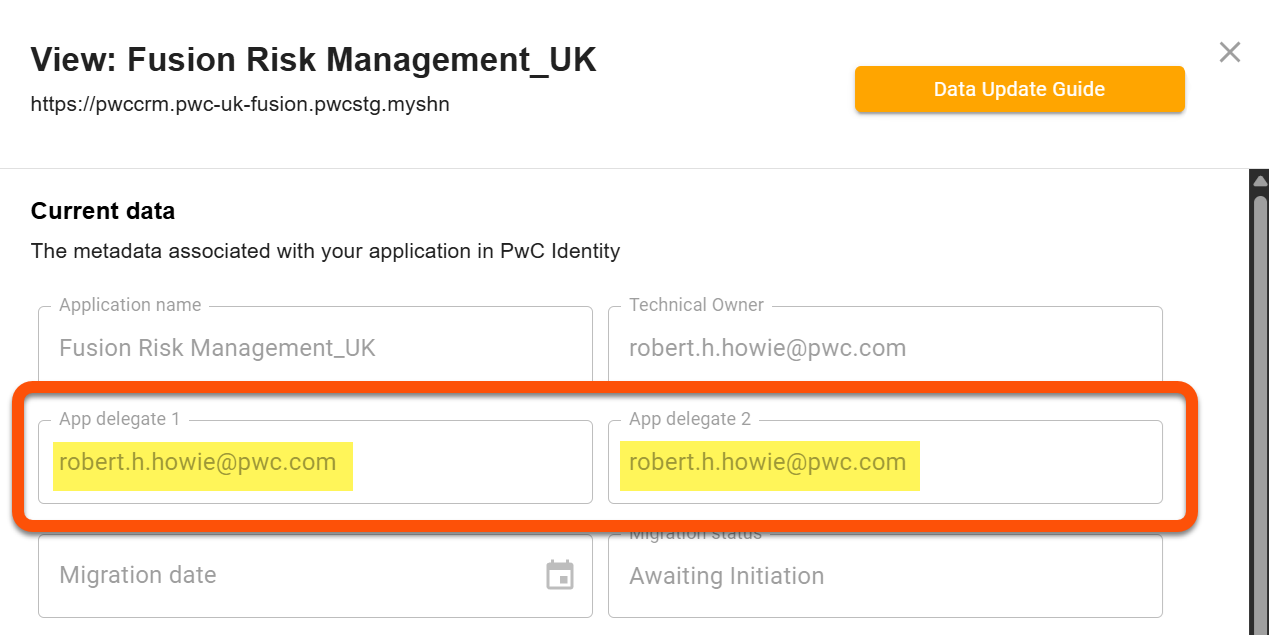
When finished, click
- Note the Definition of Ready area of your application details. This section ensures your application meets prerequisites required for migration to Entra ID.
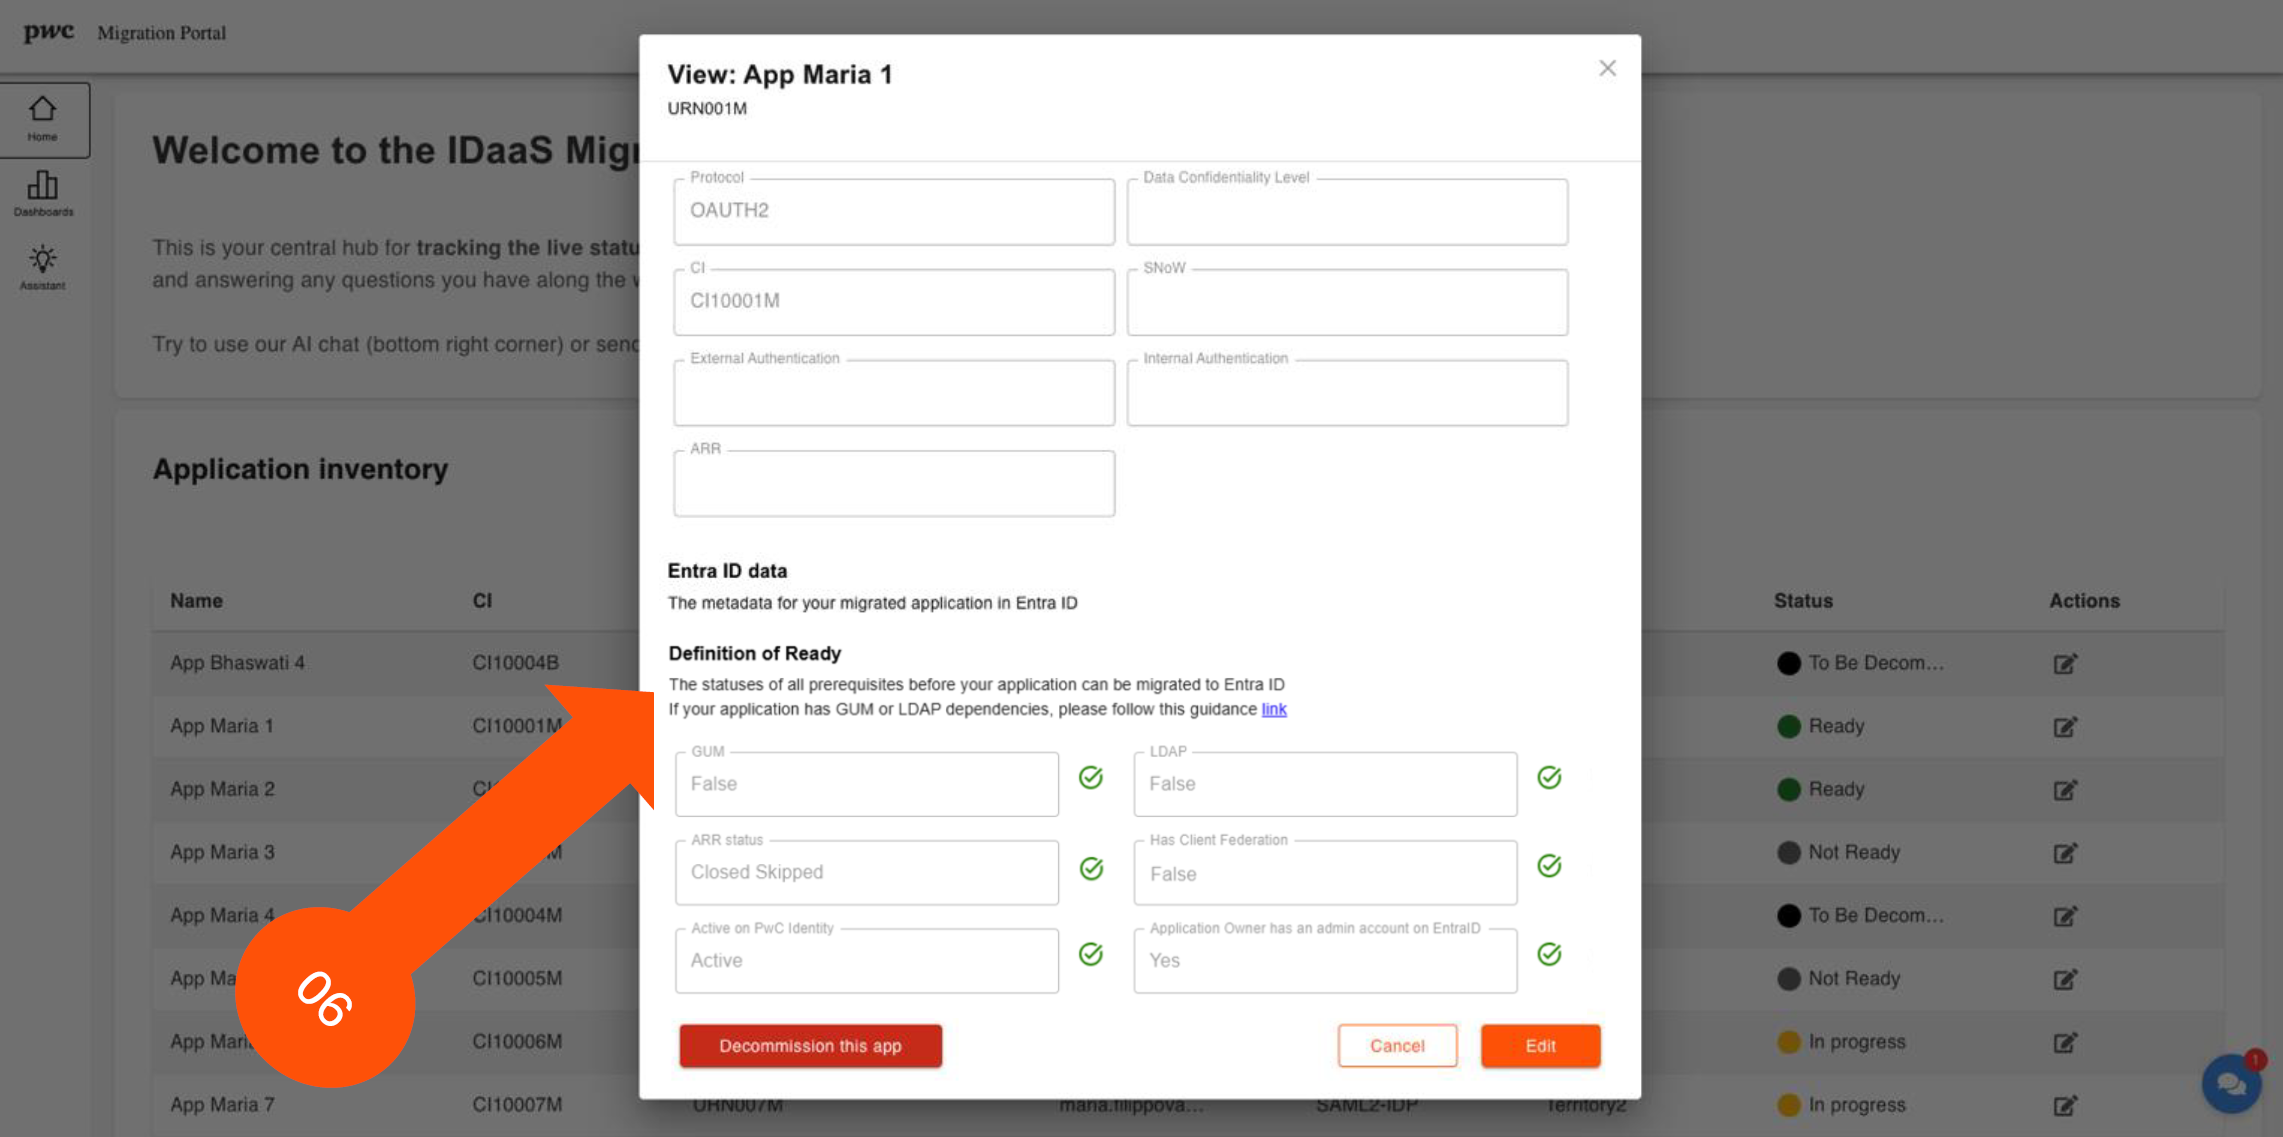
Not Ready ▶️ Ready ✅ when conditions are met.Definition of Ready Requirements
Currently only production instances of applications are to be migrated.
The table below displays current the eligibility condition(s) for migrating a given application. If your application shows as not eligible, then you cannot start the migration. Follow the guidance below to meet this requirements where possible.
| Definition of Ready Condition | Description / How to Address (if applicable) |
|---|---|
| GUM | If your application relies on GUM, you need to address certain dependencies, as covered in the IDaaS Technical Integration & Migration Guide |
| LDAP | If your application relies on LDAP, you need to address certain dependencies, covered in IDaaS Technical Integration & Migration Guide |
| Has client Federation? | Applications dependent on client federations are not eligible for migration at this time (not eligible via the Portal and the SNOW process). For applications with client federation, refer to this guidance. |
| ARR status | All production instances of applications must have a valid and complete ARR. The Prerequisites article contains guidance for properly initiating the ARR process. |
| Active on PwC Identity | If the application is no longer active in PwC ID, then it is considered decommissioned and will not be eligible for the migration. |
| Application owner has an admin account on Entra ID | App Owner should follow these steps to create their Entra ID admin account, which allows them to view and manage their application in the Entra ID tenant. |
- Upon meeting the prerequisite(s), an button will appear. Click the button, after which point the application will be created on Entra ID and, within a few minutes, its metadata will become available on the portal.
- Click to finalize changes to the metadata:
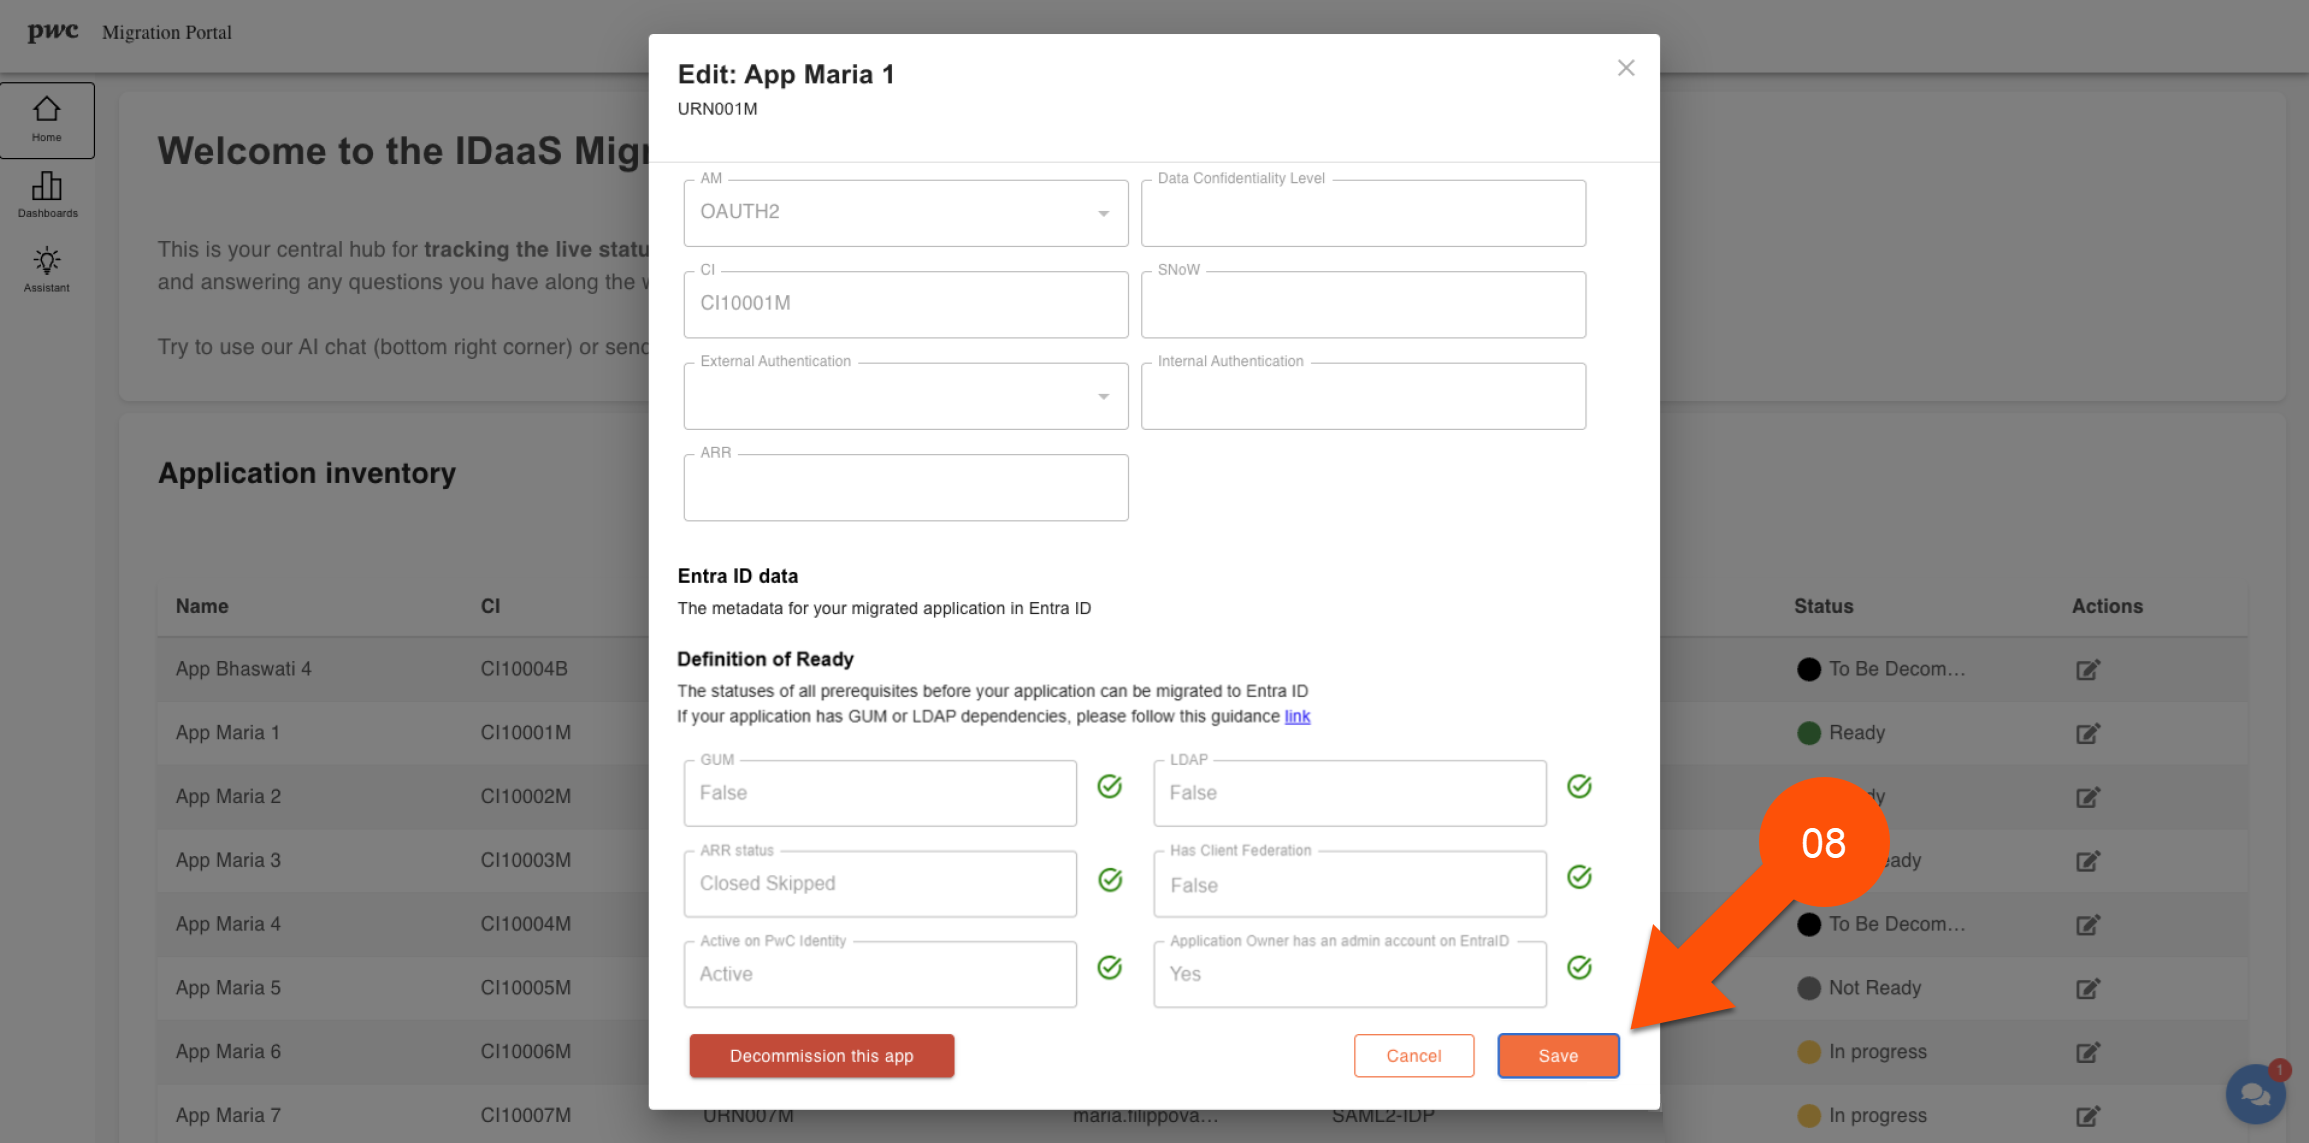
Update/modification of application metadata is only allowed when the Status is set to Not Ready. Updated attributes will only be reflected in this portal. Please contact the IDaaS Entra ID Migration Team for help in updating data in other sources. They will be able to guide you to the appropriate contacts.
- Check if the status of an application is marked as
Ready. If so, proceed with the next steps.
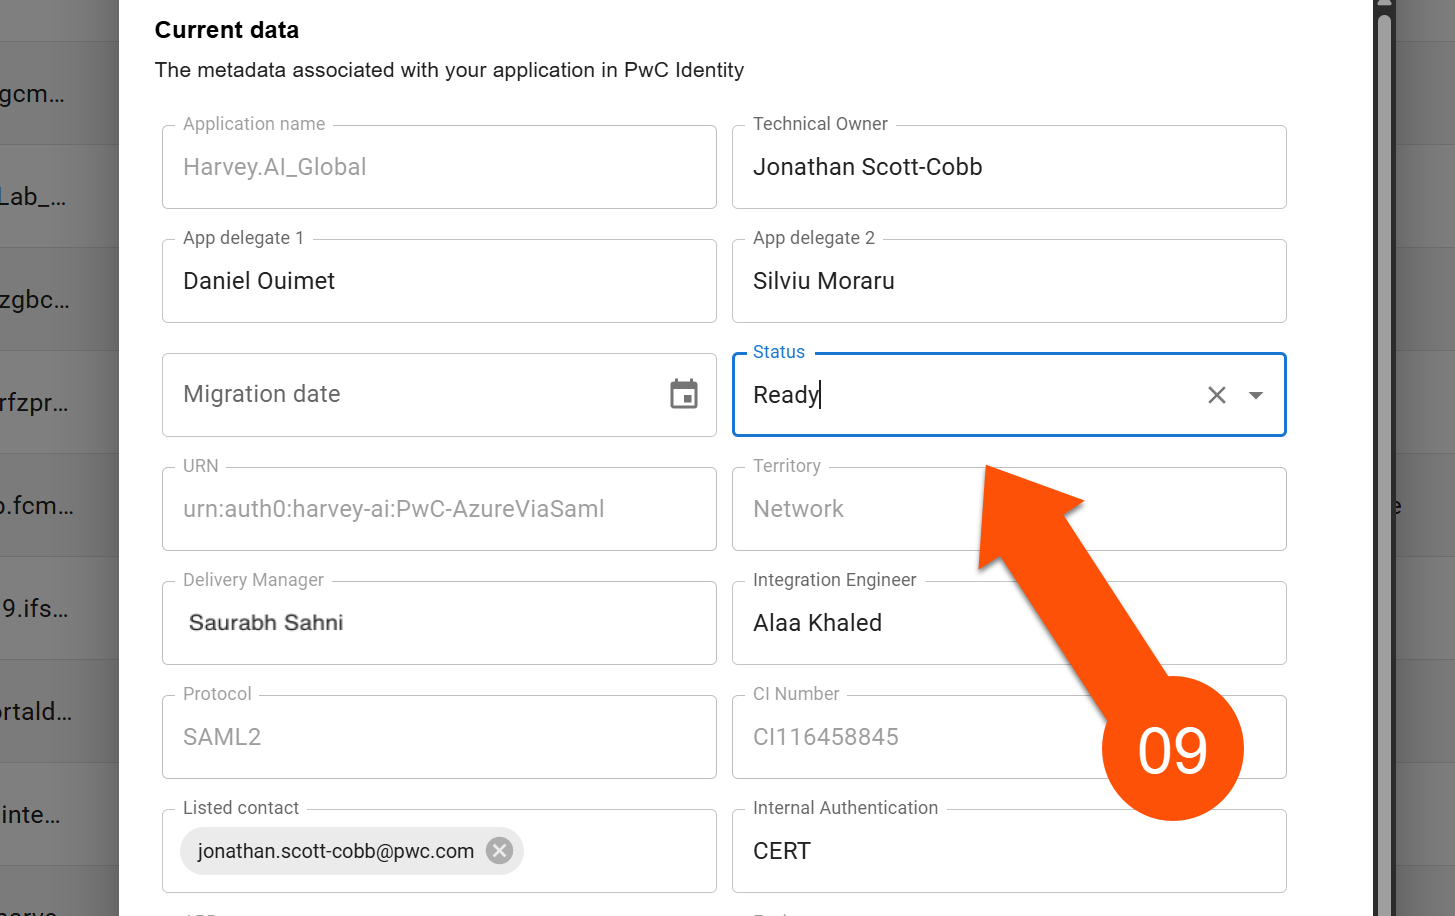
- Click the Actions tab.
The implicit grant type is not supported as an option that can be used to integrate with Entra ID for SSO capabilities. To be eligible for migration, your application must implement an approved alternative such as the Authorization Code Flow with PKCE. Refer to the Oauth section of the IDaaS Technical Integration & Migration Guide for more information.
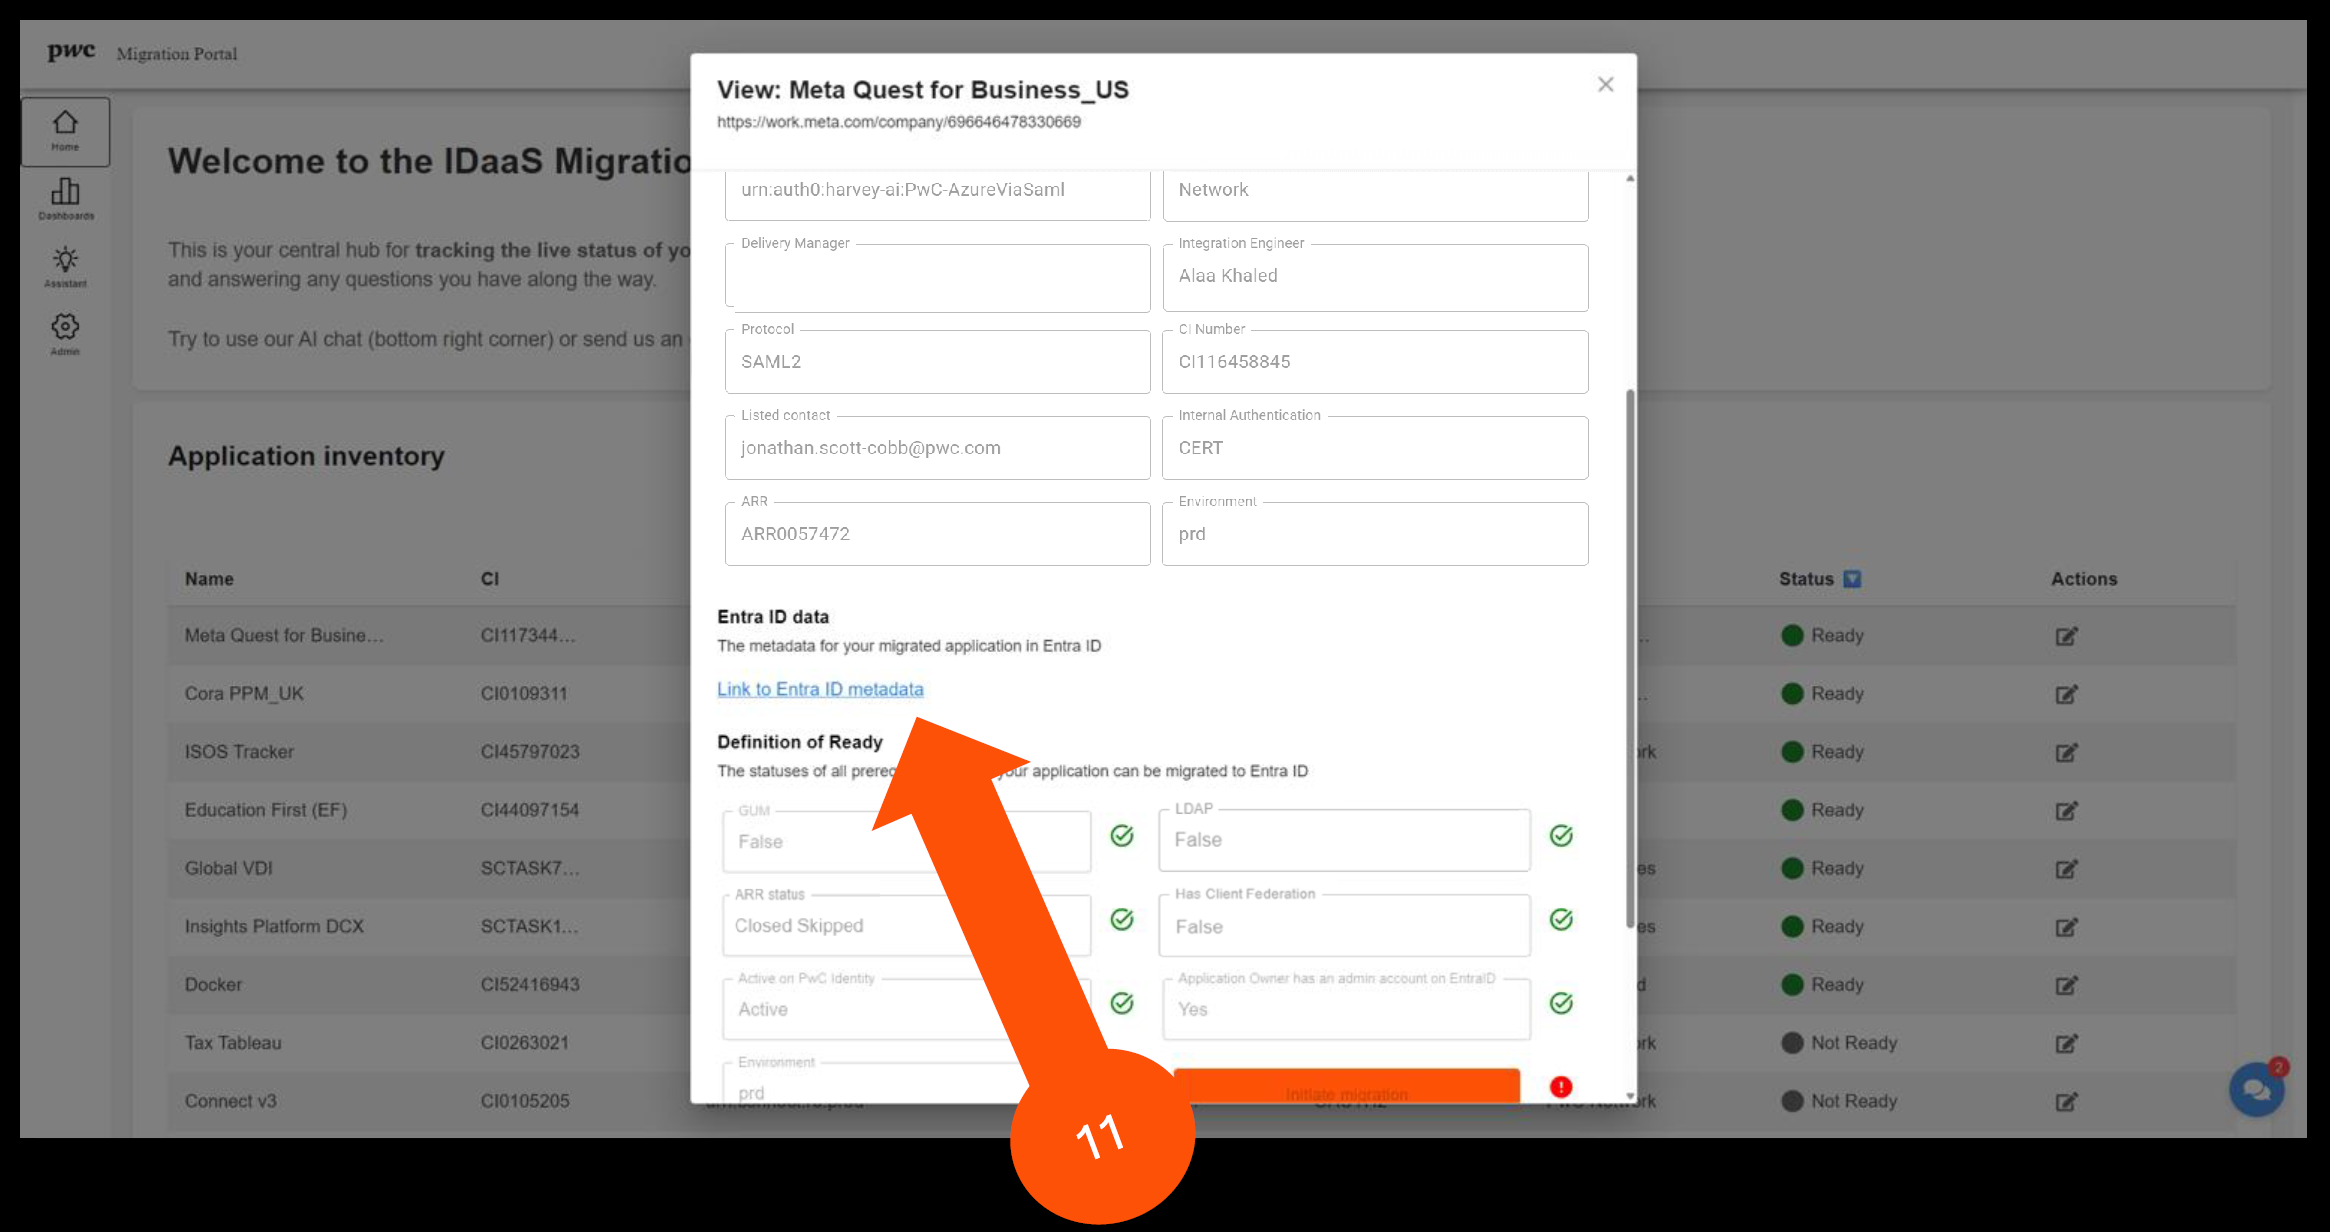
- Once you have linked your application with Entra ID, metadata will be generated. Click "Link to Entra ID Metadata" to begin reviewing it.
-
Using the metadata you retrieved, follow the appropriate process to reconfigure your application's SSO settings.
-
Test your application's SSO to ensure the new configuration is working successfully and that users can access the application.
If the prerequisites have not been met, this section will not be displayed.
-
Once the configuration has been tested successfully, the status will automatically change from
ReadytoAuthN Detected. -
Log into the portal. Verify if you see the status change in the application (
AuthN Detected).⚠️ If the status hasn't changed: notify the Integration Engineer and the PoD team.
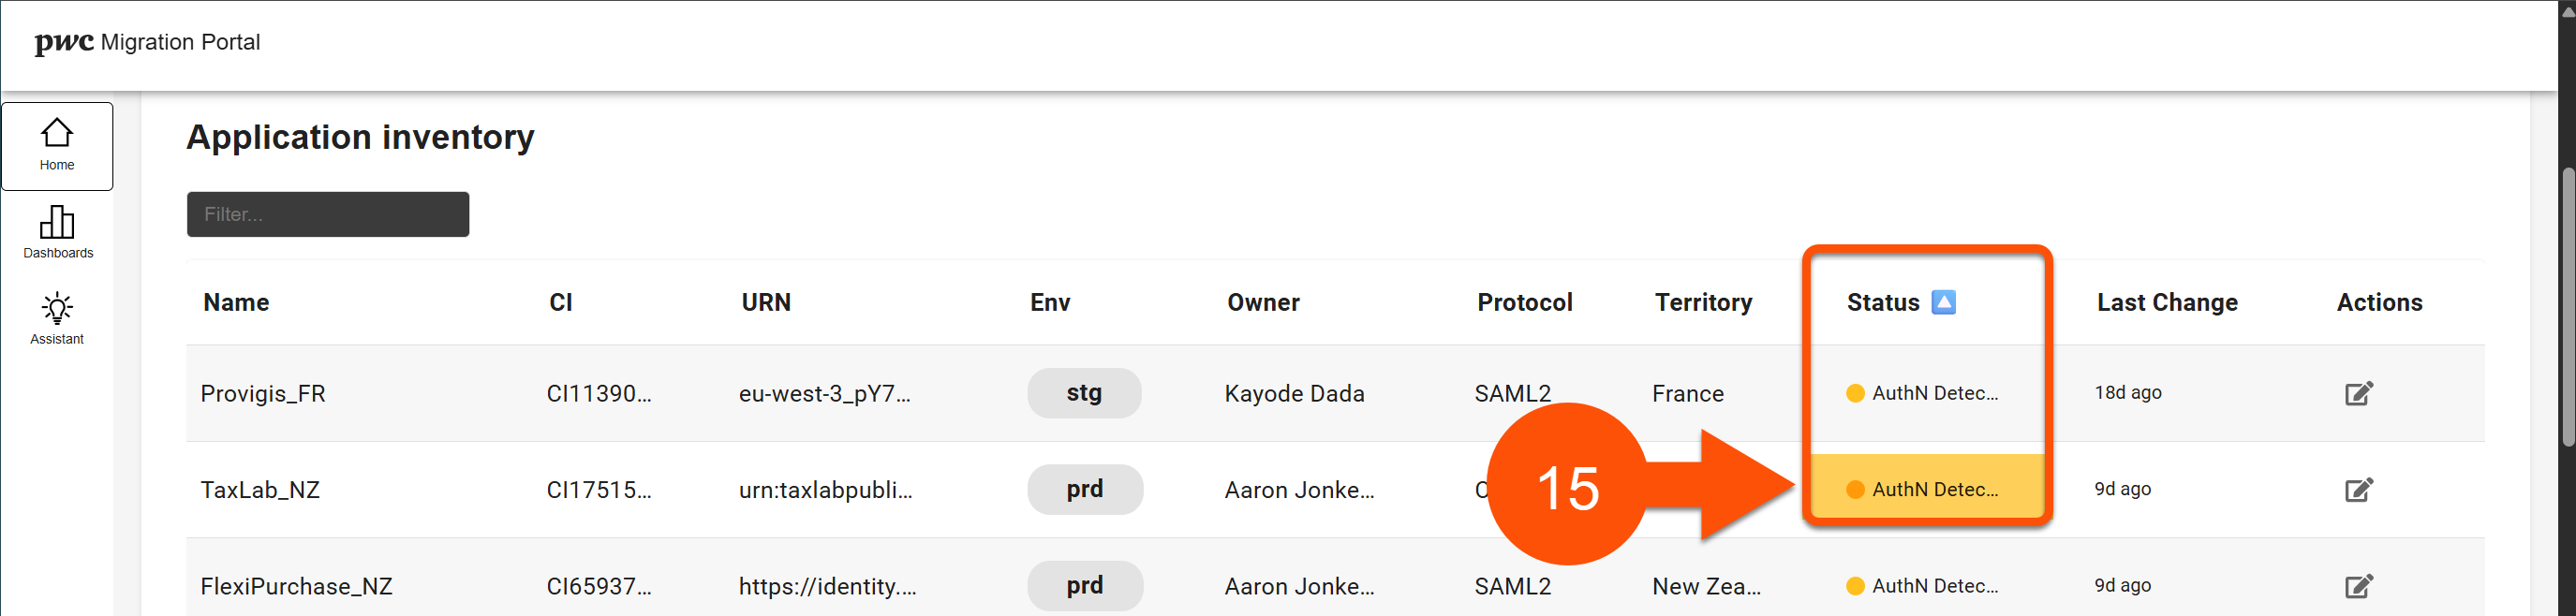
- From this screen (the Application Inventory), click Actions. Then, from the app's Current data menu, click .
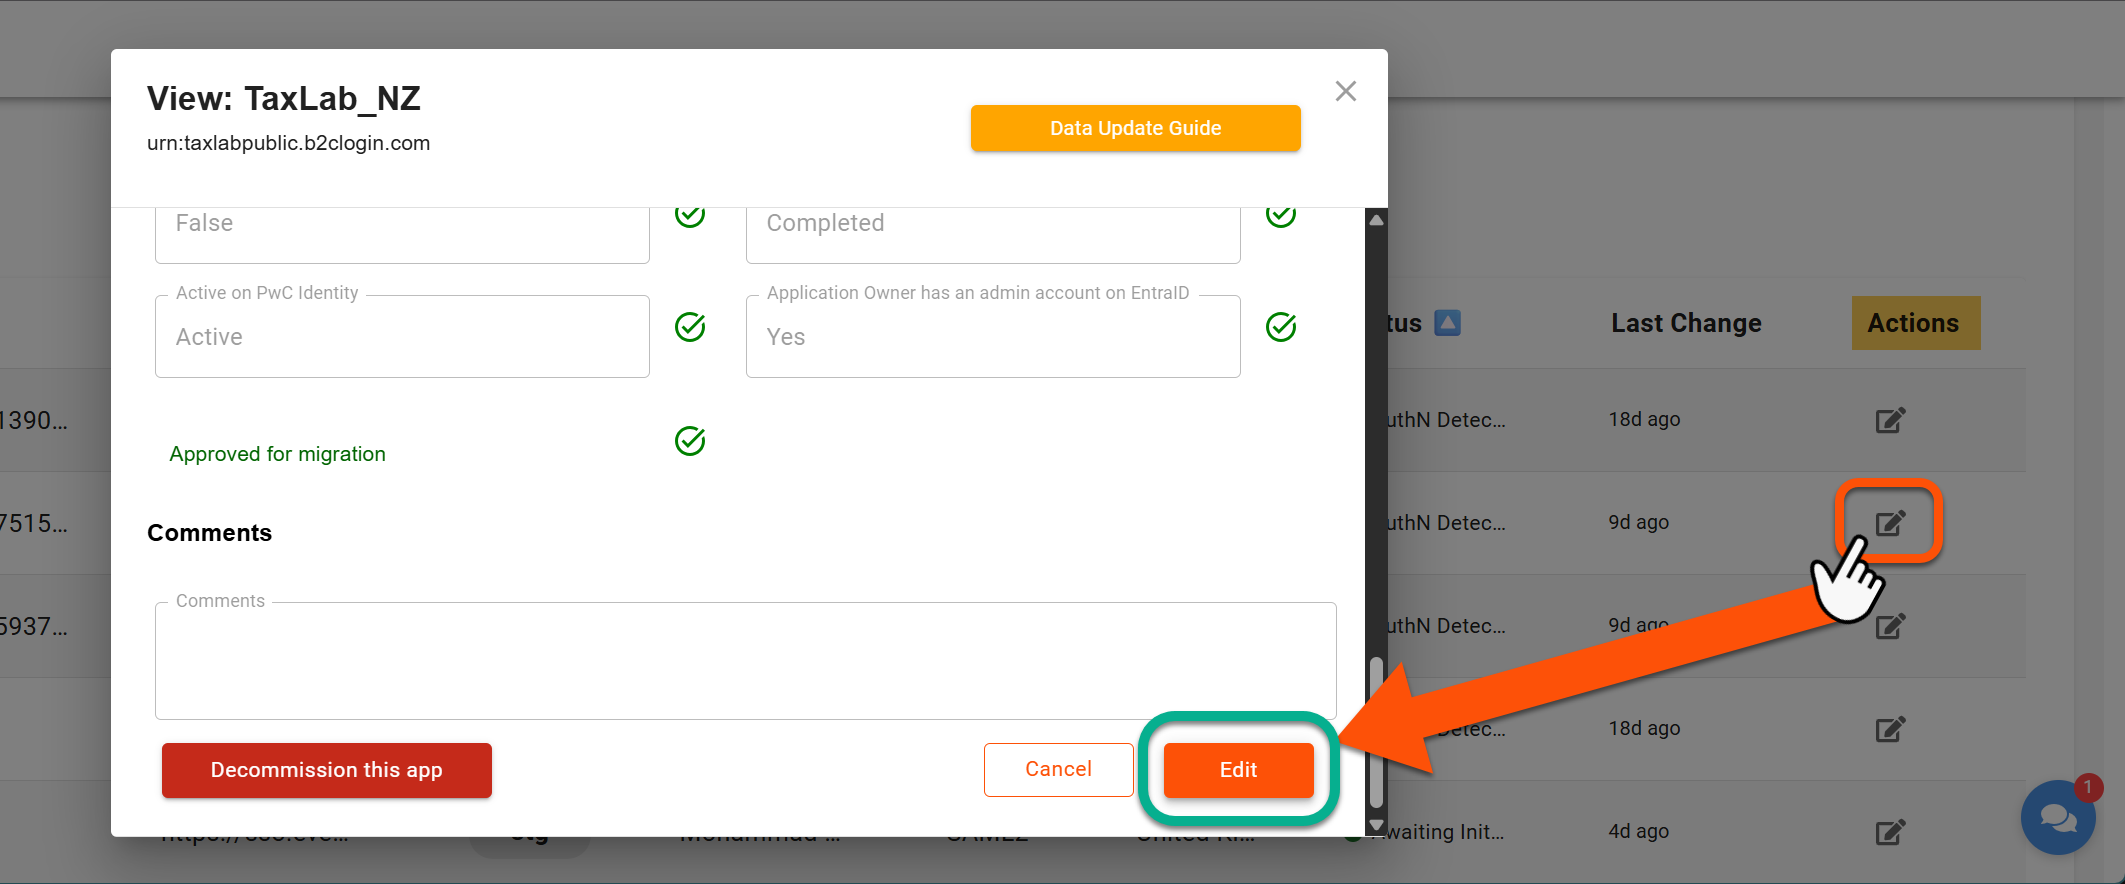
Then using the dropdown menu, change the Status to Confirm Cutover and click
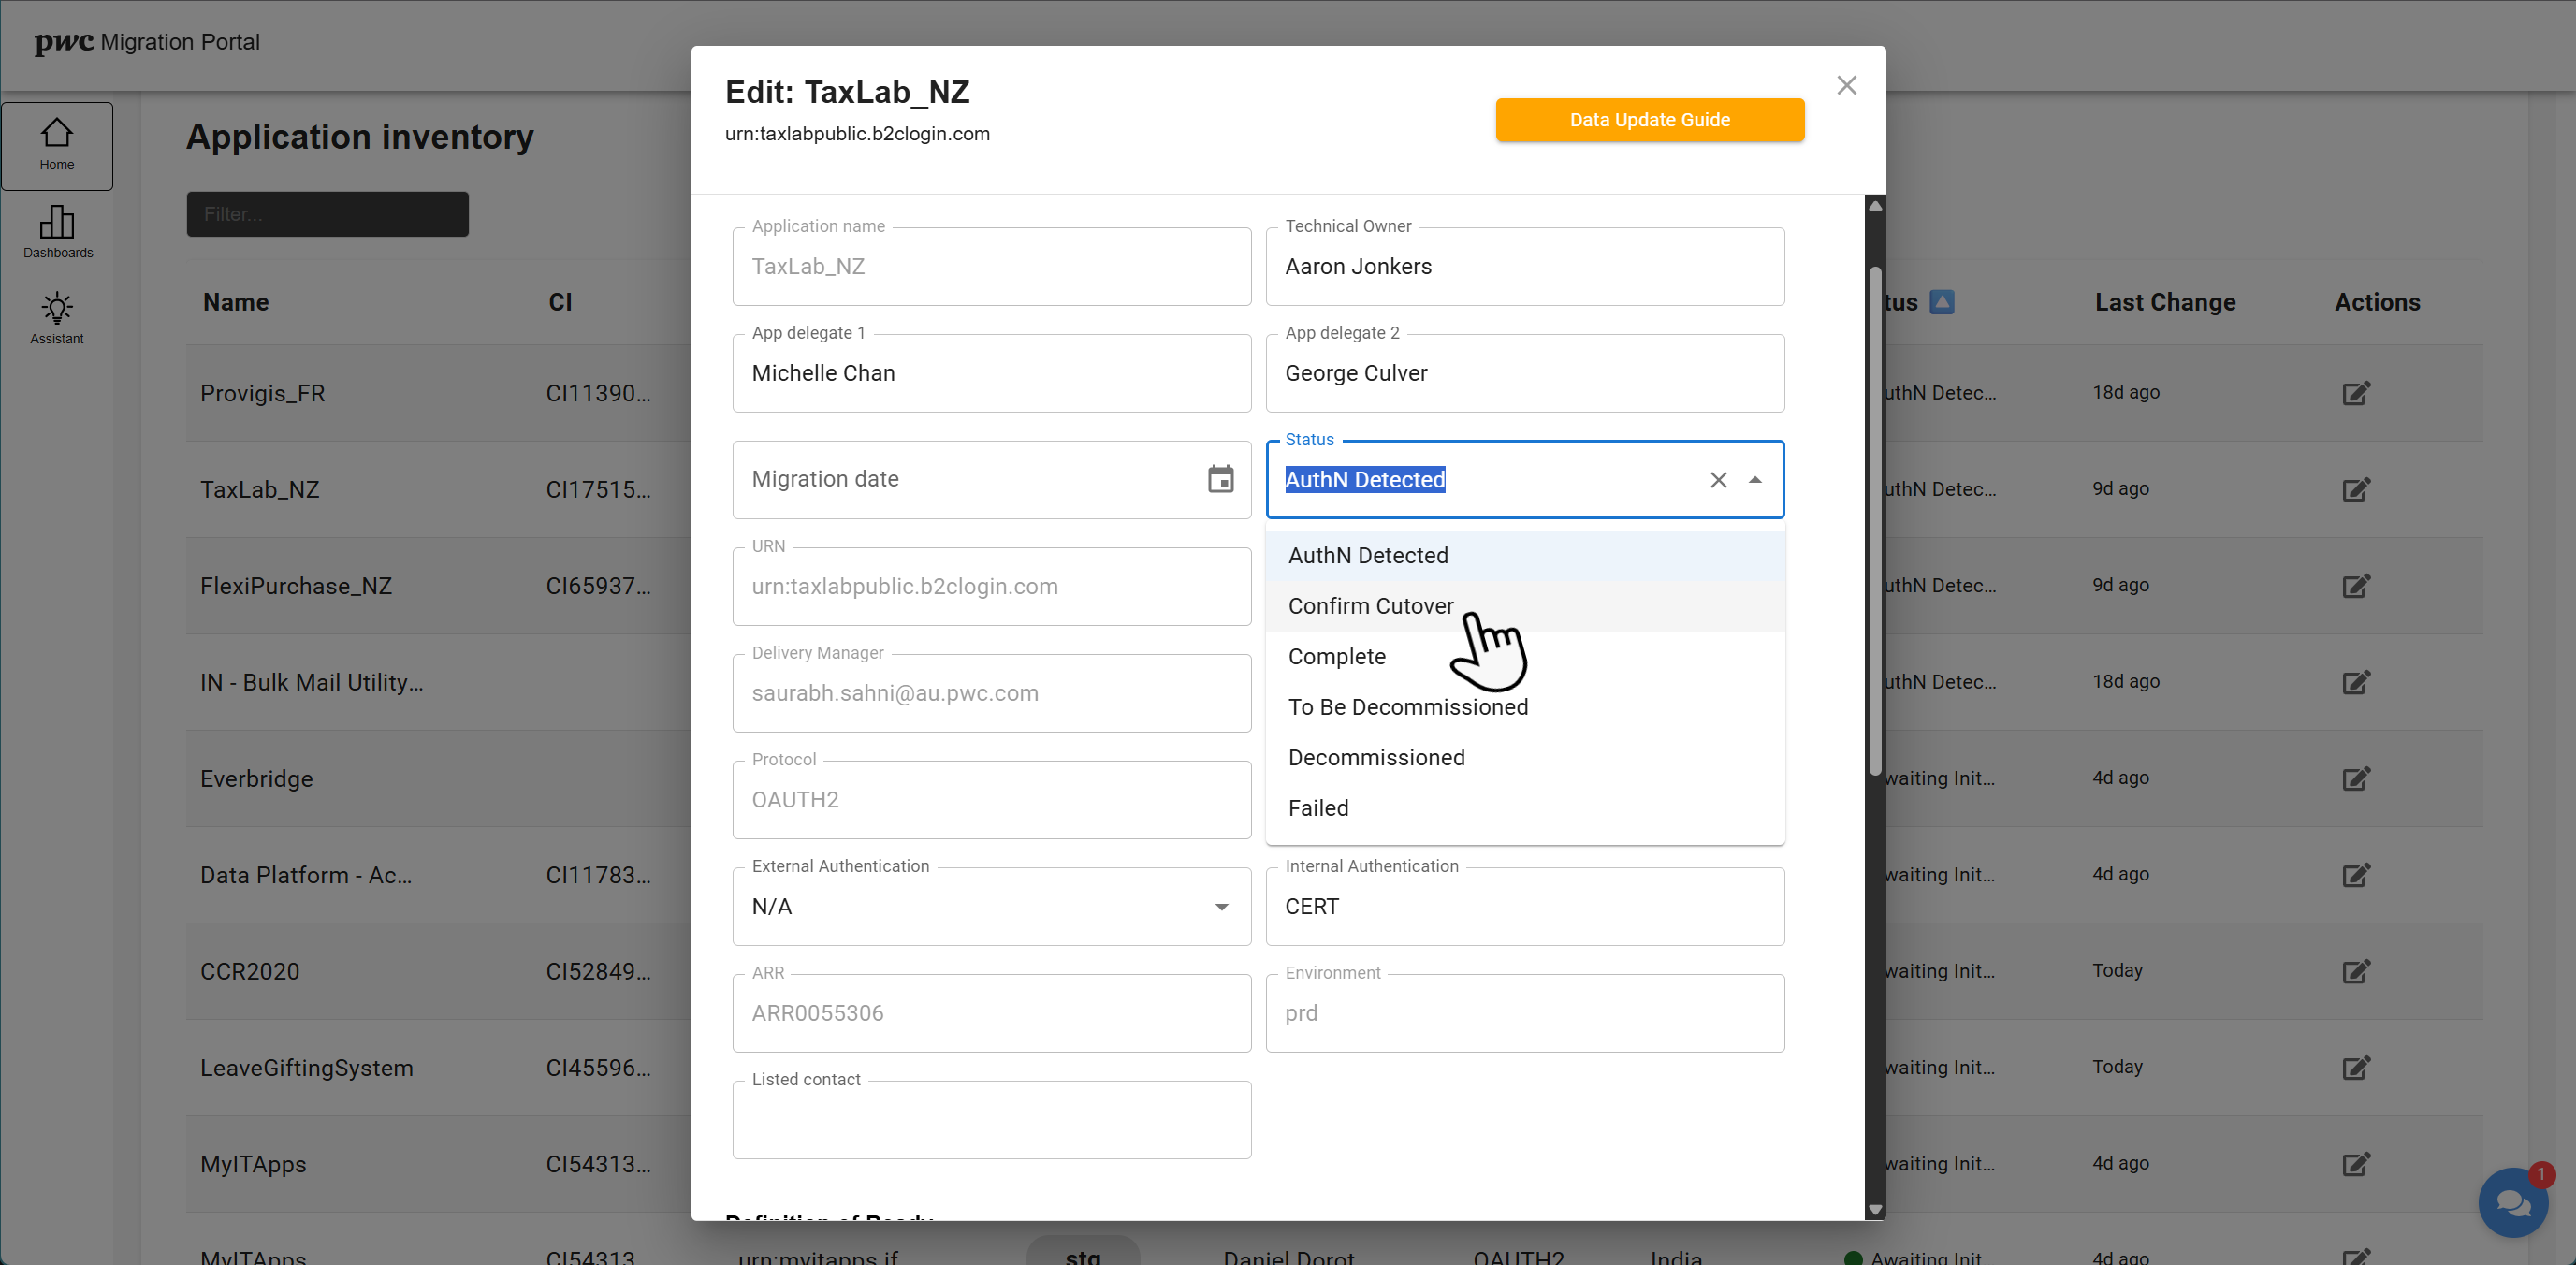
When a popup appears, follow the guidance in the pop-up and click to confirm that the app has been tested successfully and is ready for cutover.
Click if you do not wish to proceed.
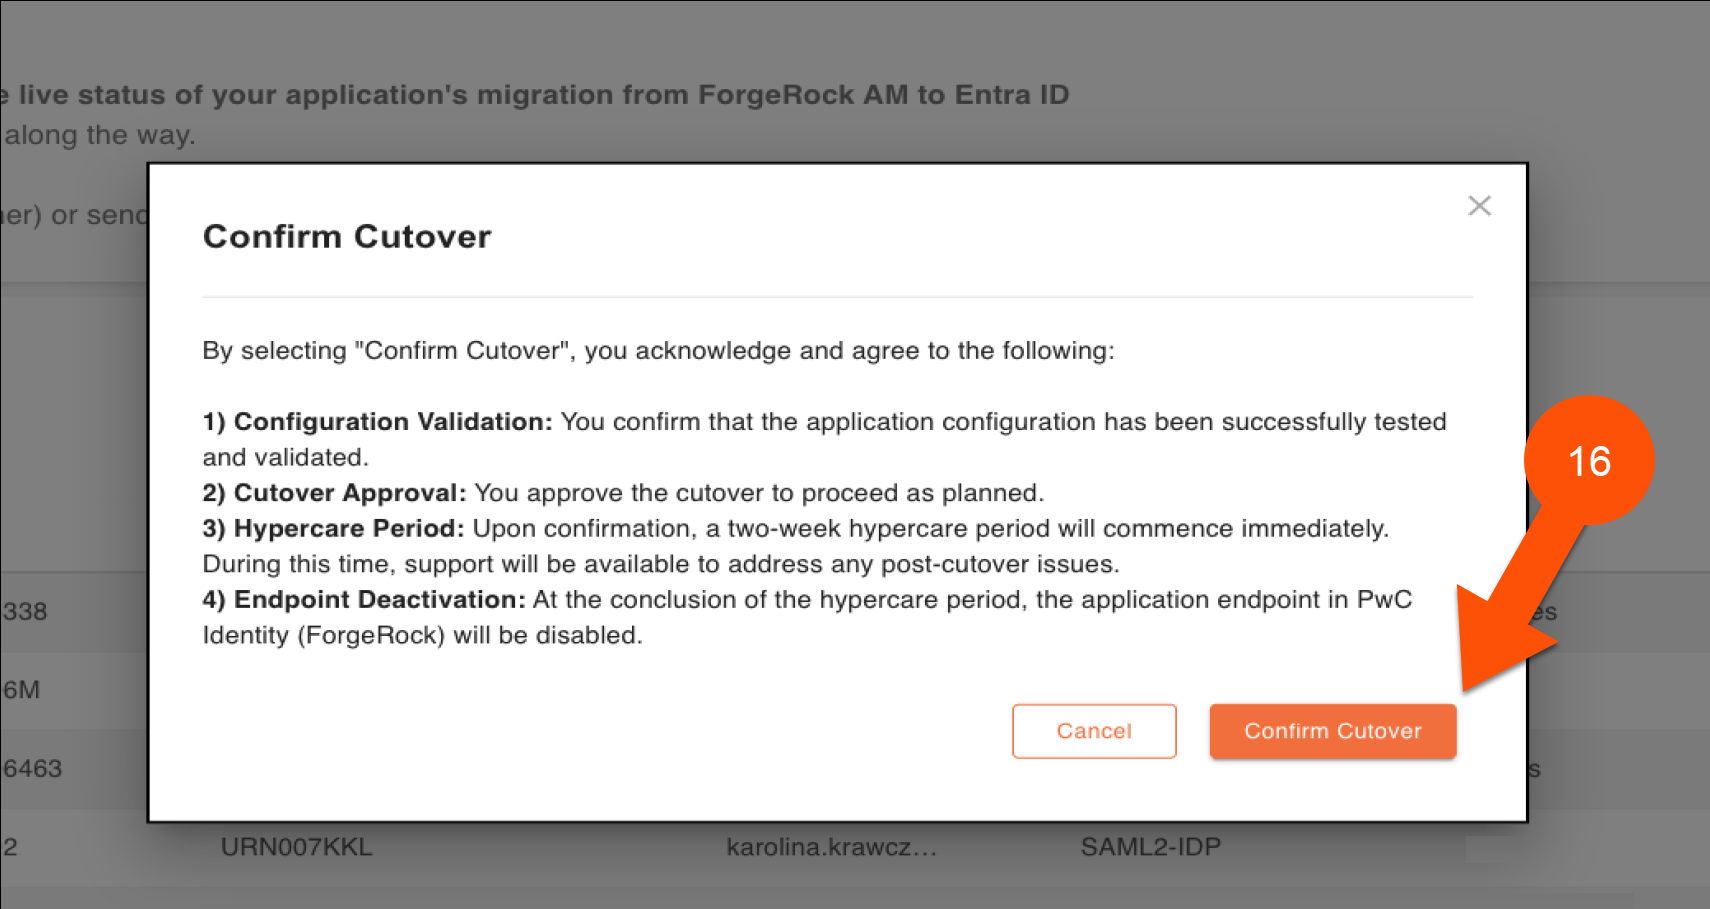
After confirming cutover, a two-week hypercare period begins. For assistance, interact with the AI chatbot or send an email to: us_gbl-nis-integration@pwc.com and an integration engineer will be assigned to you. You can also reach out to Integrations Support via Teams to obtain support.
Moving forward, no action is required from the application owner. The IDaaS Entra ID Migration Team will perform the next steps, as highlighted here. Once the hypercare period is completed, it is assumed that there are no issues and the migration is successful. The IDaaS Entra ID Migration Team will mark the status of your application as Complete once the endpoint on PwC ID (ForgeRock) is disabled (Once the application is marked as "Confirm cutover" within the migration portal, the endpoint is disabled after 4 weeks).
Transition to BAU with additional support request via SNow. Post-warranty, submit a troubleshooting ticket via SNow.
IDaaS Migration Team Steps
The following instructions are for the IDaaS Entra ID Migration Team.
After two weeks of hypercare, the IDaaSEntra ID Migration Teamwill disable the app endpoint in PwC ID.
- Log into the Migration Portal
- Click Actions for the application being migrated
- Under Current data ➡️
Statusfield, click on the drop-down icon - Select Complete
- Click Save
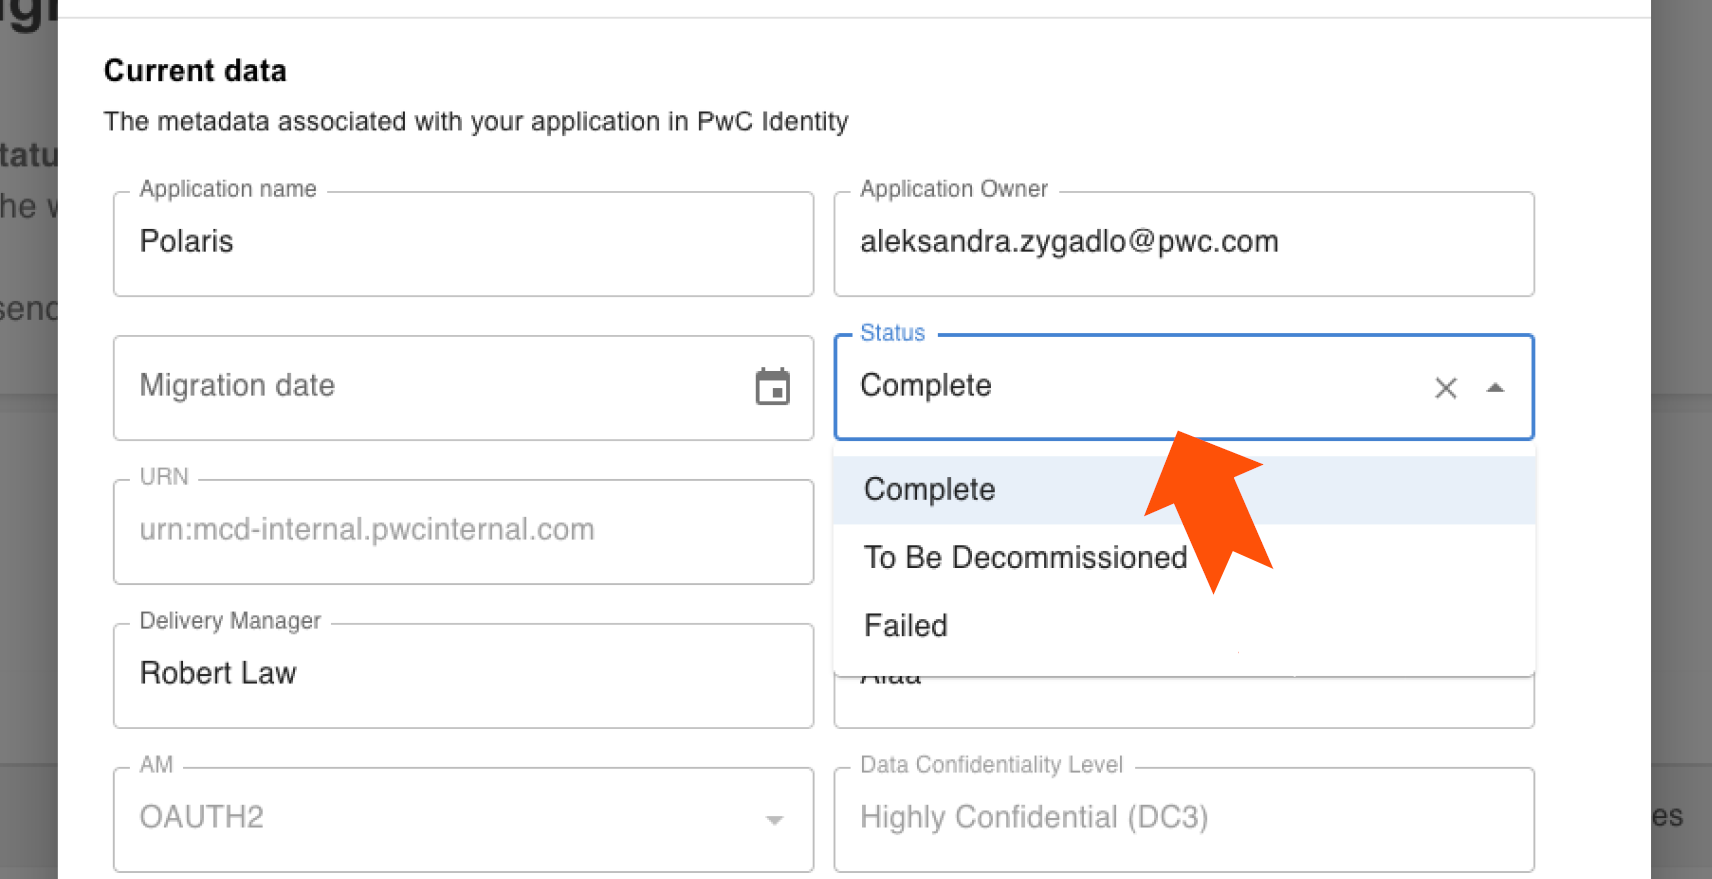
An application with a status of Complete indicates the app has successfully migrated from PwC Identity (ForgeRock) to Entra ID.
Updating Application Data
> For Migration Readiness
Data Fields
Some applications will need to update their Current Data before proceeding with migration. The table below lists each possible datapoint along with steps for updating it, if necessary.
- The Data Sources subsection provides insights on the how quickly the Portal will reflect updates to a given field.
The Migration Blocker? field indicates whether the data issue needs to be resolved (
Yes) before using the Portal to migrate your application.
| Current Data Field | How to Update | ETA for updates | Migration Blocker? |
|---|---|---|---|
| Application Name | Application Name is typically associated with CI Name in the CMDB.
| Days - Weeks | Yes |
| Primary Application Owner Secondary Application Owner Application IT Owner |
| Minutes - Hours | Yes |
| ARR # Applications Readiness Review | Missing ARR: Initiate ARR Process (additional guidance) | Minutes - Days - Months | Yes Leadership Requirement |
| ARR Status | Pre-reqs: ITIL level Access to SNow, CI should be Mapped Application Service class, ARR process at least initiated.
> ITIL level Access is required | On Demand | Yes Leadership Requirement |
| CI Number | Missing CI Number: Start TechReg Process | Minutes - Days | Yes Leadership Requirement |
| URN | auto-generated | Yes | |
| Migration Date | This field is native to the Migration Portal and can be updated by a Portal Admin, App Owner, or the IDaaS Team. | Minutes - Hours | No |
| Migration Status | Calculated value based on migration status flow and Definition of Ready prerequisites. | Varies | No |
| Territory |
| Days | No |
| Delivery Manager overseeing the delivery of the app's services/product | This field is native to the Migration Portal and can be updated by a Portal Admin. * Contact your PoD Lead to update this field. | Minutes - Hours | No |
| Integration Engineer responsible for technical integration tasks | This field is native to the Migration Portal and can be updated by a Portal Admin. * Contact your PoD Lead to update this field. | No | |
| Protocol |
| Days | No |
| Data Confidentiality Level Sensitivity level of the data handled by the app | Calculated based on Data Classification process in SNow | Days - Weeks | No |
| Internal Authentication Method used for internal user authentication | This field is native to the Migration Portal and can be updated by a Portal Admin or App Owner within the field itself. | Refer to the table below. | No |
| App delegate 1 App delegate 2 | This field is native to the Migration Portal and can be updated by a Portal Admin or App Owner. | Refer to the table below. | No |
Data Sources
This table depicts the source of record for each application data field and the field in the portal mapped to the attribute within the authoritative source.
- Portal Field - The name of the field as it appears on the portal.
- Authoritative System - The source system we reference to populate the portal field.
- Attribute Name in Authoritative System - The exact field name we extract from the authoritative system.
| # | Portal Field Name | Attribute Name in Authoritative Source | Authoritative System |
|---|---|---|---|
| 1 | Application Name | Application Name | CMDB |
| 2 | Technical Owner | Technical or Request Contact | SNOW |
| 3 | Primary Owner | Primary Owner | CMDB |
| 4 | Secondary Owner | Secondary Owner | CMDB |
| 5 | IT Owner | Application IT Owner | CMDB |
| 6 | App Delegate 1 * | n/a | Portal |
| 7 | App Delegate 2 * | n/a | Portal |
| 8 | Migration Date | n/a | Portal |
| 9 | Migration Status | n/a | Portal |
| 10 | Urn | Dependent upon application type | ForgeRock |
| 11 | Territory | Territory | CMDB |
| 12 | Delivery Manager | n/a | Core PM / CM team |
| 13 | Integration Engineer | n/a | Portal |
| 14 | Protocol | Dependent upon application type | ForgeRock |
| 15 | CI Number | ServiceNow CI, Req or sheet | SNow / CMDB |
| 16 | Listed Contact | n/a | Portal |
| 17 | Internal Authentication | int-auth level | ForgeRock |
| 18 | ARR | ARR Status | CMDB Mapped Application Service |
| 19 | Environment | Depends on source environment | ForgeRock (calculated) |
| 20 | GUM | n/a | Portal |
| 21 | LDAP | n/a | Portal |
| 22 | ARR Status | ARR Status | CMDB Mapped Application Service |
| 23 | Has Client Federation | Inventory | Entra ID Project Status |
| 24 | Active on PwC Identity | Enabled Status | ForgeRock Inventory |
| 25 | Application Owner has an admin account on Entra ID | n/a | Portal |
| 26 | Comments | n/a | Portal |
primary and secondary owner, respectively, via a one-time Portal bulk upload on Sept 25. Going forward, app owners can change the App Delegates 1 and 2 fields directly in the portal.
Bulk Updates
This process outlines how a POD leader can request bulk updates to Configuration Items (CIs) in the ServiceNow CMDB.
- This process applies to bulk updates of 10 or more CI records for a single Network Member Firm.
- CIs in each request must belong to the same CI class. For IDaaS, this is expected to be "Mapped Application Service"
- Requests outside this scope should be routed to Tadd Moore.
Instructions:
You may update the following fields for Mapped Application Service CIs:
CI Name(must be unique within CMDB)Primary OwnerSecondary OwnerEnvironmentManaging TerritoryLife Cycle Stage(e.g., "End of Life")Life Cycle Stage Status(e.g., "Retired")
Instructions
- Initiate the request in ServiceNow via the Bulk CI creation or update form.
- Download and populate a copy of the bulk upload template (link is provided within the request)
- Populate "Bulk Upload" tab – use one line for each CI – update: CI Name, CI Class, Managing Territory, Operational Status fields
- Add a header in column L for the field you'd like to be updated, e.g., "Primary Owner" and fill out specific details in this column, continue with column M, and so on if you'd like to update additional fields
- Attach this file to your request, fill out required fields and submit the request
Once submitted, monitor your email box for updates. Reach to Tadd Moore if you'd like additional support.
Additional References
| Item | Details |
|---|---|
| Key CMDB Field Definitions | MIM level definitions are among the most critical elements for enabling rapid resolution of major incidents. |
Application(s) Not Found
When viewing your list of available applications in the Portal, if you do not see all your applications, contact the designated Point of Delivery (PoD) Lead.
Provide the PoD Lead with as much information as possible to help identify the missing application(s). You may include one or more details from the following list:
- Application/CI Name
- Application URL
- Application URN
- Application CI #
The PoD Lead will assist and guide you to ensure your applications are available and support you in your successful migration efforts.
Decommissioning an Application
Decommissioning can be initiated from within the Migration Portal, and is ultimately finished via ServiceNow form.
The decommissioning process in the portal does not take into account any territory-specific requirements!
Please inform and align with local processes first before initiating the decommissioning process within the portal!
Step 1:
After you sign into the Migration Portal, browse your available applications and click Actions on the right-hand side, next to the target application you intend to decommission.
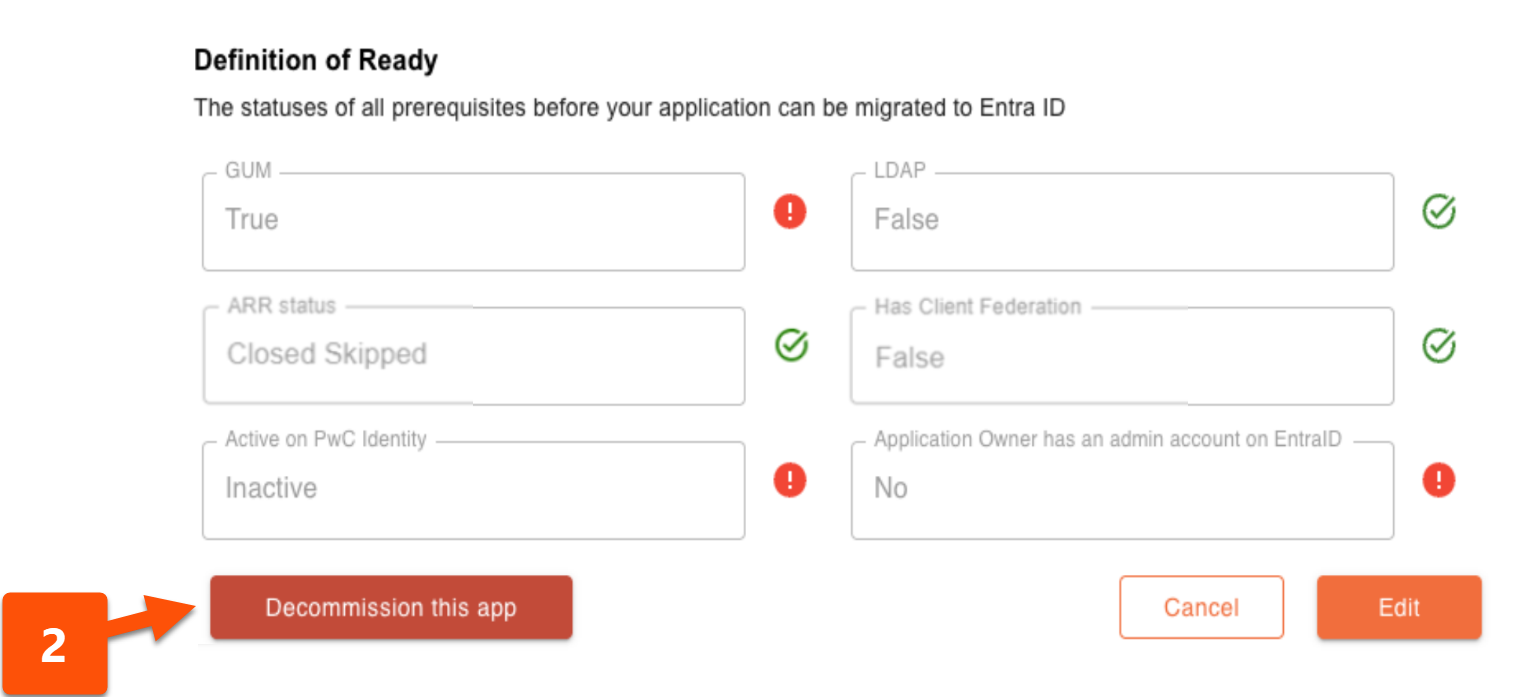
Step 2:
Scroll to the bottom of the pop-up that appears after clicking Actions. Click the button located at the bottom left.
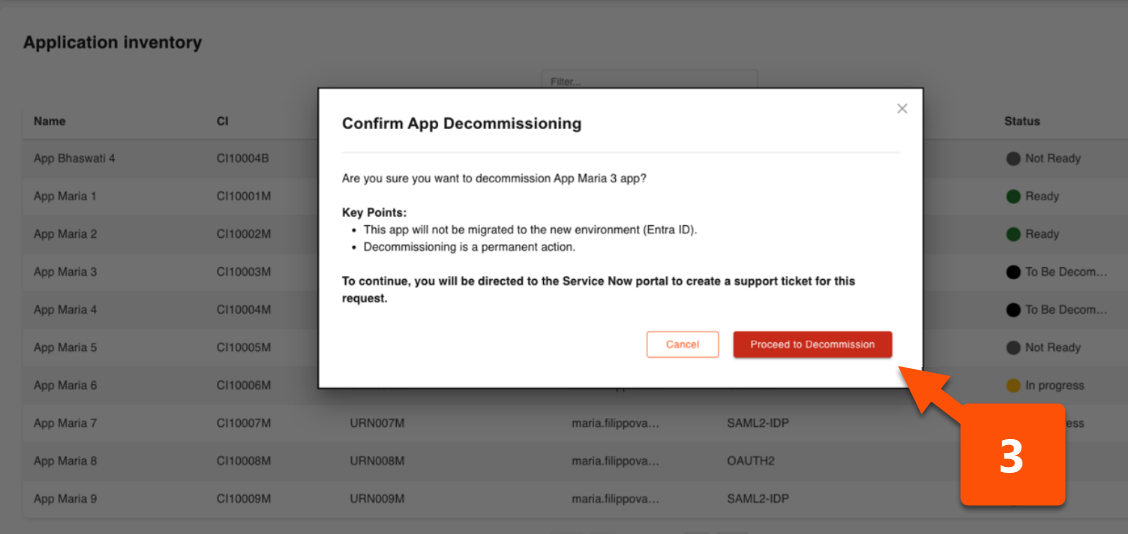
Step 3:
A new pop-up will appear. Click Proceed to Decommission to continue with this process.
Selecting the confirmation button will initiate the decommission of the application. This is a permanent action.
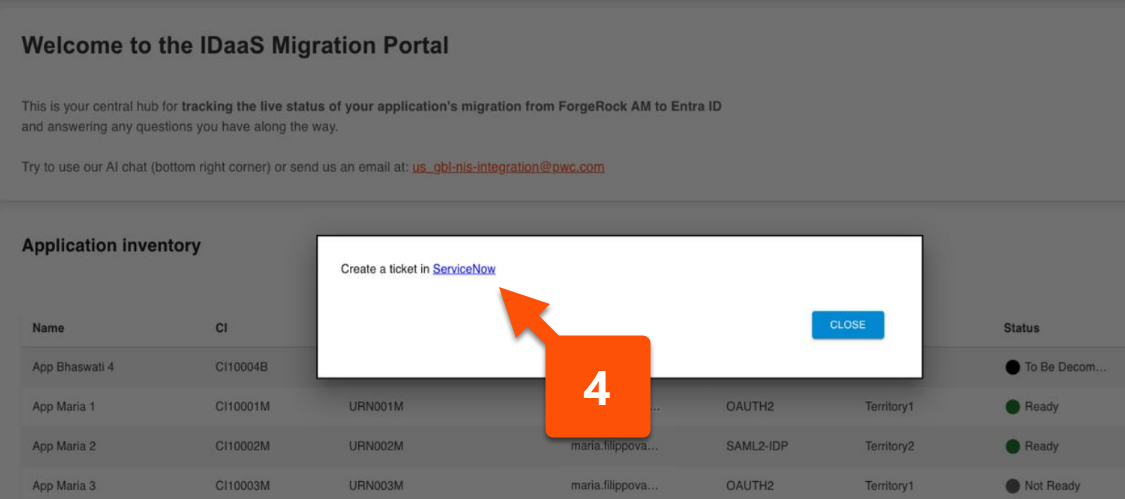
Step 4:
Another pop-up will appear with a SNow link. Click the link. You will be redirected to a SNow form, which you can complete using the decommissioning guidance contained in a separate article.
After submitting the form, the application will be scheduled for decommissioning by the IDaaS Entra ID Migration Team in PwC Identity. Close any remaining pop-ups on your screen and proceed with reviewing the next application.
Recovering a Failed App Migration
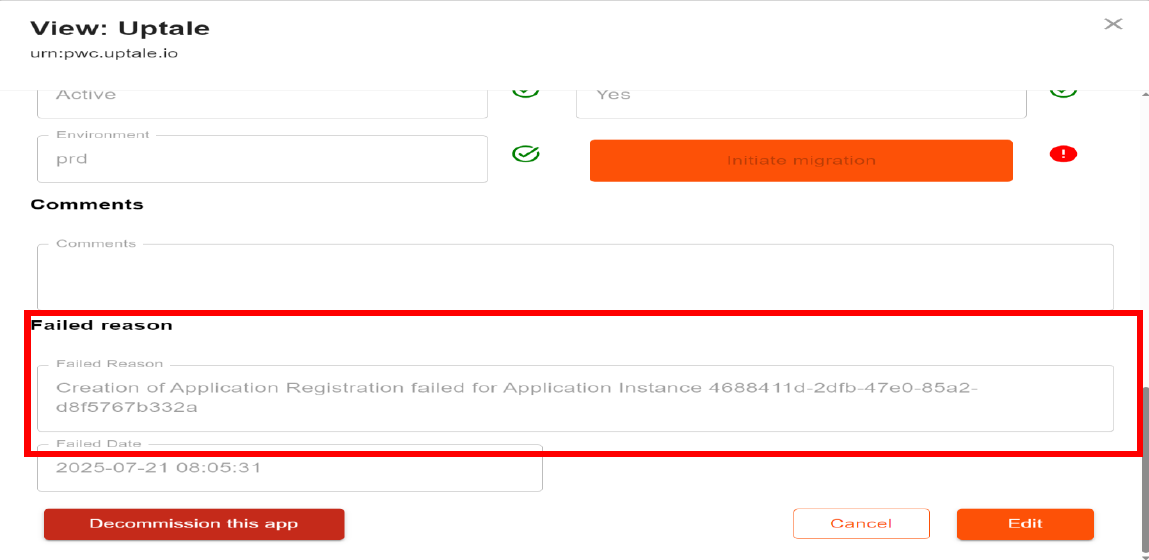
An application may sometimes fail the migration process. To understand the failure, navigate to the application record that failed and select it.
- Scroll down to the bottom of the application detail pop-up. The Failed Reason" section details the error message and when the failure occurred.
-
The IDaaS Entra ID Migration Team will have been automatically notified of the failed application. If you want more context on the issue whilst awaiting contact with theIDaaSEntra ID Migration Teamagent, leverage the following resources:
- AI: The chatbot should be able to provide basic troubleshooting steps that you can perform.
- Visit the FAQs to see if any of the answers provided there can assist.
-
If after performing initial troubleshooting, you are still unable to resolve your issue, then please contact the migration support team and provide them with the error message and details of troubleshooting steps you have performed.
- Email: us_gbl-nis-integration@pwc.com
- Teams Channel: Entra ID Integration Support
-
If the migration team cannot resolve the issue, they will escalate to the Managed Services team who will help you achieve resolution.
Support
For any issues related to the portal, please send an email to: us_gbl-nis-integration@pwc.com
To ensure your request is triaged appropriately, kindly use the following subject header naming convention:
<MF> - <Application migration/Portal> - <Issue description>
This format helps streamline issue tracking and resolution.
References
| Resource |
|---|
| LDAP Migration Guidance |
| Transitioning from GUM API |
| IDaaS Application Migration Portal |
| IDaaS Project SharePoint Community Page |
| FAQs |
| Technical Migration Guide |
Glossary
| Acronym | Definition |
|---|---|
| API | Application Programme Interface |
| CCPA | California Consumer Privacy Act |
| FIDO2 | Fast Identity Online 2 |
| GDPR | General Data Protection Regulation |
| GUM | Group and User Management |
| HIPAA | Health Insurance Portability and Accountability Act |
| IAM | Identity and Access Management |
| IDaaS | Identity as a Service |
| LDAP | Lightweight Directory Access Protocol |
| M365 | Microsoft 365 |
| REST | REpresentational State Transfer |
| SLA | Service Level Agreement |
| SNow | ServiceNow |
| SOC2 | System and Organisation Controls 2 |
| SSO | Single Sign On |
| WHfB | Windows Hello for Business |