ServiceNow Migration Request
> Submission Guide for Entra ID Integrations & Migrations
Applications dependent on GUM (API), LDAP etc. are considered complex applications and require dedicated support/consultation with our application migration team. IDaaS project encourages the application teams to request migration through SNow form.
If the application does not rely on any of the dependencies mentioned above, please begin using the Migration Portal immediately to proceed with migrating your applications.
This article details the process for using ServiceNow to request an application integration / migration from ForgeRock OpenAM to Microsoft Entra ID. Once the SNow form is submitted, the integration or migration will be facilitated by the Identity as a Service (IDaaS) and Entra ID Integration & Migration teams.
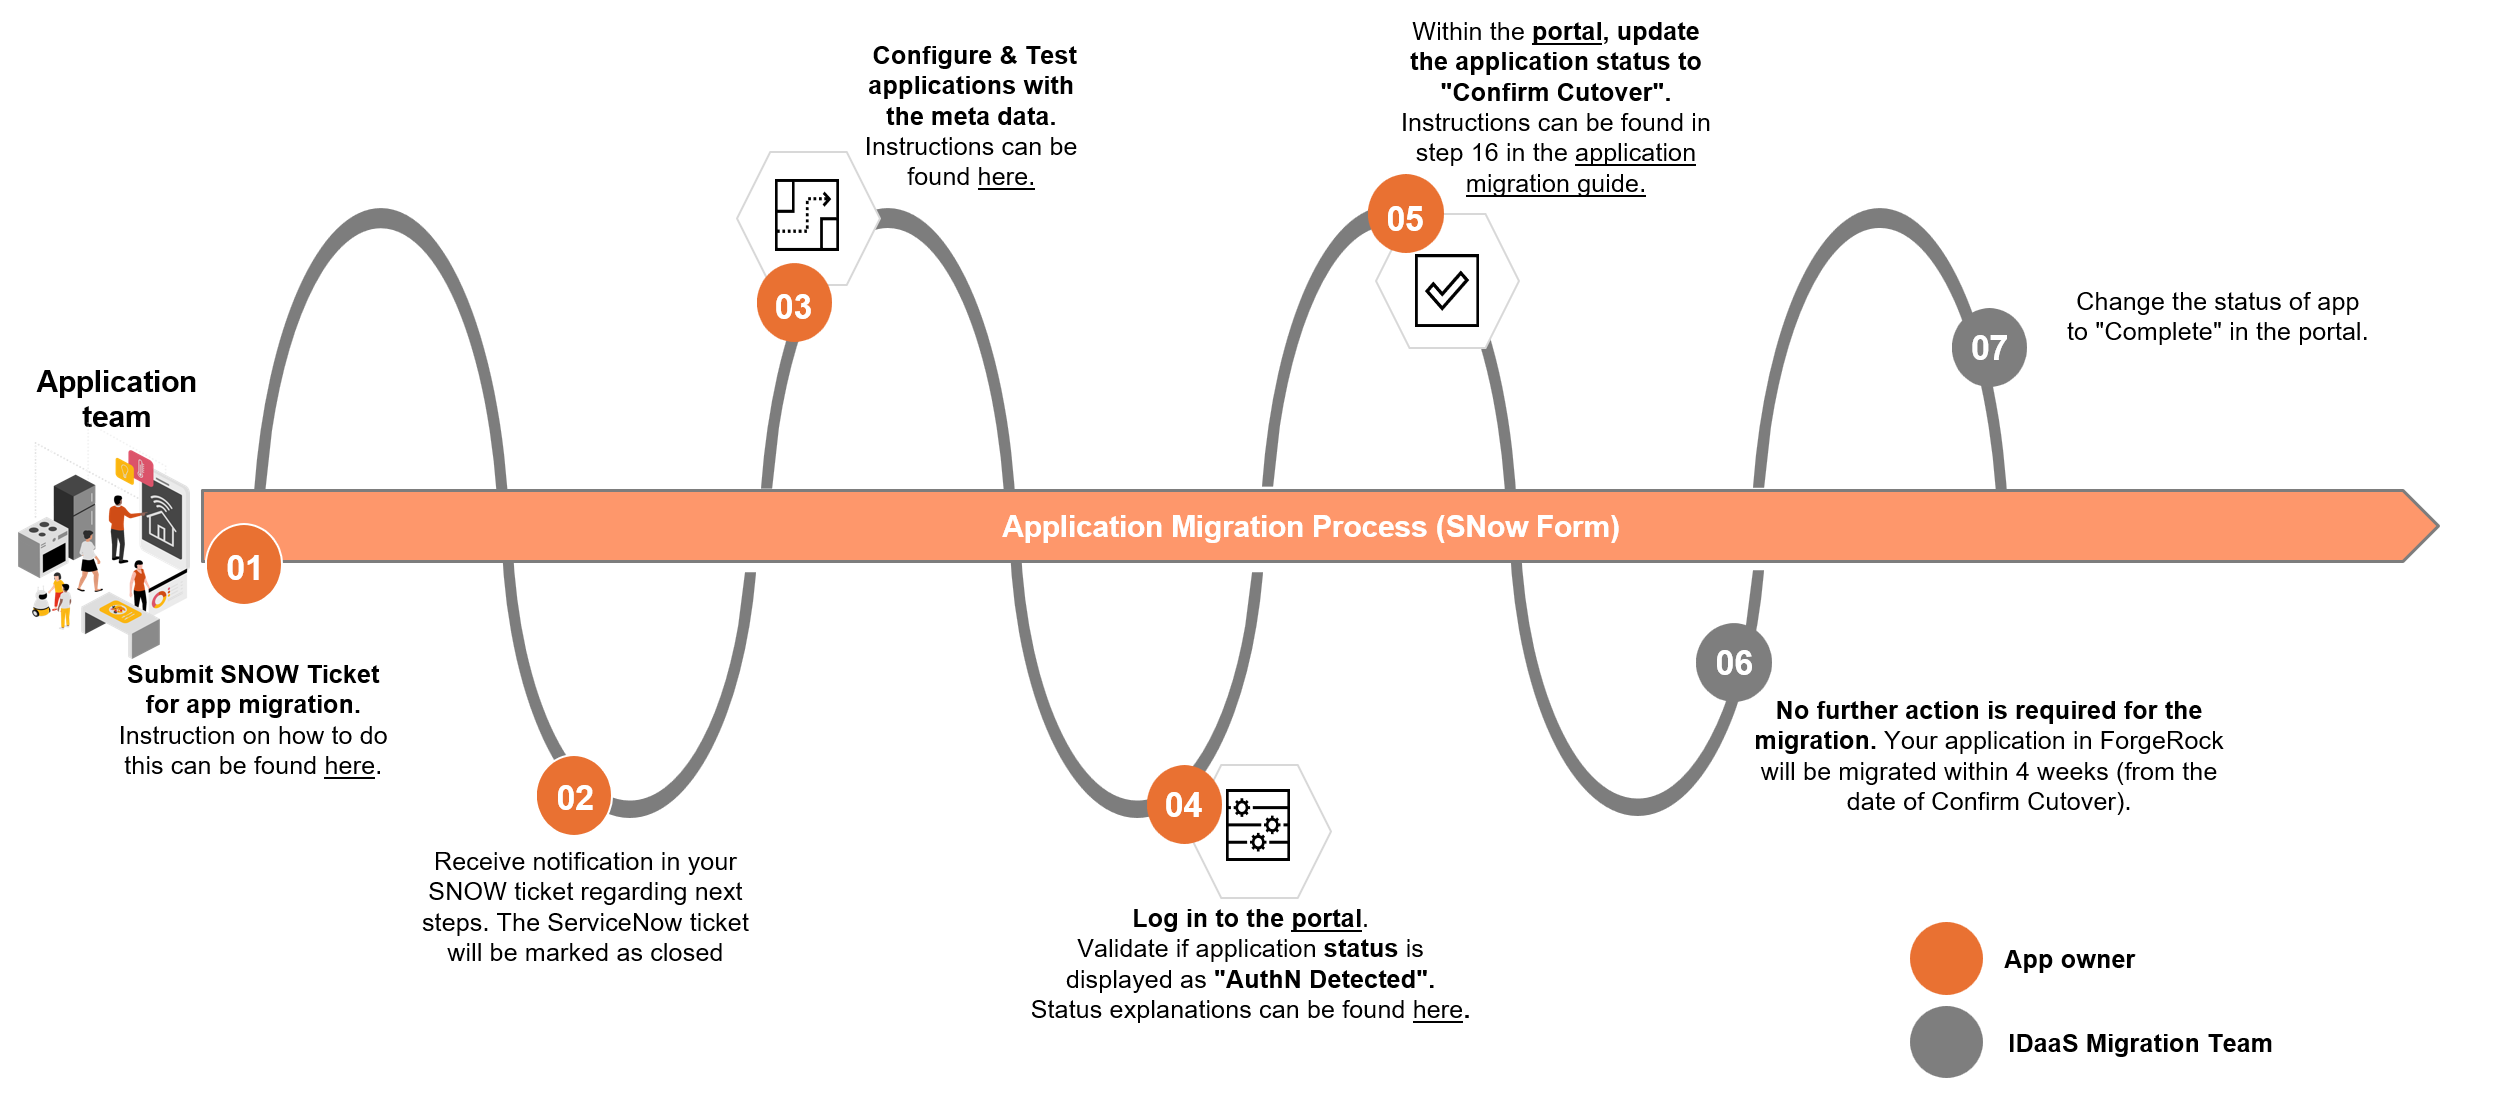
Application Migration Journey
The below process is applicable when you submit a SNow ticket for the apps meeting the following criteria:
- Internal applications which are NOT dependent on LDAP or GUM.
- External applications which are NOT dependent on LDAP / GUM / client federation.
For complex apps, the SNow form migration process remains the same as stated in the remainder of this article.
ServiceNow (SNow) - Migration Portal
New Integrations and Migration Requests
-
Access the Application Integration Service form in SNow.
-
In the Identity Provider field, select
Entra IDfrom the drop-down menu.

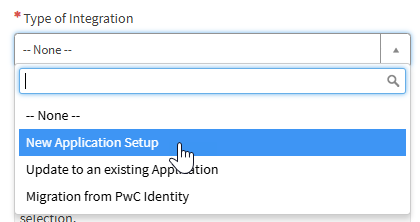
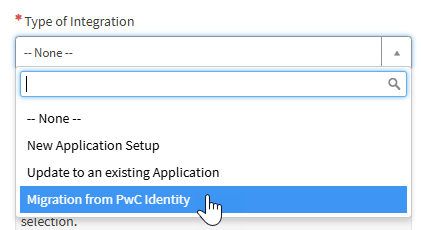
- For the Type of Integration field:
Select New Application Setup to request the integration of a new app that is currently not authenticating against any Identity Provider.
Select Migration from PwC Identity to request the migration of an application currently authenticating against PwC ID.
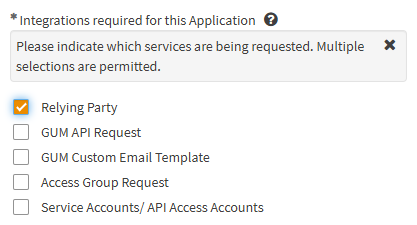
- In the Integrations required for this Application field, check the
Relying Partybox.
- In the Application Usage field, select the appropriate option for your application (e.g.,
None,TerritoryorGlobal).

- In the Number of users field, enter the approximate number of users accessing your application.

- If you've chosen
New Application Setup(Step 3), you'll be asked: Is this a proof of concept?

- If the app you need to onboard is a Proof of Concept (PoC) and has a Configuration Item (CI), select No and simply indicate in the Comments field illustrated below that
this request is a PoC and should be onboarded to the Dev tenant. - If you do not have a CI, please obtain one before continuing.
- In the Comments field, enter remarks if needed. Because this is a required field, if you do not wish to enter remarks, enter
N/Ato satisfy the requirement.

- In the Application Name field, select the name of your application from the drop-down menu.

If your application is not listed in the menu, use this link to complete the technology registration for the application.
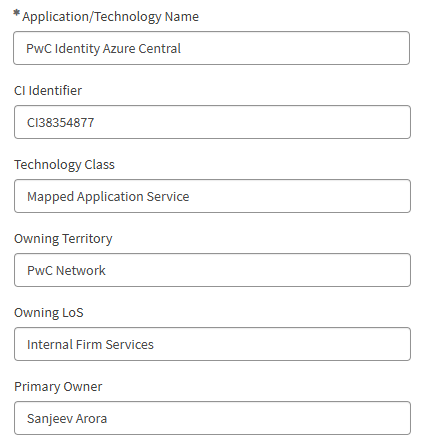
- The following fields will auto-populate based on the option you selected in the Application Name field. This information is retrieved from the application Configuration Item (CI) record in SNow.
- In the Go-Live Date field, enter the preferred production go-live date in the
YYYY-MM-DDformat or by using the calendar tool:
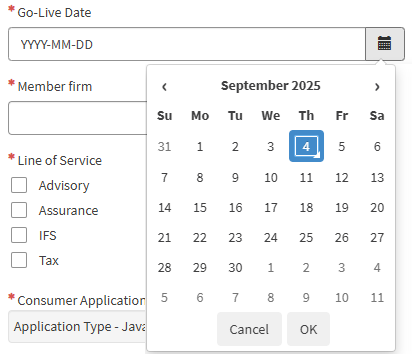
A minimum of four business days turnaround time is required. If you do not have a specific go-live date, you can insert any future date more than one week ahead.
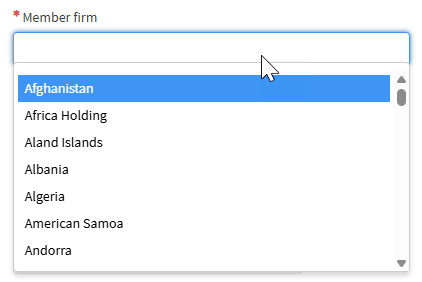
- In the Member Firm field, enter the corresponding member firm (based on the managed territory for your application's CI) or selecting it using the scroll bar.
- In the Line of Service field, select the appropriate Line of Service (LoS). If your application is used by more than one LoS, check more than one box.

- In the Consumer Application Platform field, enter the consumer application platform. Provide the programming language or framework that your application has been developed in.

For third-party vendor applications, enter Vendor;
for Software as a Service (SaaS) applications, enter SaaS.
- In the External Project Contacts field, enter the email addresses of your external project contacts (e.g., support team members or vendor point of contact. If you do not have this information, enter N/A.

- In the Business Purpose of Application field, enter a high-level description such as the main functions of the application, its target users, and how it supports business objectives.

- In the Business Contact Detail fields, enter the name for the application's point of contact. This entry will auto-populate the Business Contact GUID and Business Contact Email fields.

- In the Technical Contact Detail fields, enter the name for the application's technical point of contact. This entry will auto-populate the Technical Contact GUID and Technical Contact Email fields.

- For the IAM service notification subscription field, the technical contact selected will be subscribed to the Entra ID service notification subscription by default. They can be removed by checking the opt out box.
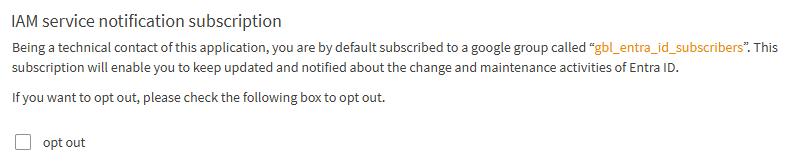
It is highly recommended that the technical contact remain a subscriber.
- In the Relying Party Request
>Application Environment field, select the application environment that you want to migrate to Entra ID.

Only one environment can be requested at a time.
- After you have selected the applicable environment in the above step, the Relying Party Name and Data Classification for Internal Users fields will auto-populate based on the environment and application name you selected:

The Relying Party Name will be in the syntax territory-appname-appenvironment (ex: us-sightline-stage).
- In the Authorization rules
>Authorization zone field, check the application's authorization zone box based on the type of users that access it. More than one box can be checked.

- If prompted for a Relying Party Enabled? field (migrating apps), select Yes from the drop-down menu to indicate the application is deployed in an enabled state.

- In the Client_Id or EntityId or URN field, enter the application's unique name or identifier.
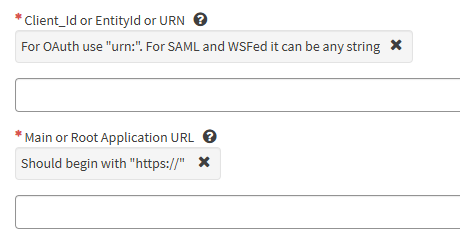
- For OAuth applications, the identifier should be
urn: - For SAML and WS-Fed, the identifier can be any string.
In the Main or Root Application URL field, enter the application main URL (it should begin with https://).
- For Web Apps/SPA with service provider-initiated sign-in only, provide the application login URL.
Multiple instances migration (Optional)
If you need to migrate multiple instances of same application (same CI) from PwC ID to Entra ID, you can do so by following the steps listed below.
-
Provide any
Client_Id/Entityid/URNfor your application in the field depicted in the previous step. -
Open this App Migration Template for Multiple URNs link, save a copy, include the name of your application in the title, fill out the spreadsheet based on your requirements and attach it to the SNow ticket.
Sample configurations:
OAuth apps

SAML apps

WSFed apps

While this option lets you migrate multiple PwC ID integrations into Entra using one ticket, this can be done only when all the PwC ID integrations fall under the same application and CI. If the PwC ID integrations that you wish to migrate do not fall under the same application or CI, you will need to create one migration ticket for every PwC ID integration. (This does not apply for a single application with one URN.)
- In the Protocol field, select the application's authentication protocol from the drop-down menu.

Depending on the protocol selected, the ServiceNow form will populate a different set of questions to finish up the request. This article breaks down the protocol-specific fields / questions for each, including those for applications using:
- In the Entra ID Provider environment field, select the environment corresponding to the app environment that you are integrating or migrating. For example:
- Production environment: select
Prodas the Entra ID Provider environment. - Non-production environment: for a PoC, UAT, QA, Test, Dev, or Stage, select
Stageas the Entra ID Provider environment.

The above is only a recommendation - mapping the app environment being integrated or migrated to the corresponding Entra ID environment. If your app requirements demand an integration to the production tenant, regardless of the app environment, you may select Prod as the desired Entra ID environment.
OAuth2/OpenID Applications
The guidance table below applies if OAuth2/OpenId was selected as the Protocol in Step 25.
| Form Field | Guidance |
|---|---|
| Any specific grant type needed? | Enter the OAuth grant type your application is using. Note: In Entra ID, all grants except 'Implicit' are enabled by default. |
| Authentication comments | Enter any relevant authentication remarks (e.g., custom claims that are not displayed on the menu). If you have provisioned a group in Entra ID for app access restrictions, enter the name of the group here. Please refer to the Entra ID Access Group Restrictions for details. |
| Any separate settings for refresh token? | Provide any relevant details |
| Callback / Redirect URI | Should begin with https://. Maximum character limit is 32,760.Note: For web apps, the callback / redirect URI must be provided as shared by the development / vendor team. Do not make any changes to the URI/URLs. |
| Authentication level for Internal Users | Select the appropriate level from the drop-down menu. |
| Authentication level for External Users | If you checked the External box in the Authorization Zone question, the Authentication level for External Users field will auto-populate based on the application's confidentiality level as per the CI record of the application. |
| NameID / Claim | Select the appropriate options from the drop-down menus. For OAuth apps, you may select any random value for Name ID, since it is not used by OAuth protocol. For Claims, you may select multiple claim values. |
| Post-Logout Redirect URI | This field is optional |
Click to complete your request.
If a red box displays around one of the fields on the form, this means the field(s) must be completed before you can submit your request.
You will receive an email from PwC Support and the assigned Entra ID Migration team representative.
CommunicationAll communications are handled within the SNow ticket.
SAML Applications
The guidance table below applies if SAML2.0 was selected as the Protocol in Step 25.
| Form Field | Guidance |
|---|---|
| Assertion Consumer Service URL/Sign-In Endpoint URL | Enter the URL shared by your development / vendor teams. |
| Authentication comments | Enter any relevant authentication remarks (e.g., custom claims that are not displayed on the menu). If you have provisioned a group in Entra ID for app access restrictions, enter the name of the group here. Please refer to the Entra ID Access Group Restrictions for details. |
| SAML2 Sign Logout Requests? | select No from the drop-down menu. |
| Sign-Out Endpoint URL | Enter the URL (if available). |
| Signed Assertion or Response | Select the applicable option from the drop-down menu. |
| Authentication level for Internal Users | Select the appropriate level from the drop-down menu. |
| Authentication level for External Users | If you checked the External box in the Authorization Zone question, the Authentication level for External Users field will auto-populate based on the application's confidentiality level as per the CI record of the application. |
| NameID / Claim | Select the appropriate options from the drop-down menus. You may select multiple claim values. Note: If the desired claims are not displayed in the menu, insert this information in the Authentication Comments field mentioned above. |
| Custom Claim Transformation | See below |
This is the section where you request any custom claims to be mapped to an existing set of attributes.
-
In the
Source Claim Typefield, select the option from the drop-down menu that represents the attribute that your custom claim's value should be sourced from. -
Next, in the
Destination(MY App) Claim Type field, enter the name of your custom claim (e.g., UserTitle) and click Save to add it to the Custom Claim Transformation section.
Repeat this process as often as needed to add multiple custom claims.
Click to complete your request.
If a red box displays around one of the fields on the form, this means the field(s) must be completed before you can submit your request.
You will receive an email from PwC Support and the assigned Entra ID Migration team representative.
CommunicationAll communications are handled within the SNow ticket.
WS-Fed
The guidance table below applies if WS-Federation was selected as the Protocol in Step 25.
| Form Field | Guidance |
|---|---|
| WReply and sign-in endpoints | enter the URL provided by your developer / vendor teams. |
| Sign-Out Endpoint URL | Enter if available. |
| Authentication comments | Enter any relevant authentication remarks (e.g., custom claims that are not displayed on the menu). |
| Authentication level for Internal Users | Select the appropriate level from the drop-down menu. |
| Authentication level for External Users | If you checked the External box in the Authorization Zone question, the Authentication level for External Users field will auto-populate based on the application's confidentiality level as per the CI record of the application. |
| NameID / Claim | In the NameID field and Claim fields, select the appropriate options from the drop-down menus. You may select multiple claim values. Note: If the desired claims are not displayed in the menu, insert this information in the Authentication Comments field mentioned above. |
| Custom Claim Transformation | See below |
This is the section where you request any custom claims to be mapped to an existing set of attributes.
-
In the
Source Claim Typefield, select the option from the drop-down menu that represents the attribute that your custom claim's value should be sourced from. -
Next, in the
Destination(MY App) Claim Type field, enter the name of your custom claim (e.g., UserTitle) and click Save to add it to the Custom Claim Transformation section.
Repeat this process as often as needed to add multiple custom claims.
Click to complete your request.
If a red box displays around one of the fields on the form, this means the field(s) must be completed before you can submit your request.
You will receive an email from PwC Support and the assigned Entra ID Migration team representative.
CommunicationAll communications are handled within the SNow ticket.