Access Group Creation
> Entra ID Access Group Restrictions
This activity is part of a group of prerequisites for migrating to Entra ID.
Migrating existing GUM Groups? Read this guidance for available options, one of which may re-direct you to this article.
Applications typically have a large number of users that require access, and these users frequently change. The task of adding, removing and managing users' access to applications can become tedious and potentially untenable.
To address this issue, we recommend creating groups containing all of the users from your team or territory who will need to access a specific application. You can manage the group by adding users to the group or removing users that no longer require access.
Group and application owners will share the collective responsibility of ensuring these groups remain current and are added to relevant applications.
Important considerations
Group owners and application owners do not have to be the same individuals. This is because the set of users who are meant to have access or membership to an application or group can be different. While app owners will have the privilege to manage application configuration to a certain extent, group owners will have the right to manage the membership and ownership of a particular group.
So, if the group created to restrict access to the app is specific to a single or group of apps managed by a team, the apps and groups can have the same owners. Otherwise, the role of group owner can be delegated, as needed.
This article only pertains to the creation of new groups in Entra ID. For guidance on managing existing Group and User Management (GUM) groups, please refer to this article here.
Group types
Microsoft Entra ID supports two types of membership-based groups:
- Assigned
- Dynamic
Assigned Groups
Assigned groups are groups where the users must be manually added or removed by the group owner. This can be done from the Azure Portal, PowerShell or Command Line Interface (CLI).
Dynamic Groups
Dynamic groups can be configured with a rule that will automatically evaluate and manage the membership of the group based on user attributes. For example, a dynamic group for a Sales team can be created and configured so that any user with their department attribute set to Sales will be automatically added to the group. Changing this attribute value will automatically remove the user from the group.
While all assigned groups can and should be created in the cloud or in Entra, dynamic groups must always be created in SailPoint, synced to One AD and then synced to Entra. This is because the number of dynamic groups that can be created in Entra is limited.
When migrating applications from PwC ID to Entra ID, any groups that the app may be using may not be on Entra. Groups with static membership are created and managed in Group and User Management (GUM); dynamic groups, which automatically update their membership based on rules provided, are created and managed in SailPoint. These groups should ideally be synced to Entra; if that cannot be done, create the group on Entra.
Creating a dynamic group
To create a dynamic group, please raise a ServiceNow (SNow) ticket using this form.
Required fields
Please complete the following fields as advised below:
| SNow Form Field | Value/Instructions |
|---|---|
| Active Directory Request Type | One AD |
| One AD Request Type | Security Group |
| Group Type | Dynamic Group |
| Request Type | Create group |
| Primary Owner | Enter the name, email address or Global User ID (GUID) of the user who will be responsible for managing the membership of the group |
| Secondary Owner(s) | Enter any backup owners that you would like to add as owners of the group |
| Global/Territorial | For any global group, select Global and if this is for a particular territory, select Territorial |
| Territory | If you selected Territorial, please specify which territory the group is for (ex: JP - Japan) |
| Group Name | Please enter a group name (e.g., All_Japan_Users) |
| Group Description | Please provide a working description of the group (e.g., All users from Japan) |
| Sync group to Azure AD? | Yes |
| Membership Assignment Rules | Enter text describing the rule to be created for automatic group management(e.g., All users who have the country code as Japan should be automatically added to the group) |
Support contact
If you need support, please send an email to the Global IAM Tickets team: gbl_nis-iam-tickets@pwc.com.
Verify group creation
Log into the respective Entra ID tenant with your admin account and confirm the group has synced to the cloud.
Please review the Entra ID New Admin(z) Account guide to confirm your admin account access. If you do not, please follow the instructions in the guide to raise a ticket in SNow.
After logging in to the Entra Portal, please follow the steps listed below.
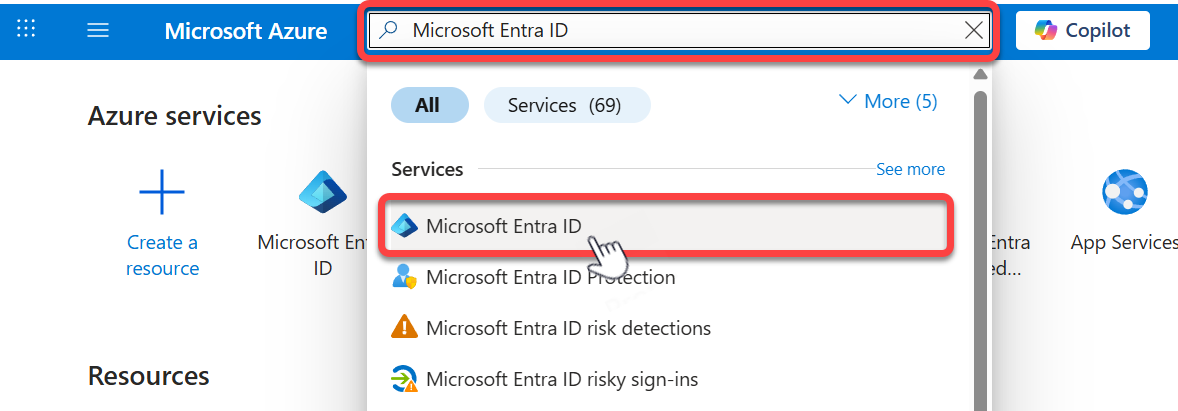
Step 1: Navigate to Microsoft Entra ID
Click the search bar at the top of the page, search for Microsoft Entra ID, and click on it when displayed:
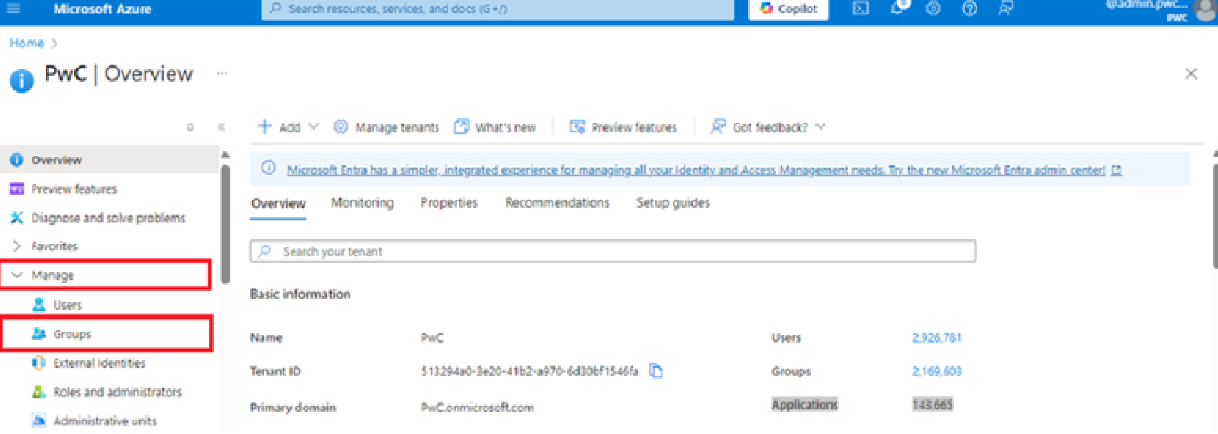
Step 2: Navigate to Groups
Expand Manage and click Groups.
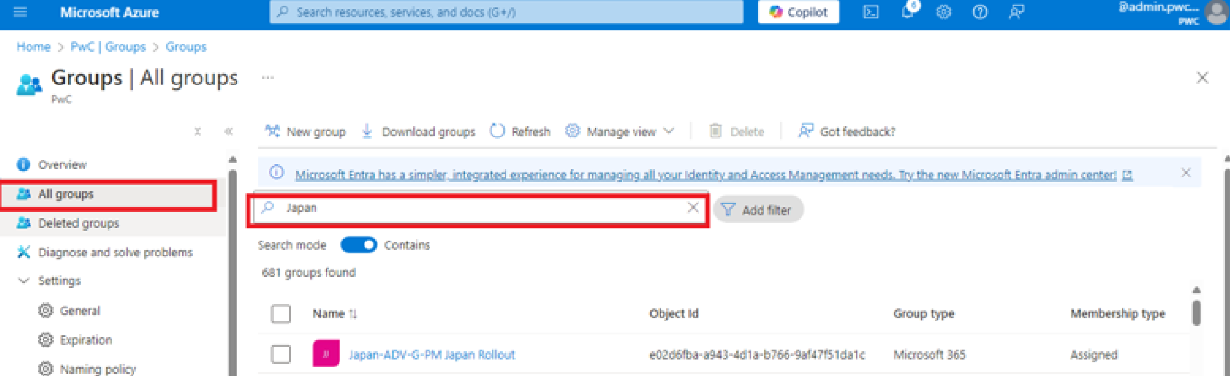
Step 3: Search for your group
Click All groups, then click on the search bar and enter the group name to confirm the group name is present in the cloud:
Step 4: Verify group membership
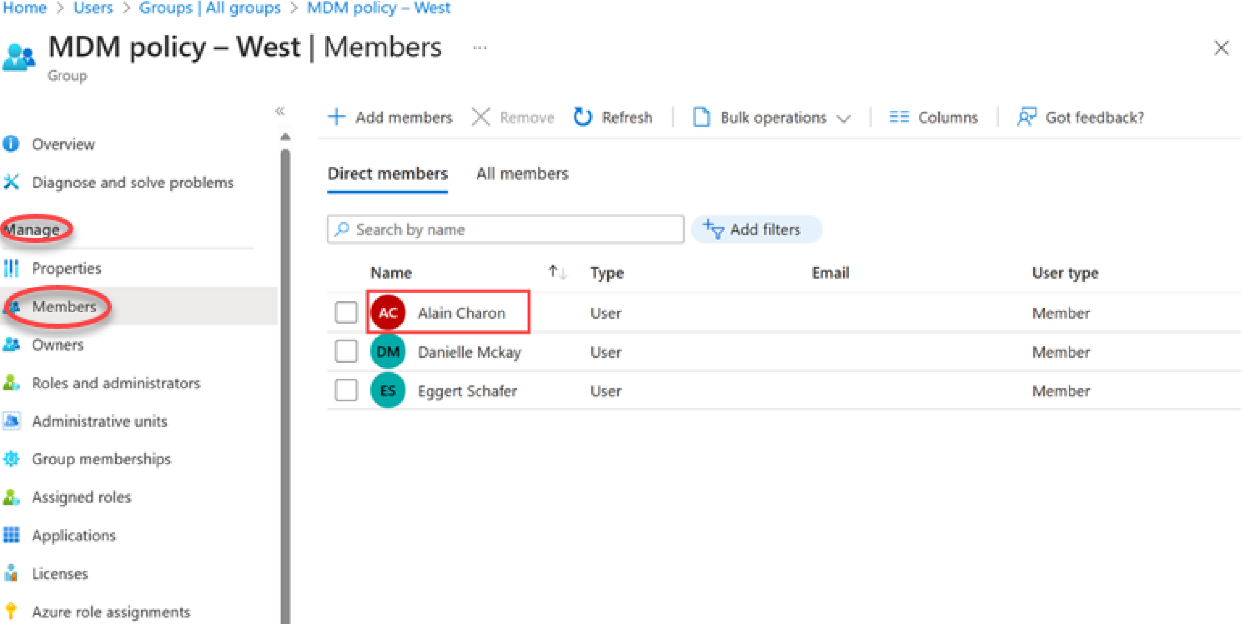
After locating your group, click on it to open it. Expand Manage and select Members to confirm that all the users that should be a member of the group are listed. Use the search bar if needed.
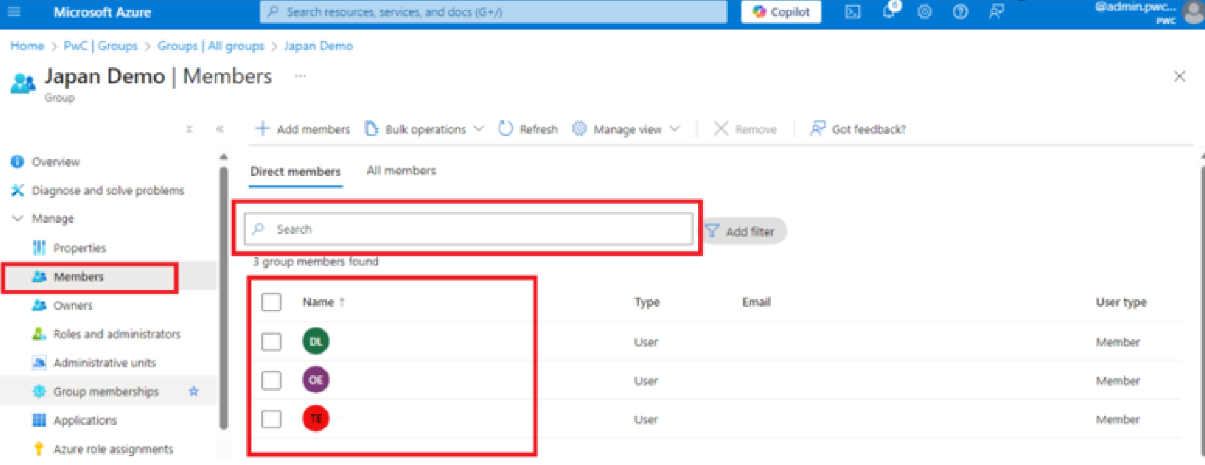
Please note that since this is a dynamic group that is synced from Sailpoint and One AD, you will not be able to add members to the group from the Azure or Entra portal.
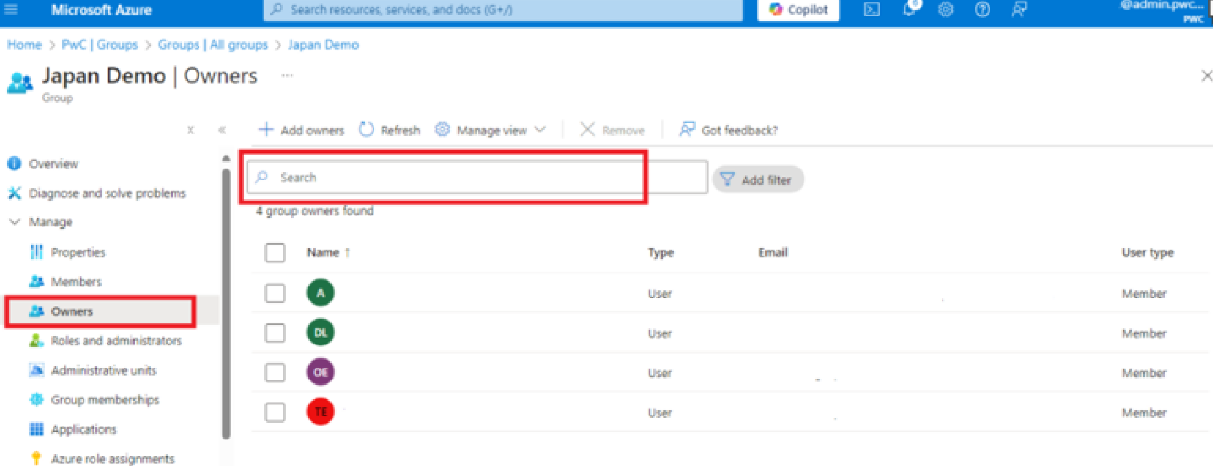
Step 5: Verify group owners
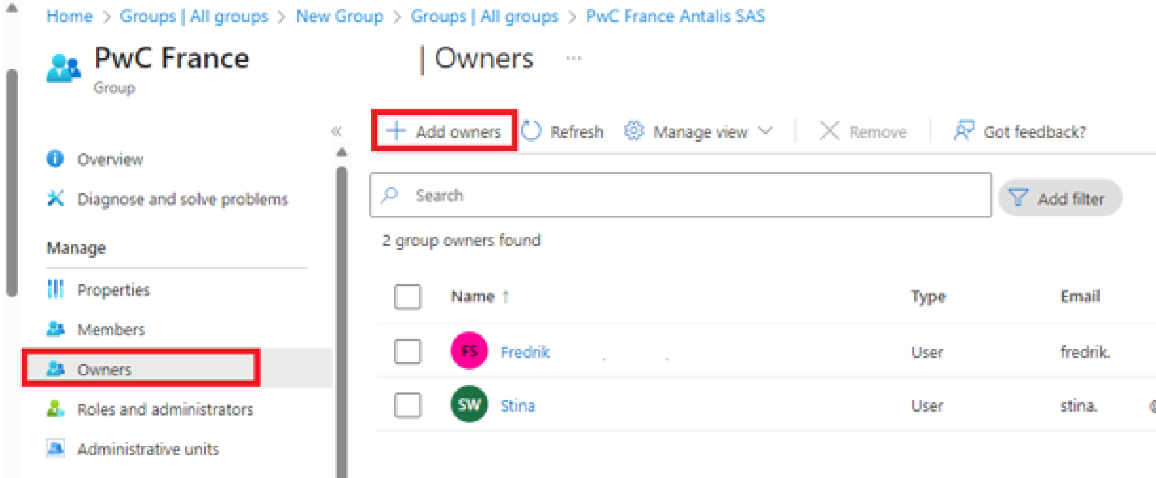
Click Owners to verify that the correct people are added as owners of the group. These individuals will be responsible for ensuring that changes to the group or its membership are processed in a timely manner.
Step 6: Switch tenant if needed
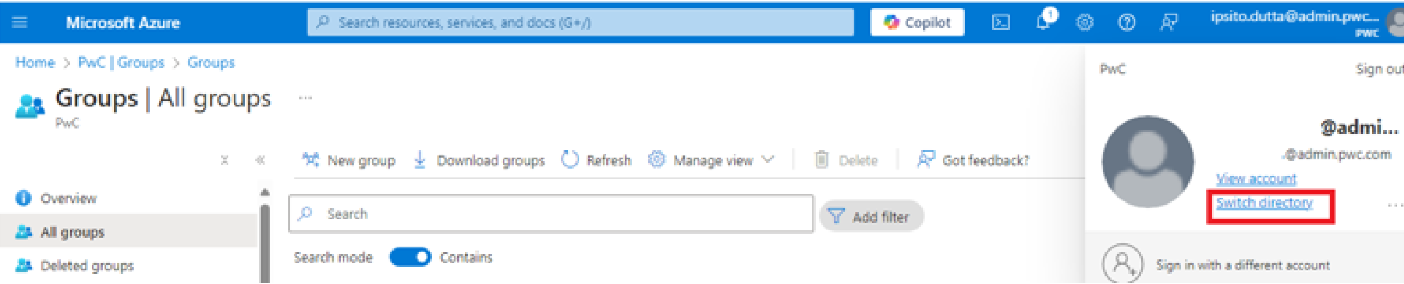
If you are unable to find the group you are looking for, make sure you are logged into the right tenant. By default, when you log in to the Entra Portal using an admin account, you will log in to the Entra Prod tenant. If you created a dynamic group for the stage tenant and you are logged into the prod tenant, please follow the steps listed below to switch the directory.
- Click your username located in the upper right corner of the screen.

- Click Switch directory.
- Select Switch next to the directory that you want to be redirected to.
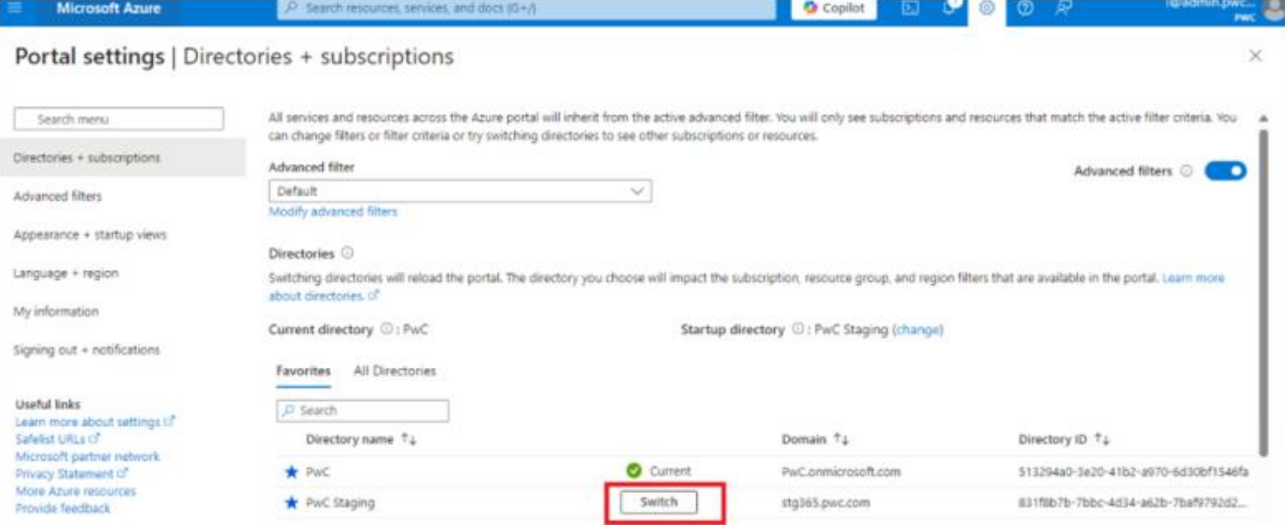
After you have switched to the new directory, please return to Steps 1-5 to locate and manage the relevant group.
Creating & managing an assigned group without an admin account
If you do not have an admin account provisioned for yourself, or if one of your non-admin users needs to create an assigned group, please follow the steps listed below.
Step 1: Determine login account
Determine the account that you will log in to the Azure or Entra portal with. The account that you choose will decide the Entra tenant that your group will be created in, as described in the following table.
| Username format | Tenant where the group will be created |
|---|---|
john.doe@admin.PwC.com | Stage or Production |
john.doe@PwC.com | Production |
john.doe@testenv.PwC.com | Stage |
john.doe@devenv.PwC.com | Dev |
john.doe@dev365.PwC.com | Dev |
Step 2: Check organization tenant
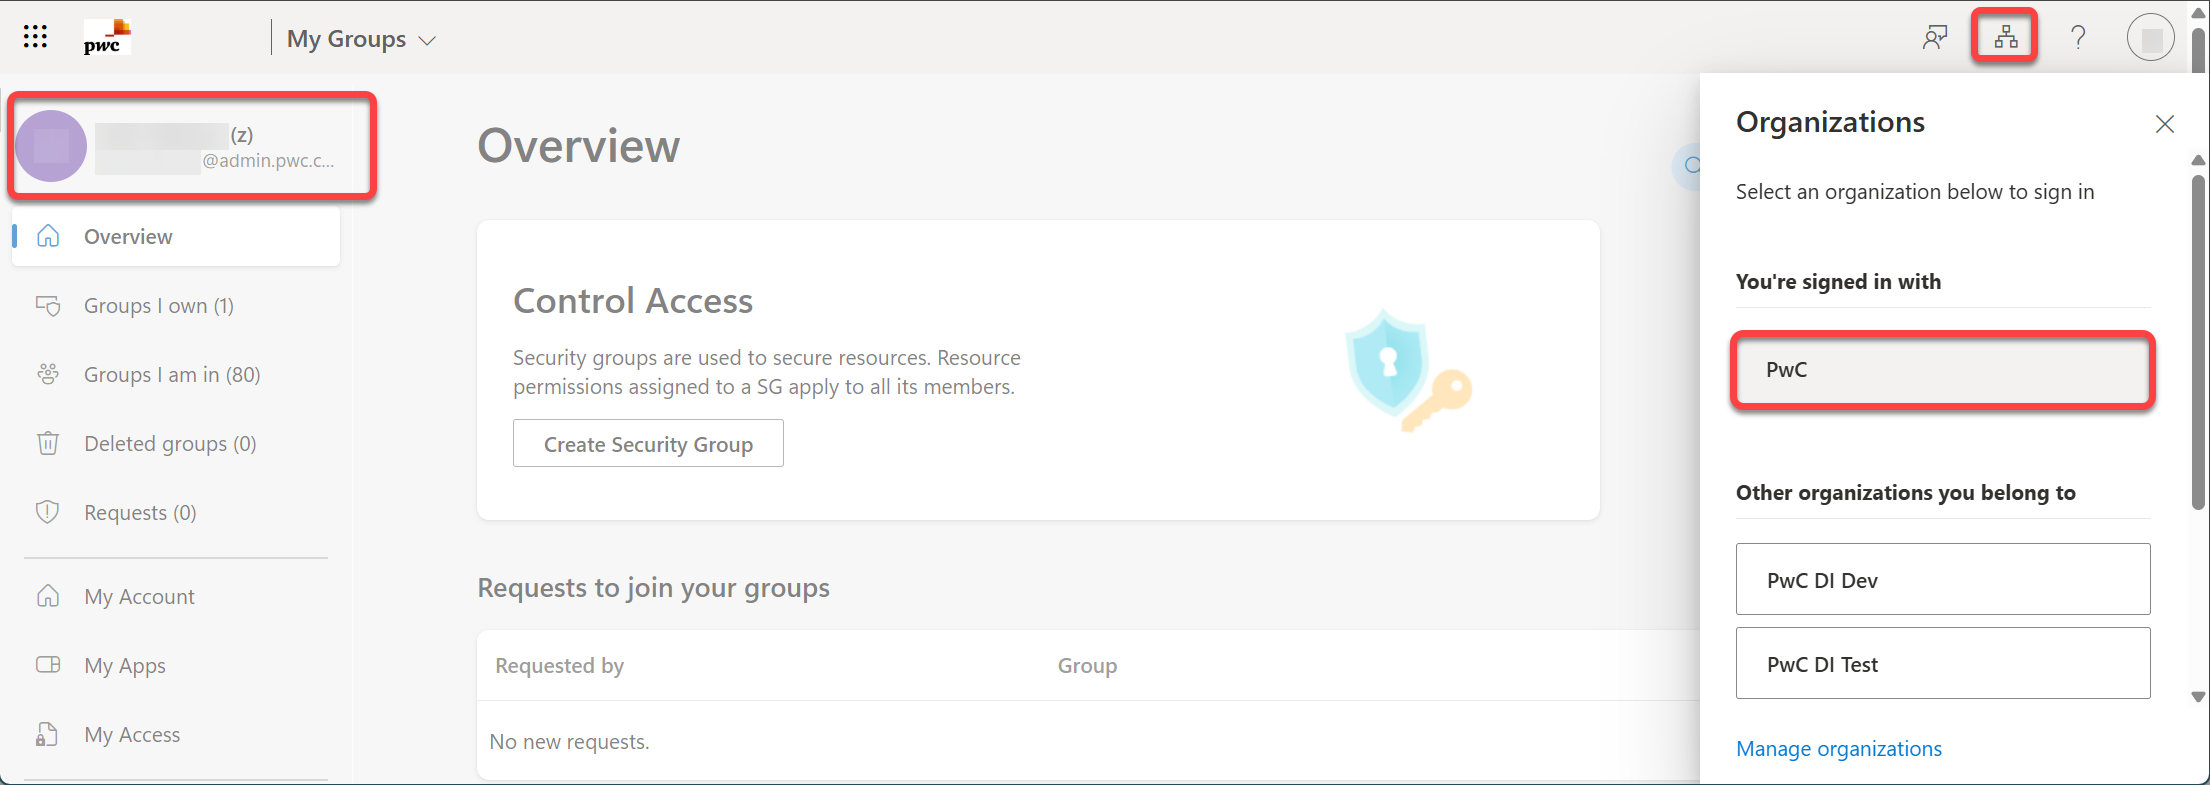
If using your @admin.pwc.com account to log into the My Groups Portal, please click the Organisations icon ( ) to ensure you are logged into the desired tenant. If you are not logged in to the correct tenant, click the desired tenant.
Step 3: Access My Groups portal
Go to https://myaccount.microsoft.com/groups and login with your account.
Step 4: Create new group
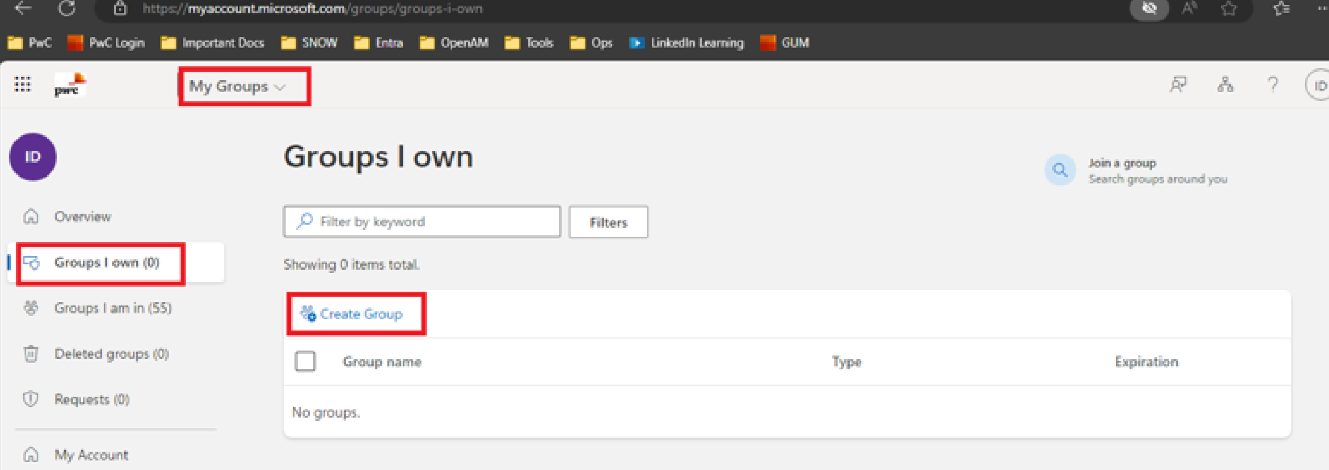
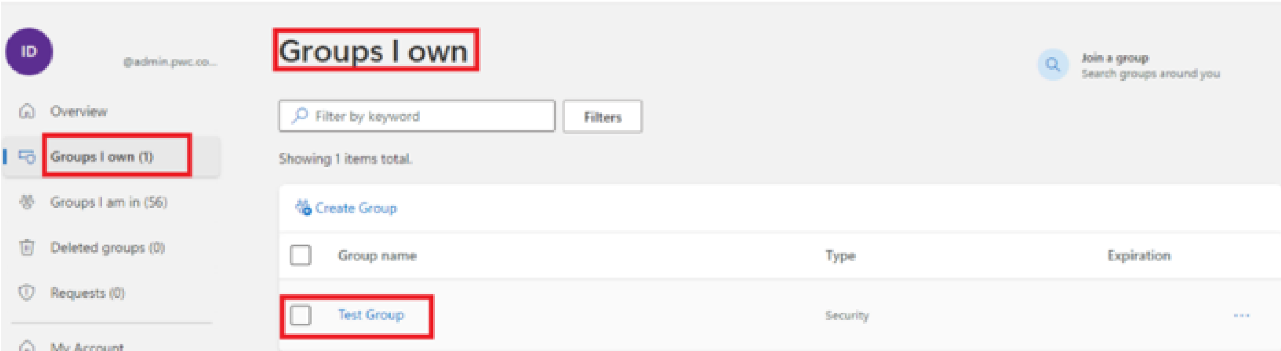
On the My Groups page, click Groups I own, and select Create Group.
Step 5: Configure group settings
The New Security group box will display. Enter the information in the required and optional fields.
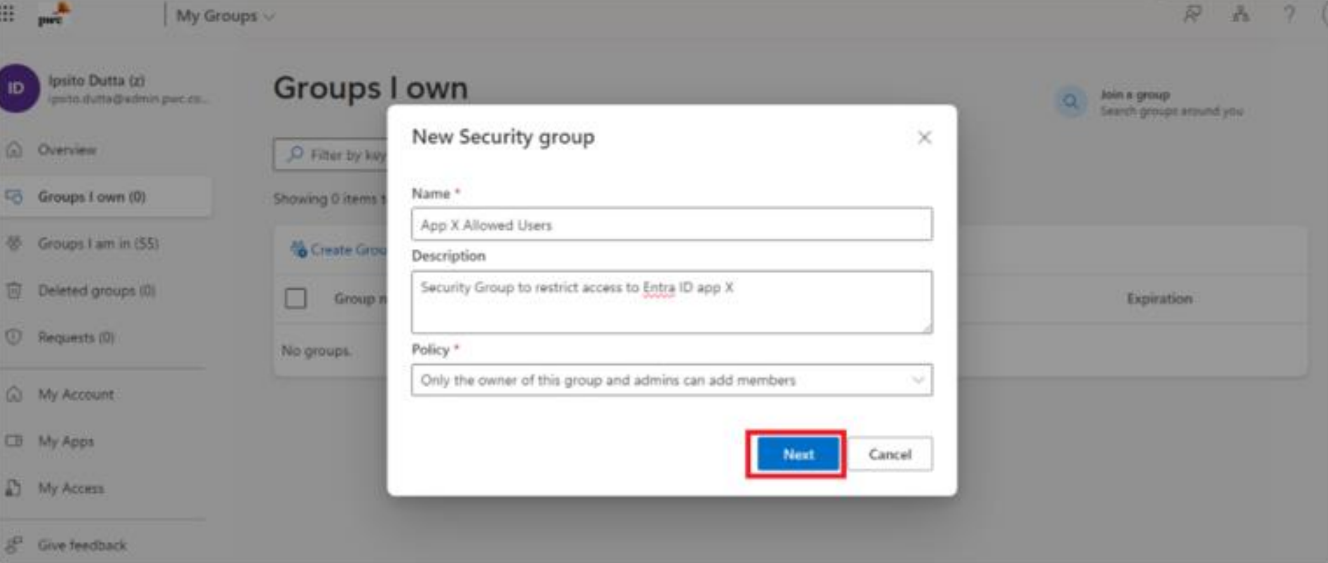
- Name: Enter a name for the group, something intuitive and easy to remember and record for ongoing maintenance purposes.
- Description (optional): Add a brief description of your group, if desired.
- Policy: Choose from one of three options:
- allow everyone to join the group
- require owner approval, or
- only allow the owner of the group to add members.
Step 6: Finalize group creation
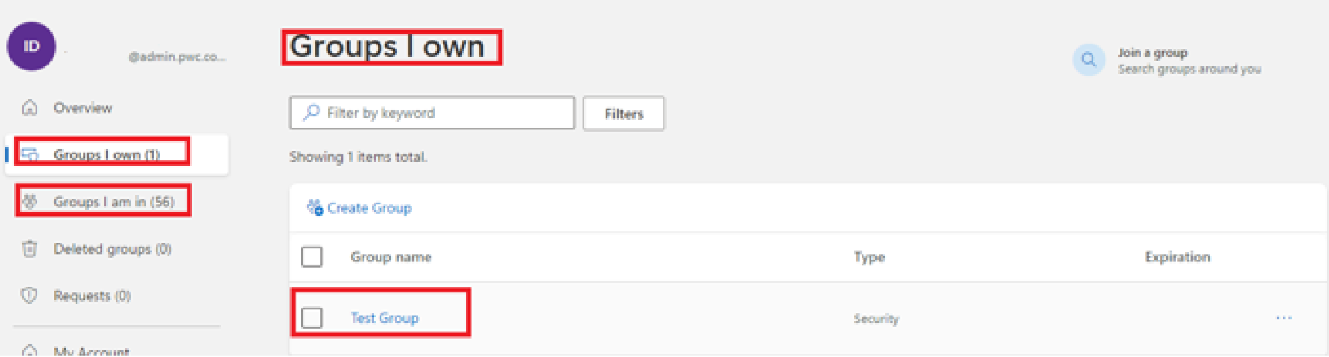
Click Next. The new group will be created with you as both the owner and a member. Your group is added to the Groups I own list. Because you are a member, this group also displays in the Groups I'm in list.
Step 7: Add members to the group
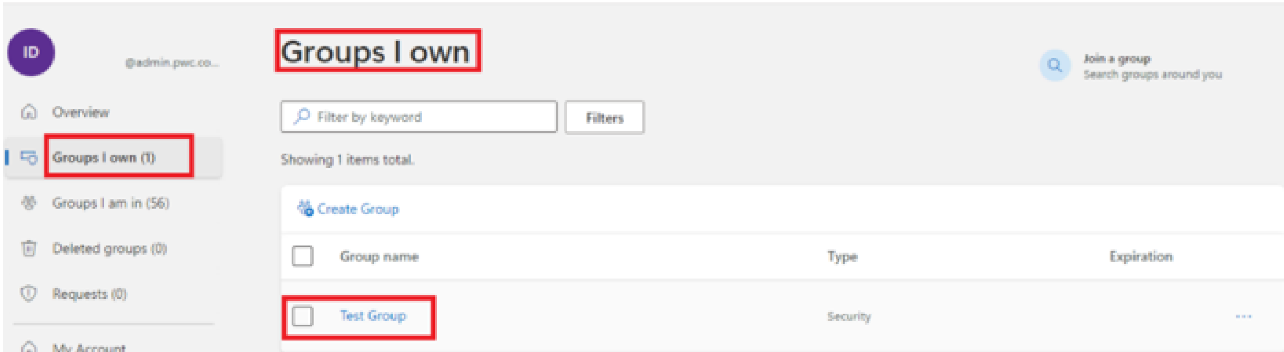
From the group you created (e.g., Test Group), follow the steps listed below to add members to the group.
- Select the group you want to add members to from the Groups I own section.
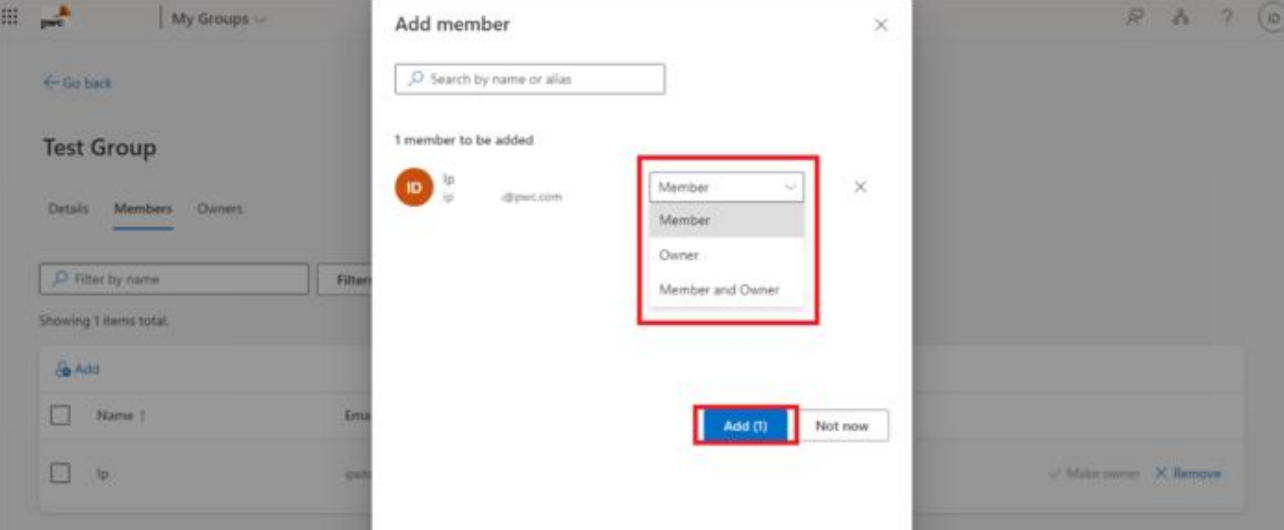
- From the Members tab, click Add and search for the member you want to add. An email will be sent to the new member to help them begin accessing the organisation's apps.
- When adding members, you can also select the member type from the Member drop-down menu. Depending on your choice, the newly added user can become a member, an owner, or a member and an owner. When you have made your selection, click Add.
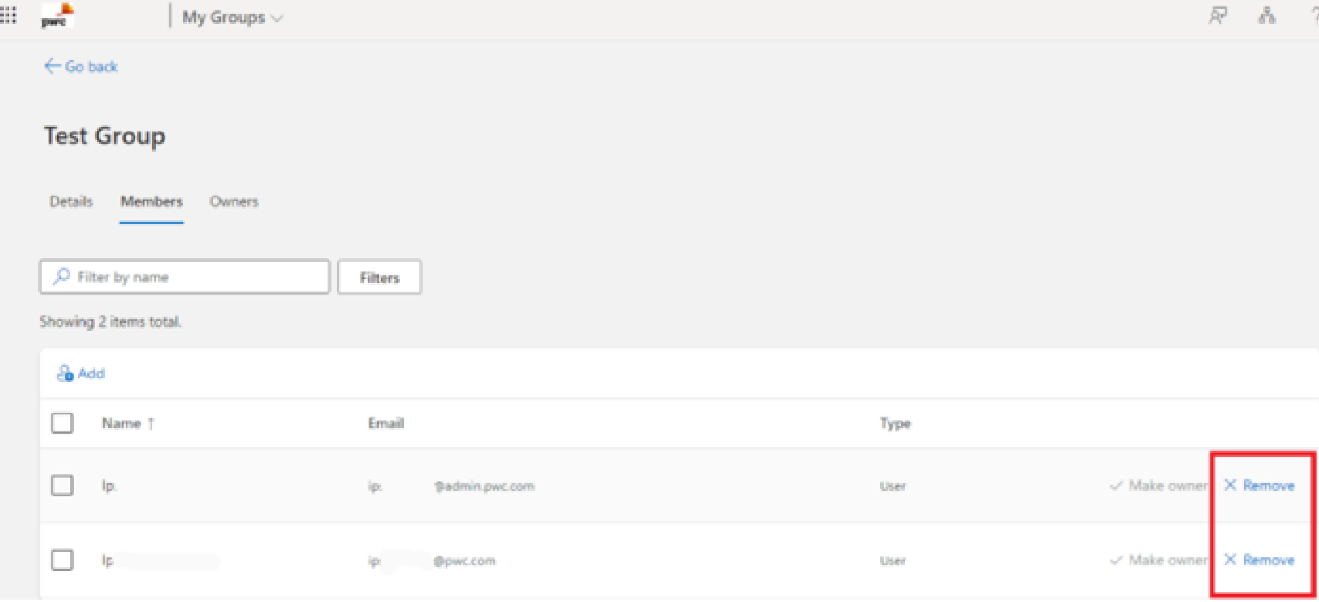
- If you add a member by mistake or if a member has left your organisation, you can remove the individual by selecting Remove member next to the member's name on the group page.
To learn more about how to update your groups in the My Groups Portal, click here.
Creating & managing an assigned group with an admin account
The following steps should help you create a static/assigned group from the Entra Portal using your admin(z) account:
Step 1: Sign in to admin center
Sign in to the Microsoft Entra admin center.
Step 2: Navigate to groups
Browse to Identity > Groups > All groups. Select New group.
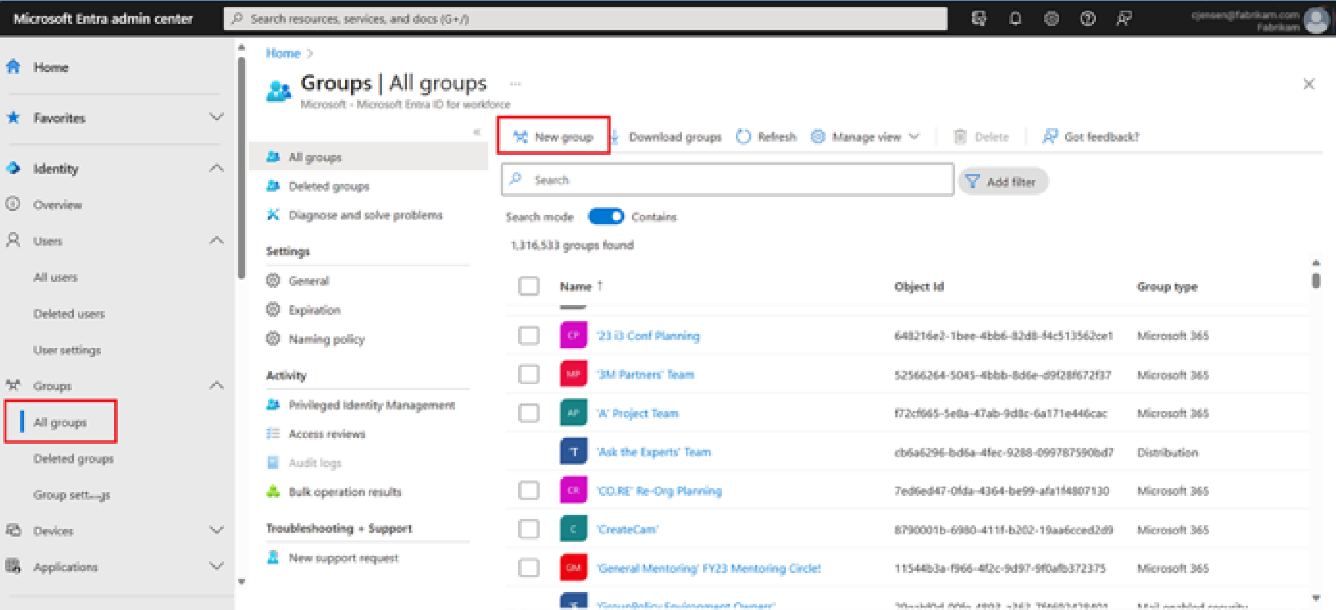
Step 3: Configure new group
Complete the required fields in the New Group page:
- Group name: Enter the group name.
- Group description: Enter a description with the app name, territory that the group represents and the general purpose of the group.
- Membership type: Select
Assignedfrom the drop-down menu.
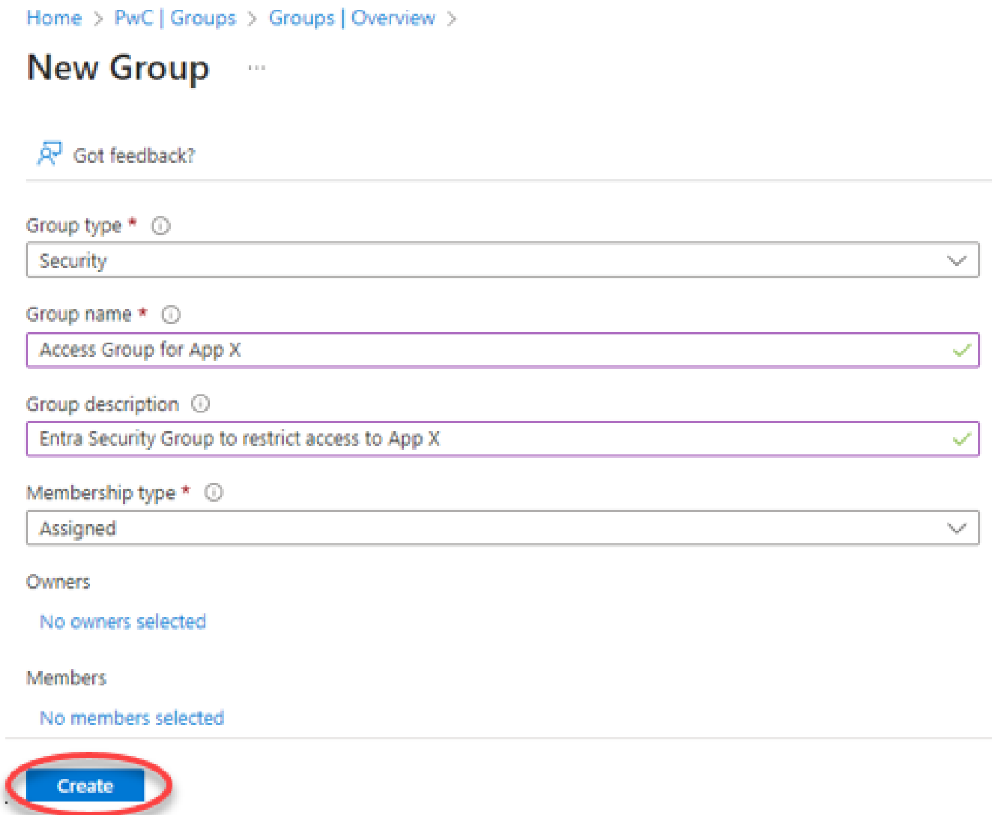
Click Create to add new users to the newly created group.
Step 4: Search for your group
Browse to Identity > Groups > All groups. Search for the group by the name that you created earlier (i.e., pwc france).
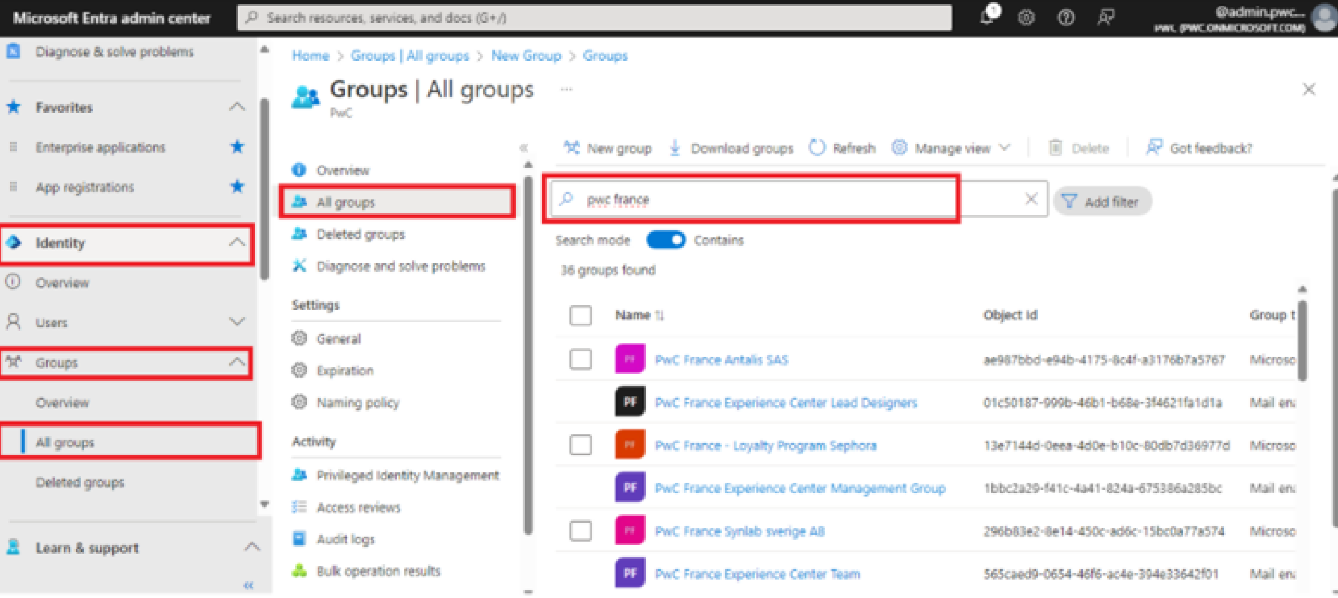
Step 5: Add members
From the Group Overview page, select Members and then select Add members.
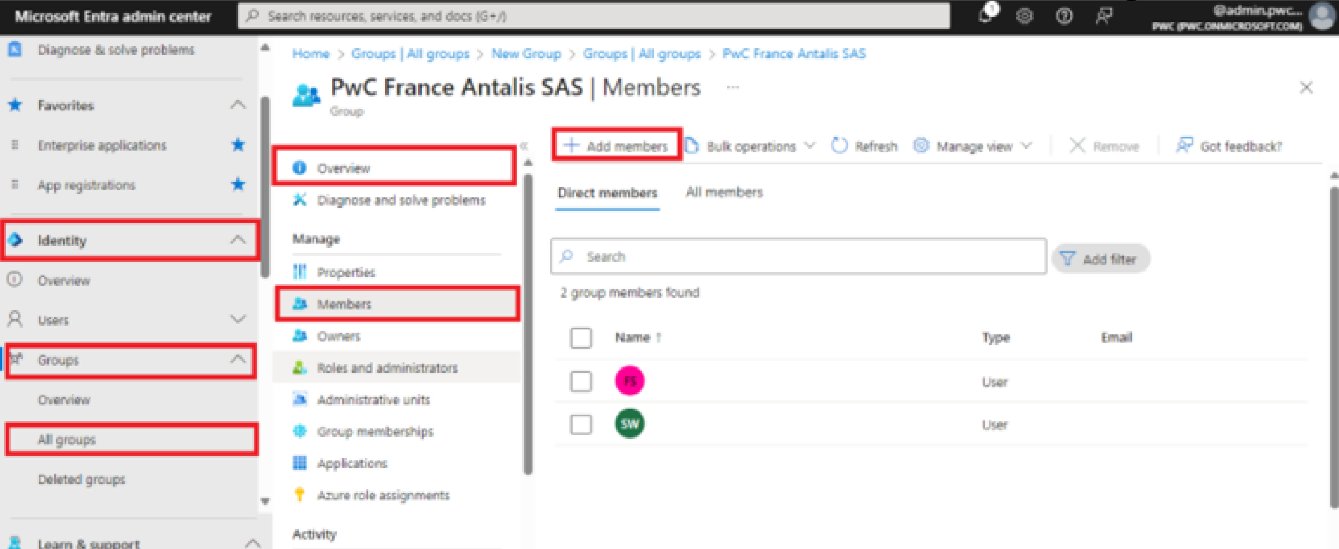
Step 6: Select users
Search and select the user that you want to add to the group. Click Select.
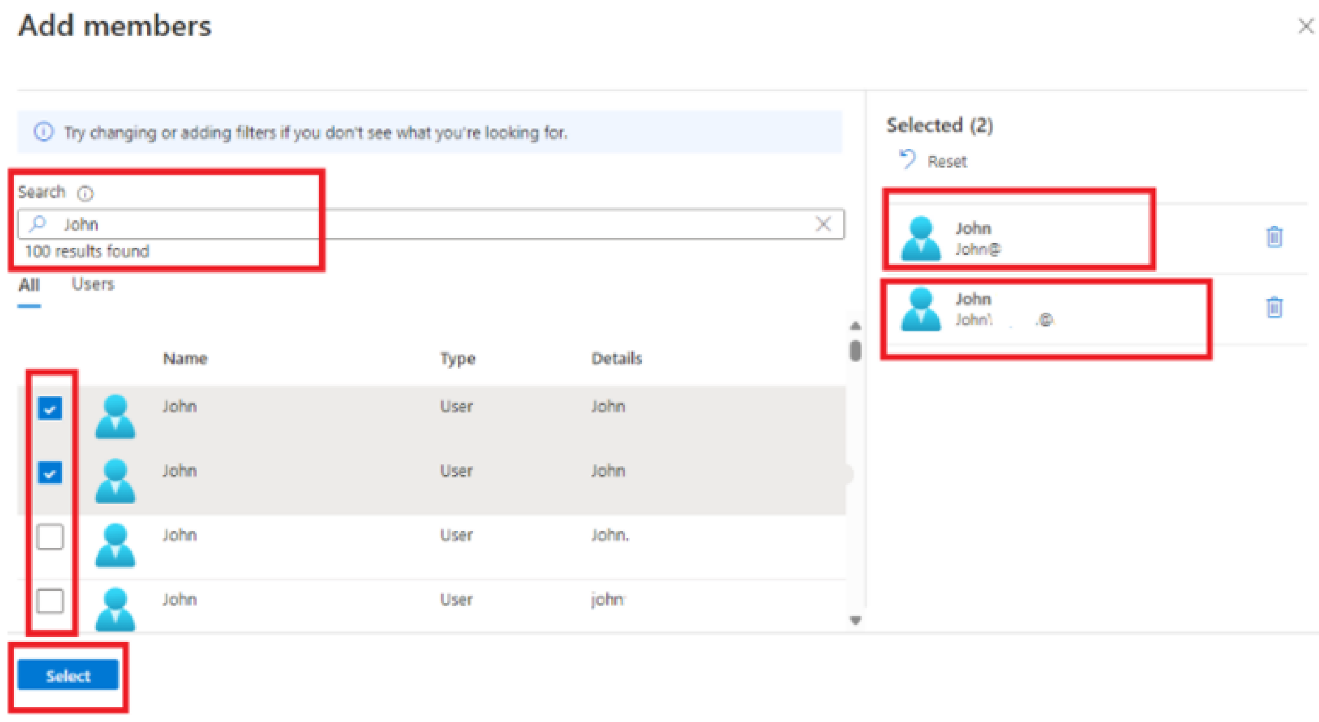
Step 7: Review group members
Navigate to Manage > Members, then review the complete list of member names assigned to that specific group.
Step 8: Configure group owners
Select Owners and ensure that the appropriate people are added as owners of the group by clicking Add Owners. These users will be responsible for ensuring that changes to the group or its membership are processed in a timely manner.
Assigning groups & users to your application
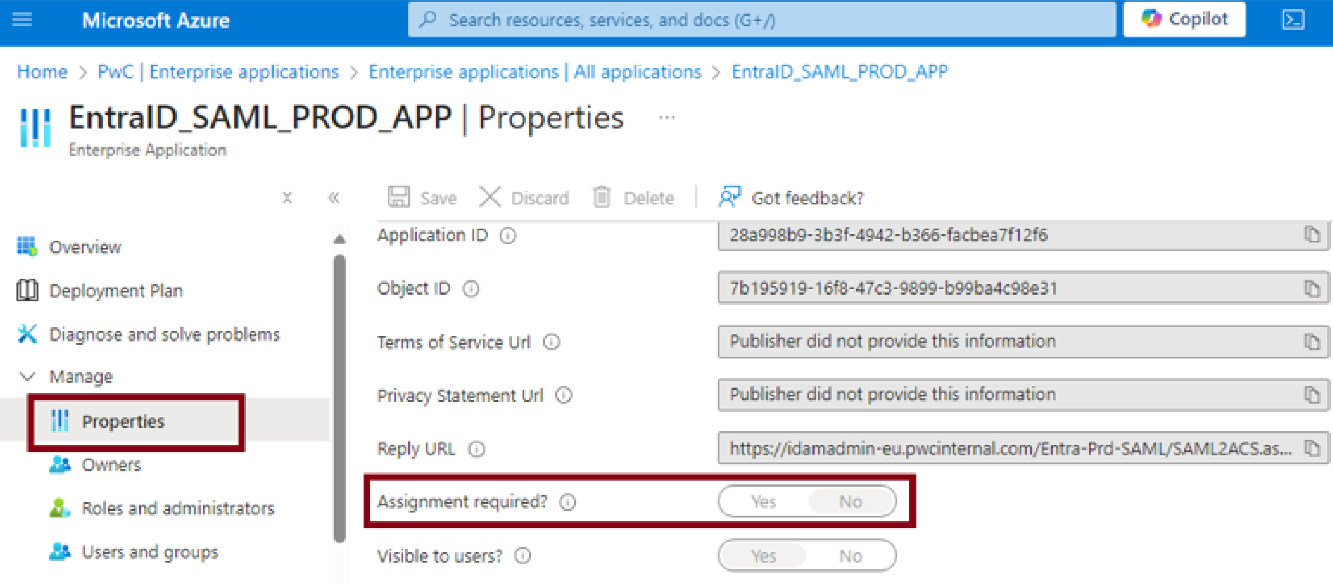
By default, all Entra applications require users and groups to be manually assigned to the application for it to be accessible. If needed, an application can be made accessible to the entire PwC directory.
The following setting controls this behaviour. Choosing Yes in the Assignment required field will restrict access to those groups or users who are explicitly granted access to the application.
Step 1: Sign in with admin account
Sign in to the Microsoft Entra admin center with your admin(z) account (Ex: firstname.lastname@admin.pwc.com).
Step 2: Navigate to enterprise applications
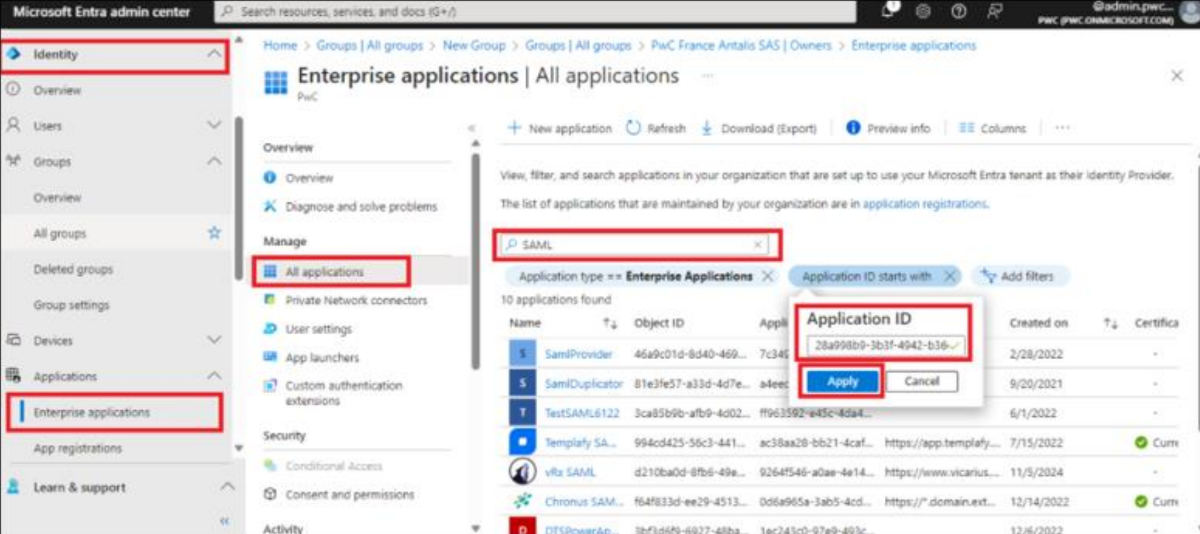
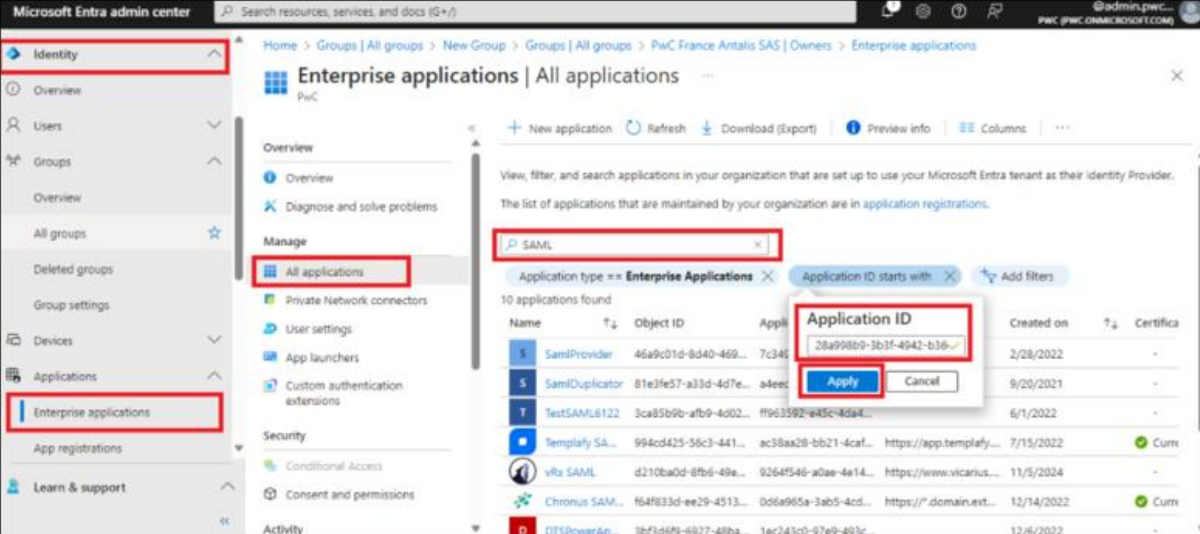
Browse to Identity > Applications > Enterprise applications > All applications.
Enter the name of the existing application in the Search field and select the application from the search results. You can also click Add Filter, choose Application ID, and enter the Application/Client ID provided by your Entra ID Integration/Migration engineer. Click Apply.
Step 3: Configure assignment requirements
Expand Manage and click Properties. Toggle the Assignment required? field to Yes or No, as needed.
If you select No, you will not have to individually add users and groups to the application, as anyone will be able to access it. If you select Yes, continue with the steps below to explicitly grant access to the application for selected users and groups.
Step 4: Add users and groups
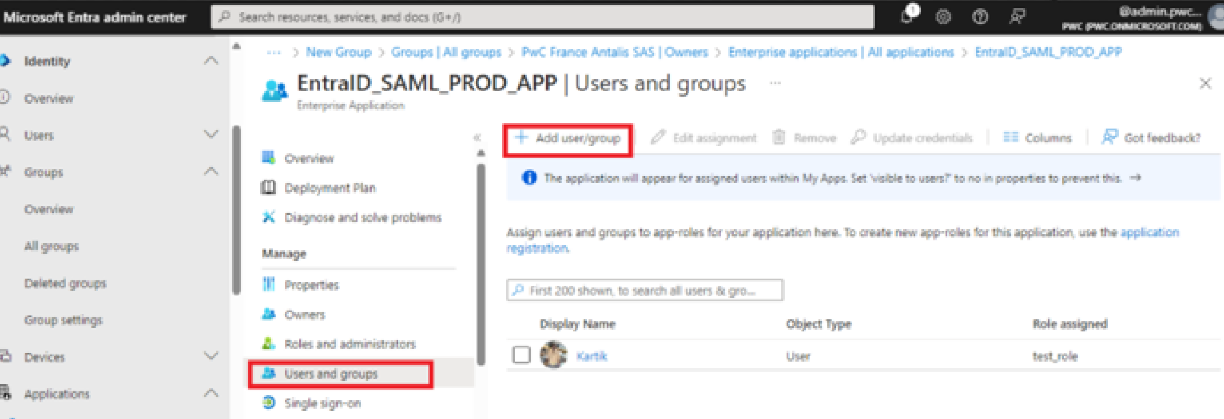
Select Users and groups and then select Add user/group.
Step 5: Select assignment targets
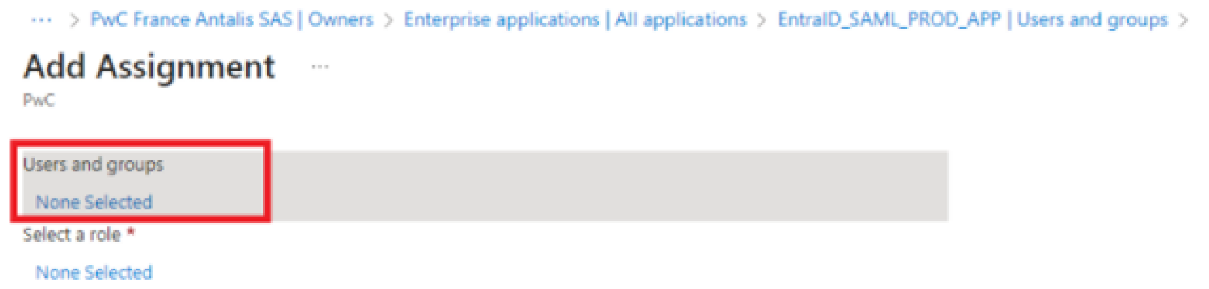
From the Add Assignment pane, below Users and groups, select None Selected.
Step 6: Assign access
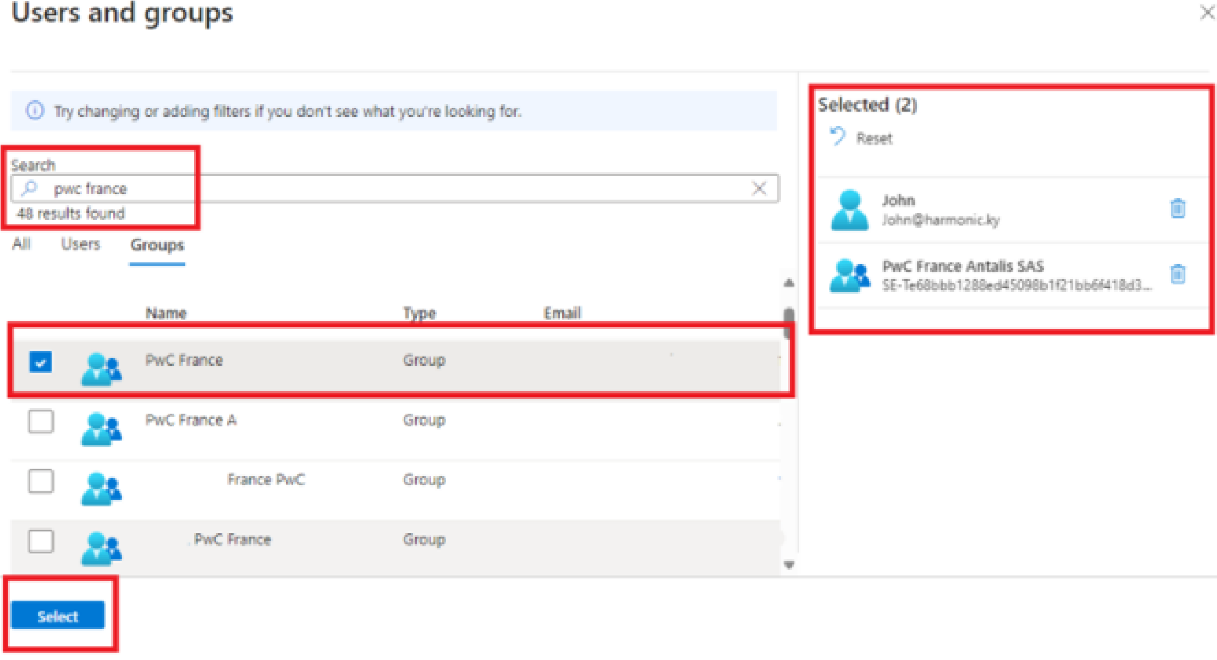
Search for and select the group/s and/or users that you want to assign to the application (e.g., PwC France or John Smith). From the Add Assignment pane, select Assign to assign the group to the application. Click Select.
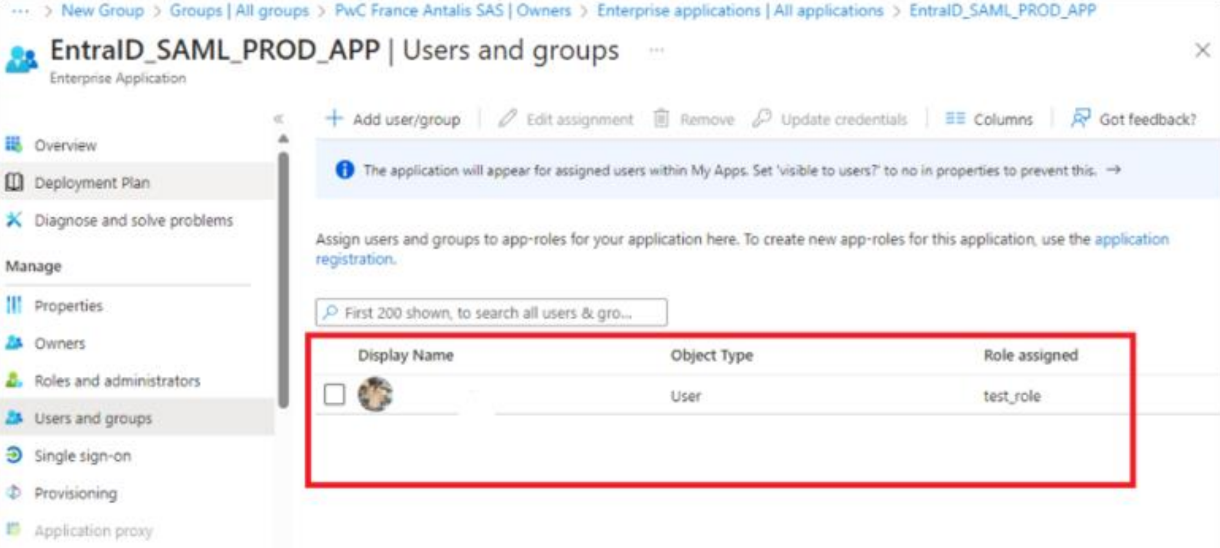
Step 7: Review assignments
Review the users in the Users and groups section to ensure all the desired users and groups are listed.
Support
The SNow forms referenced below will help you raise tickets to request support with group management tasks and follow up with the teams responsible for the resolution of those tickets.
Group Creation Support
To create a new group in the cloud, please raise a ticket using this form.
Contact: us_gbl-nis-integration@pwc.com
Application Access Restrictions
To update an app's access restrictions based on group or user assignment, please complete the appropriate form.
Contact: us_gbl-nis-integration@pwc.com
Group Membership Management
If you need help adding or removing members from your group(s), please raise a ticket using the appropriate form.
Contact: gbl_eam_access_management@pwc.com